Customise Tag Formats
Any field recorded in SmartyGrants can be pulled out into a report. By default, those fields are produced in the format it is stored as in the database.
There may be an occasion where you might want to amend the format of some of these fields. Below, we have outlined some of the fields where this is possible by editing the 'tag'. You should be familiar with reporting rules and how tags work in order to make these changes. See Reports & Correspondence to learn more.
See below for:
Tip
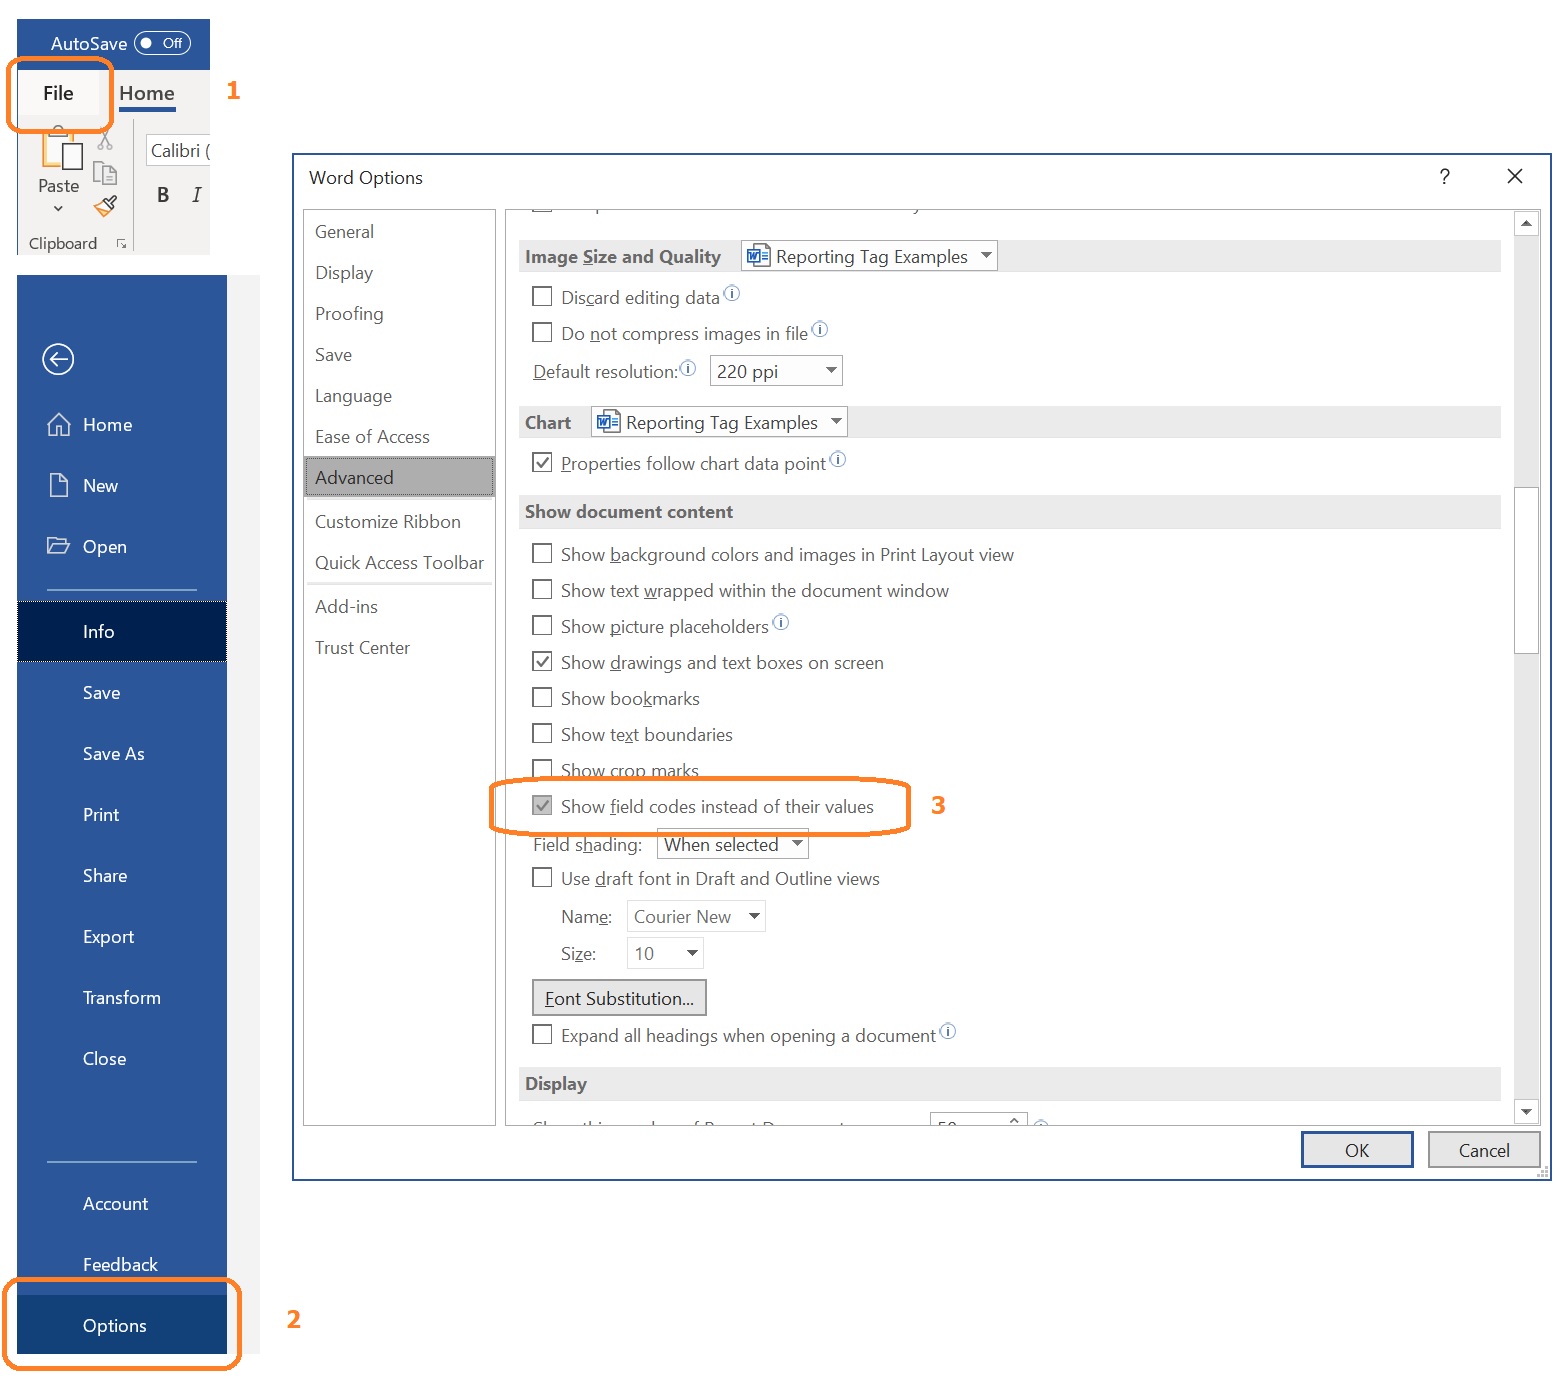
If you are editing a template in Microsoft Word, by default, you will find your template fields show like this: <Date_Submitted>
To edit the code behind the tag, you can use the shortcut: ALT + F9 (Windows) or FN + ALT/OPTION + F9 (Mac)
Alternatively, you can go into the Word Options (Windows) or Preferences (Mac) and select to show "Fields codes instead of values". Instructions to enable this setting in Word are as follows:
Windows
Mac

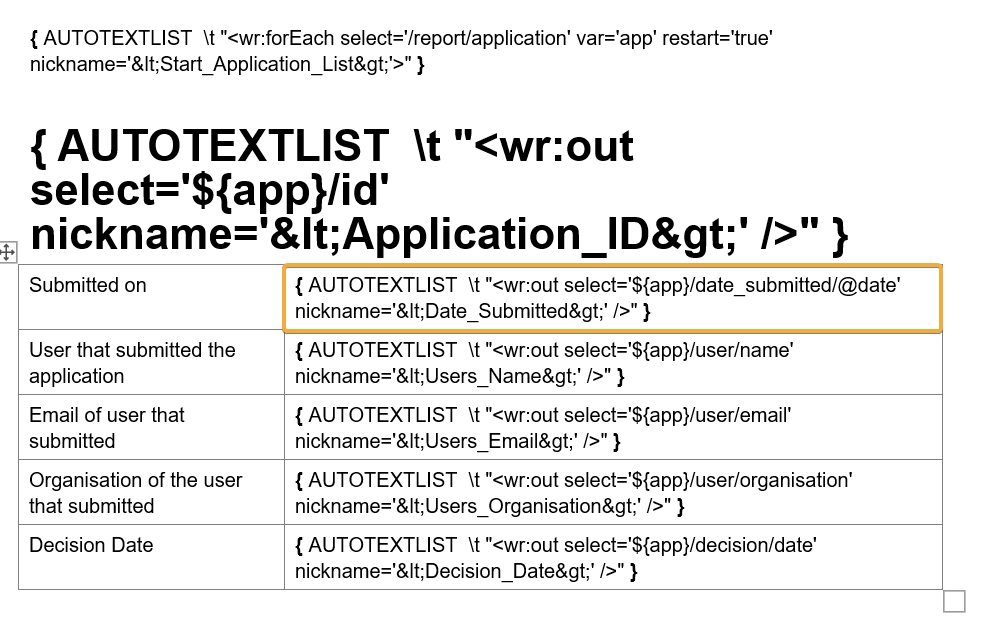
Once enabled (or the shortcut is used), tags will now appear as field codes, such as:
{AUTOTEXTLIST \t "<wr:out select='${app}/date_submitted/@datetime' nickname='<Date_Submitted>' />"}
Date & Time Fields
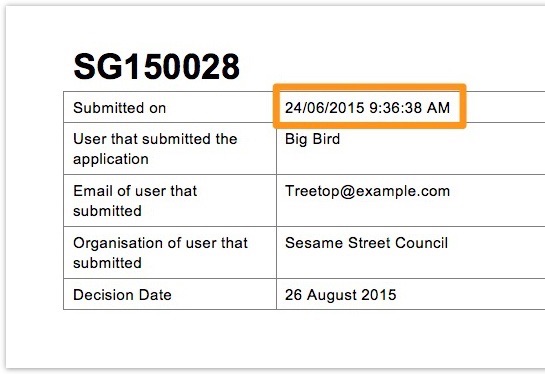
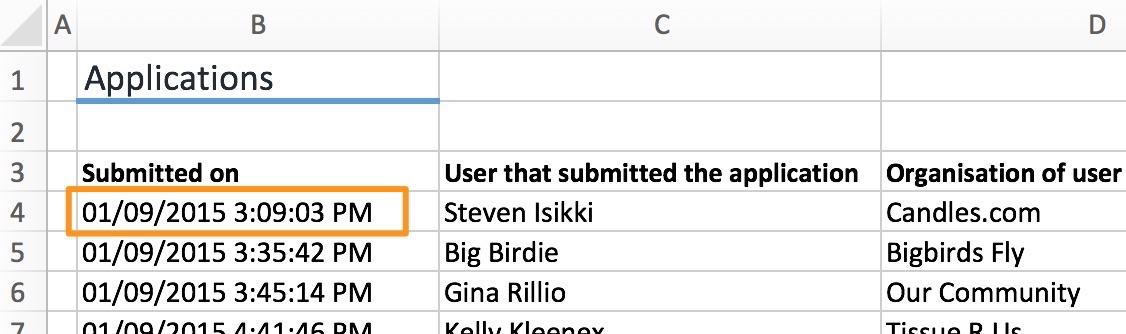
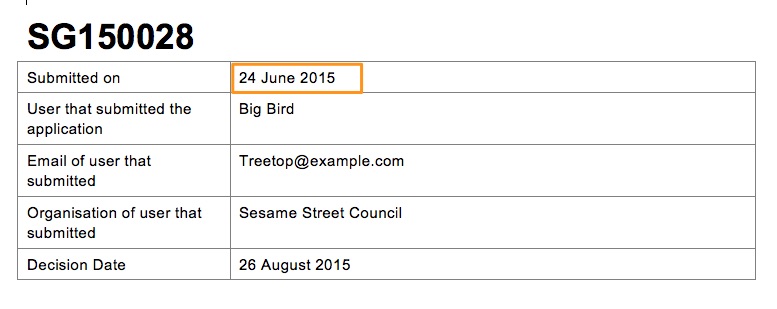
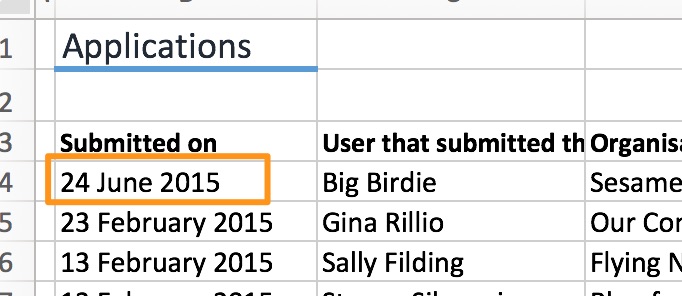
Some date fields will also return a time with it if this is how it is recorded in the system (eg, Date Submitted). An example of this is shown here:
Microsoft Word | Microsoft Excel |
 |  |
If you did not want the time to appear and only wanted the date to appear, the field code (tag) can be amended. When editing the template, edit the code to remove the "/@datetime" from it (or in some cases, just the word "time" so that this part of the tag reads "/@date"). For example:
Word Format
Highlight "time" from the field code and delete it: |
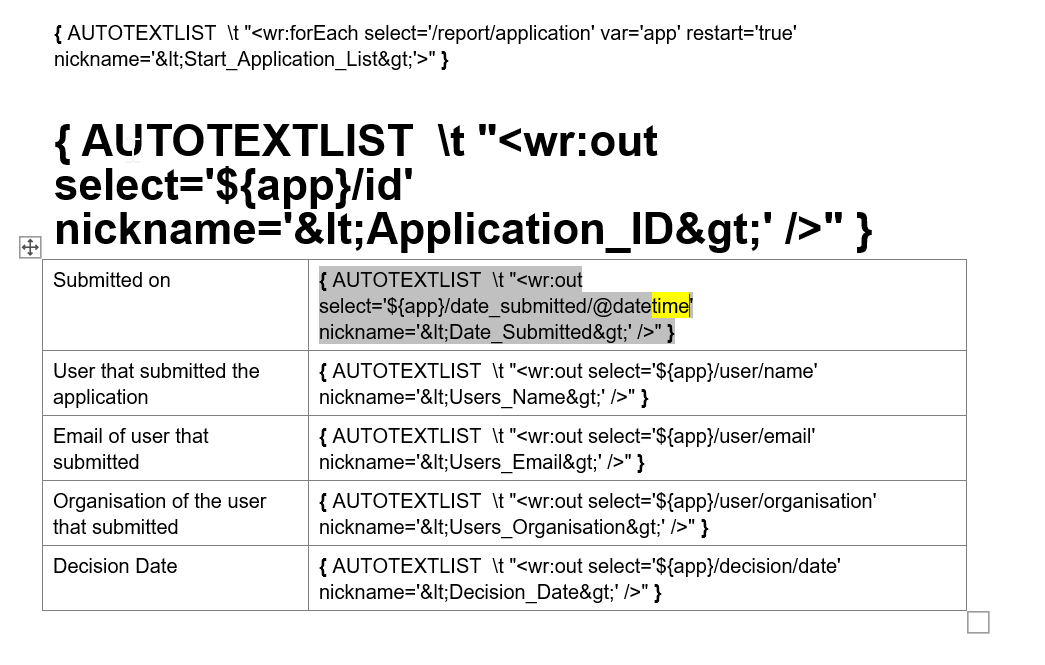 |
The field code should now look like this: |
 |
Once you upload the amended template, and run the report, the result will look like this: |
 |
Excel Format
Highlight "time" from the field code and delete it: |
 |
The field code should now look like this: |
 |
Once you upload the amended template, and run the report, the result will look like this: |
 |
Number & Currency Fields
Number and currency fields are produced in reports in the following format by default:
Microsoft Excel |
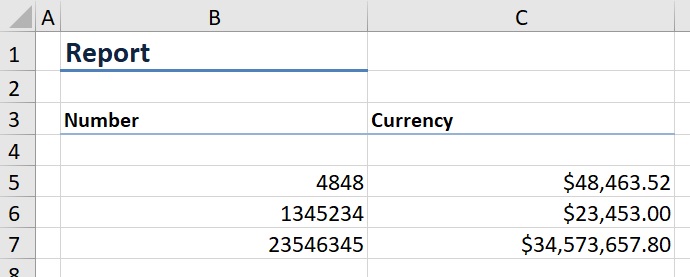 |
It may be that you would like to produce this information in a format that includes a decimal or a comma:
Microsoft Excel |
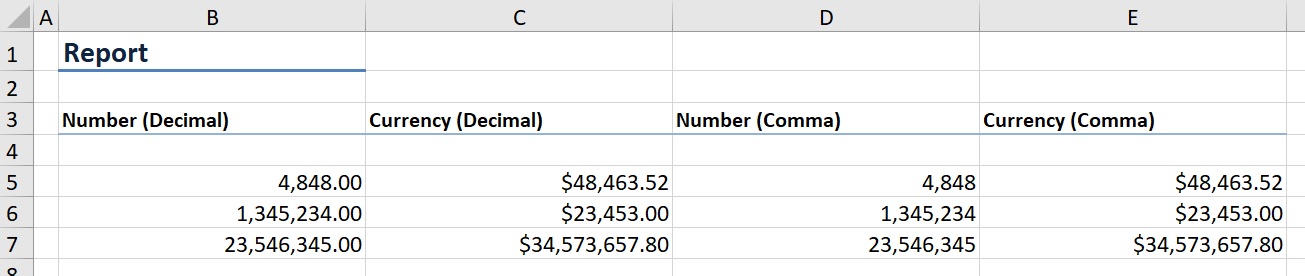 |
Editing Number & Currency Format
There are a number of different combinations available to display number and currency fields in different formats (note: this only applies to number and currency format questions, not financial information displayed in other areas of the system such as the decision tab). Consider the below for a range of possibilities:
Tag | Format | Example |
|---|---|---|
Number | ||
<wr:out select='${app}/forms/...' nickname='[label]'/> | Default | 1234 |
<wr:out select='${app}/forms/...' nickname='[label]' format=‘####.##’/> | format=‘####.##’ | 1234.00 |
<wr:out select='${app}/forms/...' nickname='[label]' format=‘#,###’/> | format=‘#,###’ | 1,234 |
Currency | ||
<wr:out select='${app}/forms/...' nickname='[label]'/> | Default | 1234 |
<wr:out select='${app}/forms/...' nickname='[label]' type=‘CURRENCY’ format='$#,##0.00'/> | format='$#,##0.00' | $1,234.00 |
<wr:out select='${app}/forms/...' nickname='[label]' type=‘CURRENCY’ format='$#,###'/> | format='$#,###' | $1,234 |
If reporting on currency information from the decision tab, the following element can be added to the relevant report tags:
Tag | Format | Example |
|---|---|---|
<wr:out select='${payment}/amount'> | Default | $1234.00 |
<wr:out select='${payment}/amount/@value' type='CURRENCY' format='$#,##0.00'> | format='$#,##0.00' | $1,234.00 |
<wr:out select='${payment}/amount/@value' type='CURRENCY' format='$#,###'> | format='$#,###' | $1,234 |
Today's Date Tag
Use these instructions to insert a new tag for today's date to appear in a Word or Excel report.
Word Format
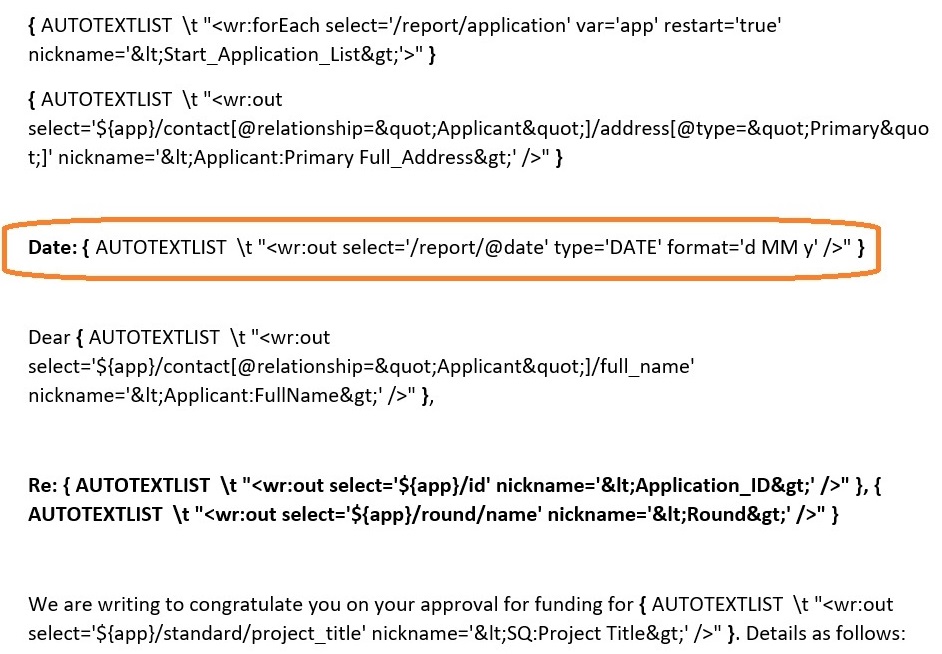
If you add the below field code (you can copy and paste from here) anywhere in the report template it will print today's date:
{ AUTOTEXTLIST \t "<wr:out select='/report/@date' type='DATE' format='d MM y' />" }
Example of field code in template: |
 |
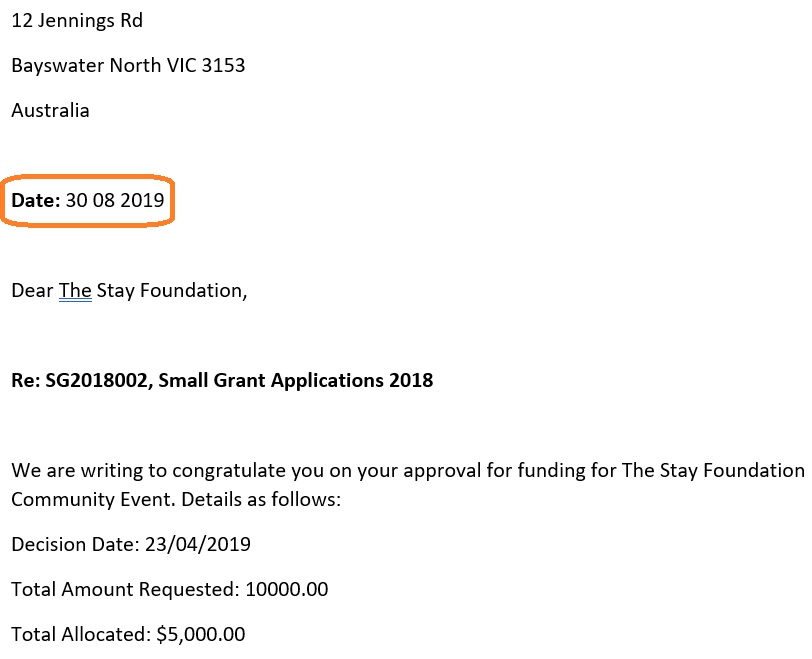
Example of report output: |
 |
Excel Format
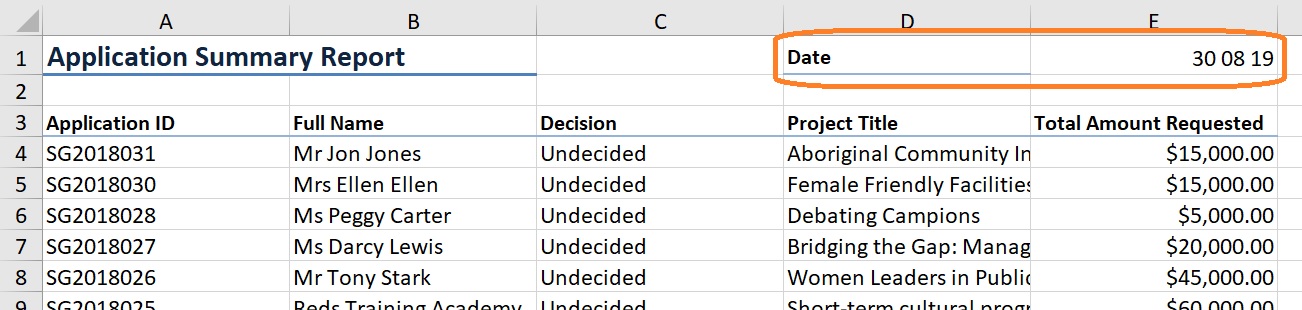
If you add the below tag (you can copy and paste from here) anywhere in the report template it will print today's date:
<wr:out select='/report/@date' type='DATE' format='d MM y' />
Example of tag in template: |
 |
Example of report output: |
 |
Editing Date Format
There are a number of different combinations available to display the date in different formats. Consider the below for the full range of possibilities (mix and match combinations as required):
Tag | Format | Example |
|---|---|---|
Day | ||
<wr:out select='/report/@date' type='DATE' format='d M yy' /> | d M yy | 28 8 19 |
<wr:out select='/report/@date' type='DATE' format='d ddd M yy' /> | d ddd M yy | 28 Wed 8 19 |
<wr:out select='/report/@date' type='DATE' format='d dddd M yy' /> | d dddd M yy | 28 Wednesday 8 19 |
Month | ||
<wr:out select='/report/@date' type='DATE' format='d M yy' /> | d M yy | 28 8 19 |
<wr:out select='/report/@date' type='DATE' format='d MMM yy' /> | d MMM yy | 28 Aug 19 |
<wr:out select='/report/@date' type='DATE' format='d MMMM yy' /> | d MMMM yy | 28 August 19 |
Year | ||
<wr:out select='/report/@date' type='DATE' format='d M yy' /> | d M yy | 28 8 19 |
<wr:out select='/report/@date' type='DATE' format='d M yyyy' /> | d M yyyy | 28 8 2019 |
Formatting | ||
<wr:out select='/report/@date' type='DATE' format='d/M/y' /> | d/M/yy | 28/8/19 |
Note: only applicable to the "today's date" tag and the application date submitted tag (i.e., not form date submitted tags)
Editing Time Format
There are a number of different combinations available to display the time in different formats. Consider the below for the full range of possibilities:
Tag | Format | Example |
|---|---|---|
<wr:out select='${app}/date_submitted/@datetime' type='DATE' format='dd/mm/yyyy hh:mm' /> | dd/mm/yyyy hh:mm | 13/03/2019 15:08 |
<wr:out select='${app}/date_submitted/@datetime' type='DATE' format='dd/mm/yyyy hh:mm:ss' /> | dd/mm/yyyy hh:mm:ss | 13/03/2019 15:08:52 |
<wr:out select='${app}/date_submitted/@datetime' type='DATE' format='dd/mm/yyyy hh:mm:ss am/pm' /> | dd/mm/yyyy hh:mm:ss am/pm | 13/03/2019 03:08:52 pm |
Note: only applicable to the application date submitted tag (i.e., not form date submitted tags)
IF and ELSE Statements
Proceed with caution
IF and ELSE reporting functionality is an advanced feature. Users should ensure they have had report training in relation to creating custom templates, and we always encourage testing your templates.
You are able to use IF and ELSE statements in report tags. You can use IF and ELSE tags for many responses including number, currency, and free text.
IF Tag are used to conditionally display content in your Report Template. An IF tag is basically an expression, or condition, whose value determines whether the contents of the IF tag are processed. When the contents of the IF tag are met (or 'true'), then the report will process the content between the IF and ENDIF tags. If the condition is not met, we can use the ELSE tag to populate a value into the report noting that the IF tag has not been meant (e.g. FALSE or X).
When running reports against multiple Applications or Contacts, we are able to filter the relevant list so that the report will only output information for the filtered items. However, filtering may not refine the reported output to the level required. For example, if there are multiple assessors assessing each Application and we only want to report on one of those assessor's responses, filtering will not be sufficient to refine the reported output.
In cases such as these, you may want to utilise IF and ELSE tags.
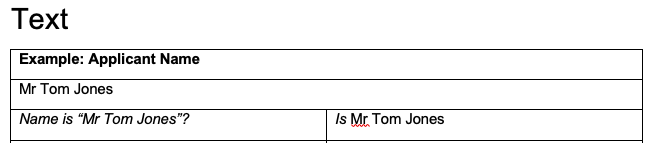
Here is an example of an IF and ELSE tag.
[if:Is Mr Tom Jones[else]Is Not Mr Tom Jones:if]
This tag is setting the condition that the Applicant Name is exactly Tom Jones and when this condition is true, the report will populate a "Is Mr Tom Jones" for every application that Tom Jones is the applicant of, for all the applications the report template has been run against.
In the template this would look like . . .

And when the IF condiition is met, the output will look like . . .
The functions that can be applied to IF tags are . . .
Function / Symbol | Result |
|---|---|
= | is equal to |
!= | is not equal to |
> | is greater than |
>= | is greater than or equal to |
< | is less than |
<= | is less than or equal to |
Word Format
The links below are to a report template that has been created that uses IF and ELSE tags. The first link is to the template, the second to the output of the template. You are able to download these templates to access the tag templates for your own reporting requirements
Excel Format
The IF and ELSE tags can be used in Excel reports, but only the tag information located between < and > needs to be extracted. For example:
Word | Excel |
|---|---|
{ AUTOTEXTLIST \t "<wr:if select='${payment}/amount/@value = 0' nickname='[if:'>" } | <wr:if select='${payment}/amount/@value = 0' nickname='[if:'> |
{ AUTOTEXTLIST \t "</wr:if nickname=':if]'>" } | </wr:if nickname=':if]'> |
Reporting On Database ID Numbers/Including Links in Reports
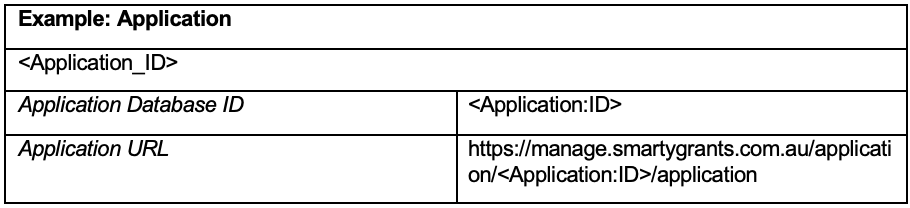
The database ID is unique, not only to your account, but to the entire SmartyGrants platform. The only place the database ID is visible in your account, is within the page URL at the top of your browser. You might include this number as a truly unique identifier in your reports. Application ID numbers are generally unique – but it is possible to double up application ID numbers in your account. You might include this number as an identifier for contacts (i.e., contacts do not have an equivalent to the application ID number). You might want to include the URL (this links to the relevant record on the manage site) in your reports for your colleagues, assessors or other internal users to click on.
To do this, you can use a tag similar to this (which will report the Application URL):
https://manage.smartygrants.com.au/<Application:ID>
In the template it would look like . . .
Word Format
The below link is to a report template that is using these tags. You are able to download this template to access the tag templates for your own reporting requirements.
Excel Format
The below tags can be copied and pasted into an Excel report to report on the database ID or URL:
Item | Tag | Example |
|---|---|---|
Application Database ID | <wr:out select='${app}/@id' nickname='<Application:ID>' /> | 123456 |
Application Database URL | https://manage.smartygrants.com.au/application/<wr:out select='${app}/@id' nickname='<Application:ID>' />/application | https://manage.smartygrants.com.au/application/123456/application |
Contact Database ID | <wr:forEach select='${app}/contact[@relationship="Applicant"]' var='contact' nickname='<Applicant:Start_Contact_List>'><wr:out select='${contact}/@id' nickname='<Applicant:ID>' /></wr:forEach nickname='<Applicant:End_Contact_List>'> | 123456 |
Contact Database URL | https://manage.smartygrants.com.au/contacts/<wr:forEach select='${app}/contact[@relationship="Applicant"]' var='contact' nickname='<Applicant:Start_Contact_List>'><wr:out select='${contact}/@id' nickname='<Applicant:ID>' /></wr:forEach nickname='<Applicant:End_Contact_List>'>/view | https://manage.smartygrants.com.au/contacts/123456/view |
Reporting On Response ID Numbers
Each form added to a submitted application (for example an Acquittal form) has a response ID. The response ID is unique, not only to your account, but to the entire SmartyGrants platform. The only place the response ID is visible in your account, is within the page URL at the top of your browser. You may wish to use the response ID in you reports, as an attached form does not have an Application ID as each form is part of the overall submitted application.
To do this, you can use a tag similar to this (which will report the Response):
This is how it will look in a Word report template.

For the tags included in the examples below, you will need to edit the <data> tag to include the form name for the Response ID you would like to include in your report. Where the example <data> tag references “Form Name” you will need to include the name of your form. For example, if your form is called ‘Acquittal Report’ then the tag should be <wr:out select='${form}/@id' nickname='[Acquittal_Report:Response_ID]'/>
All relevant <start> and >end> tags for your form will also need to be included in your template.
Word Format
The below link is to a report template that is using these tags. You are able to download this template to access the tag templates for your own reporting requirements.
Excel Format
The below tags can be copied and pasted into an Excel report to report on the database ID or URL:
Item | Tag | Example |
|---|---|---|
Response ID | <wr:out select='${form}/@id' nickname='[Form Name:Response_ID]'/> | 1234567 |
Reporting on multiple choice formats
Your report output will group any multiple choice responses together in one cell, but if you would like to separate out the responses into separate cells, you can use an Excel formula:
Template |
|---|
 |
Output |
 |
The formula used to generate this output is:
=IFERROR((IF(FIND(B1,A2),B1)),"No Matching Value")
In this case:
B1 is the column heading (e.g., "Cardboard")
A2 is the cell where the multiple choice output has populated (e.g., "Cardboard, Organics, Metal")
Note: the values referred to would differ depending on report layout and absolute references (if applicable)
The formula works as follows (brackets first):
FIND(B1,A2) | Check to see if the content in B1 matches A2 |
|---|---|
IF(FIND(B1,A2),B1) | IF the content in B1 matches A2, display the value for B1 |
=IFERROR((IF(FIND(B1,A2),B1)),"No Matching Value") | IF the content in B1 DOES NOT match A2, display "No Matching Value" instead of an error |
If you are looking to obtain a precise match (i.e., where you need to distinguish between "Cardboard" and "Corrugated Cardboard"), the formula used to generate this output is more complex. Please find below, and Excel spreadsheet you can use with this more complex formula if some of your choices need to be distinguished:
Limiting Reports by Form Type
When creating a multi-report template, a user can filter applications in their report based on the status of forms rather than individual forms themselves. This can be useful if, for example, a user wishes to filter out any applications that contain any unsubmitted assessment forms.
If a user was looking to limit their report to applications that only have submitted assessment forms, as the below example specifies, they can add a generic form start tag (and end tag) to omit any application records that have open assessment forms against them. This is in addition to the regular start/end tags that appear across all report templates.
In the following codes, you can substitute the following words:
“Open” or “Submitted” (whether you want to include responses from forms that’s status is either open or submitted)
“Application” or “Assessment” or “Acquittal” or “Admin” (specifying which forms you wish the report to generate applications from)
You can insert the following start codes into your multi-program report and exchange these variables as highlighted:
EXCEL | <wr:forEach select=’${app}/forms/current[@status=“Submitted” and @purpose=“Assessment”]’ var=‘form’> |
|---|---|
WORD | <wr:forEach select=’${app}/forms/current[@status=“Submitted” and @purpose=“Assessment”]’ var=‘form’ nickname=’<Start_Assessment_Forms>’> |
Make sure that both of these start tags have their corresponding end tags.
Please find below an example of a simple multi-program Word template that makes use of each example of these modified start tags: