Workflow
SmartyGrants allows users to create and manage workflows incorporating Stages, Recurring tasks and Rules. Workflows can be used to assist users in following the established grant making process employed by the grant making organisation.
Creating and managing stages
Stages are an important component of managing workflow throughout the grantmaking lifecycle. A stage is generally referred to as a status or folder that you can use to sort applications as they move throughout the process. Stages sit at the program level and are designed to be reused for each round. Consider the following set of example stages:
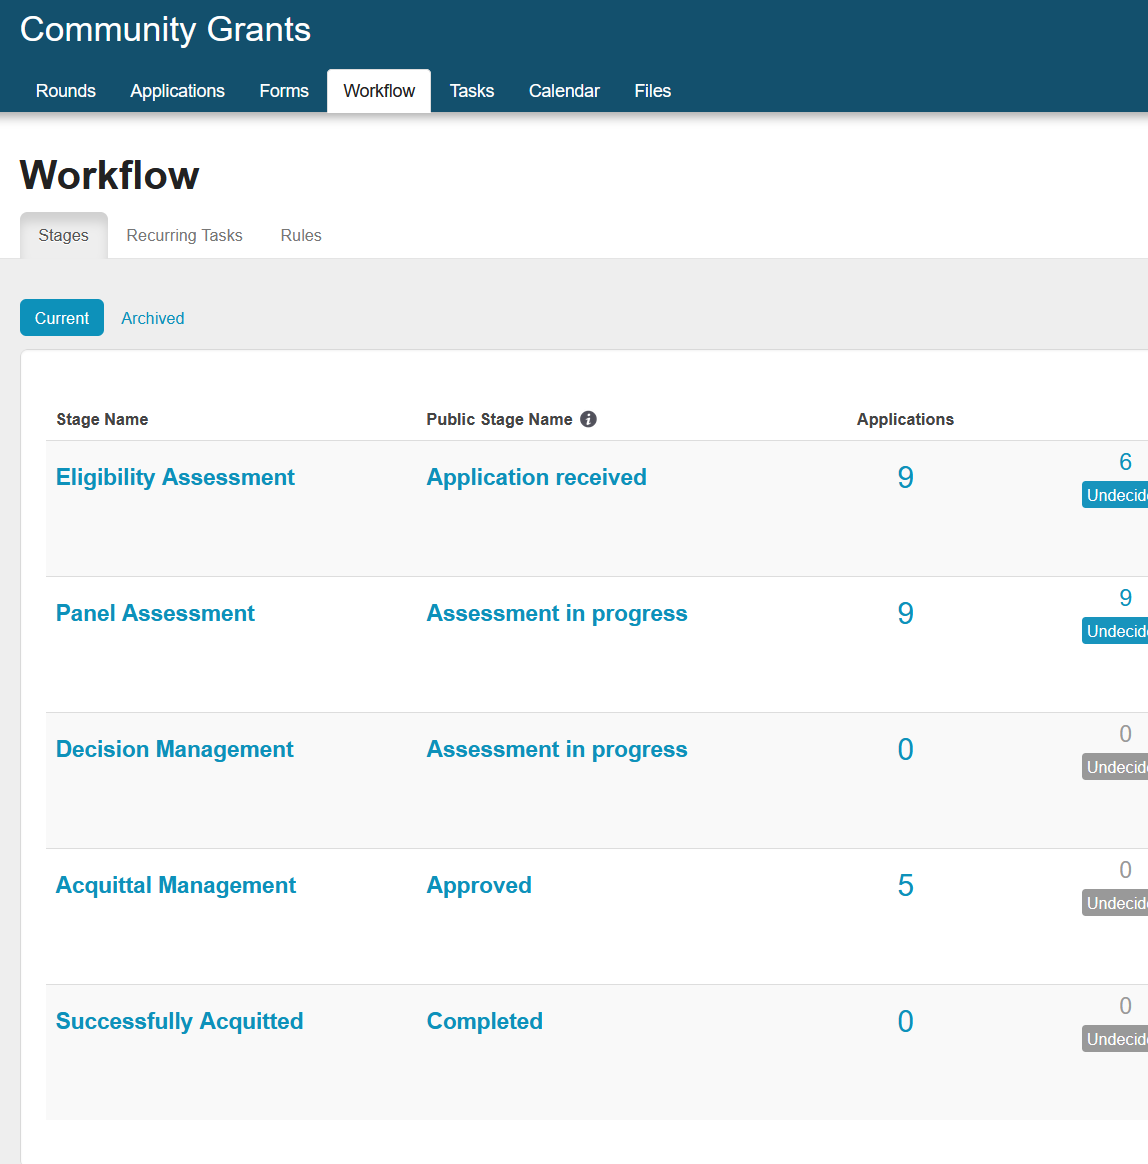
Eligibility Assessment.
Panel Assessment.
Decision Management.
Acquittal Management.
Successfully Acquitted.
Managing stages
You can create and manage application stages here on the Workflow tab.The below screenshot explains the format of the Stages tab. All the hyperlinks on this screen (as shown on the screenshot below) are links to the associated data:
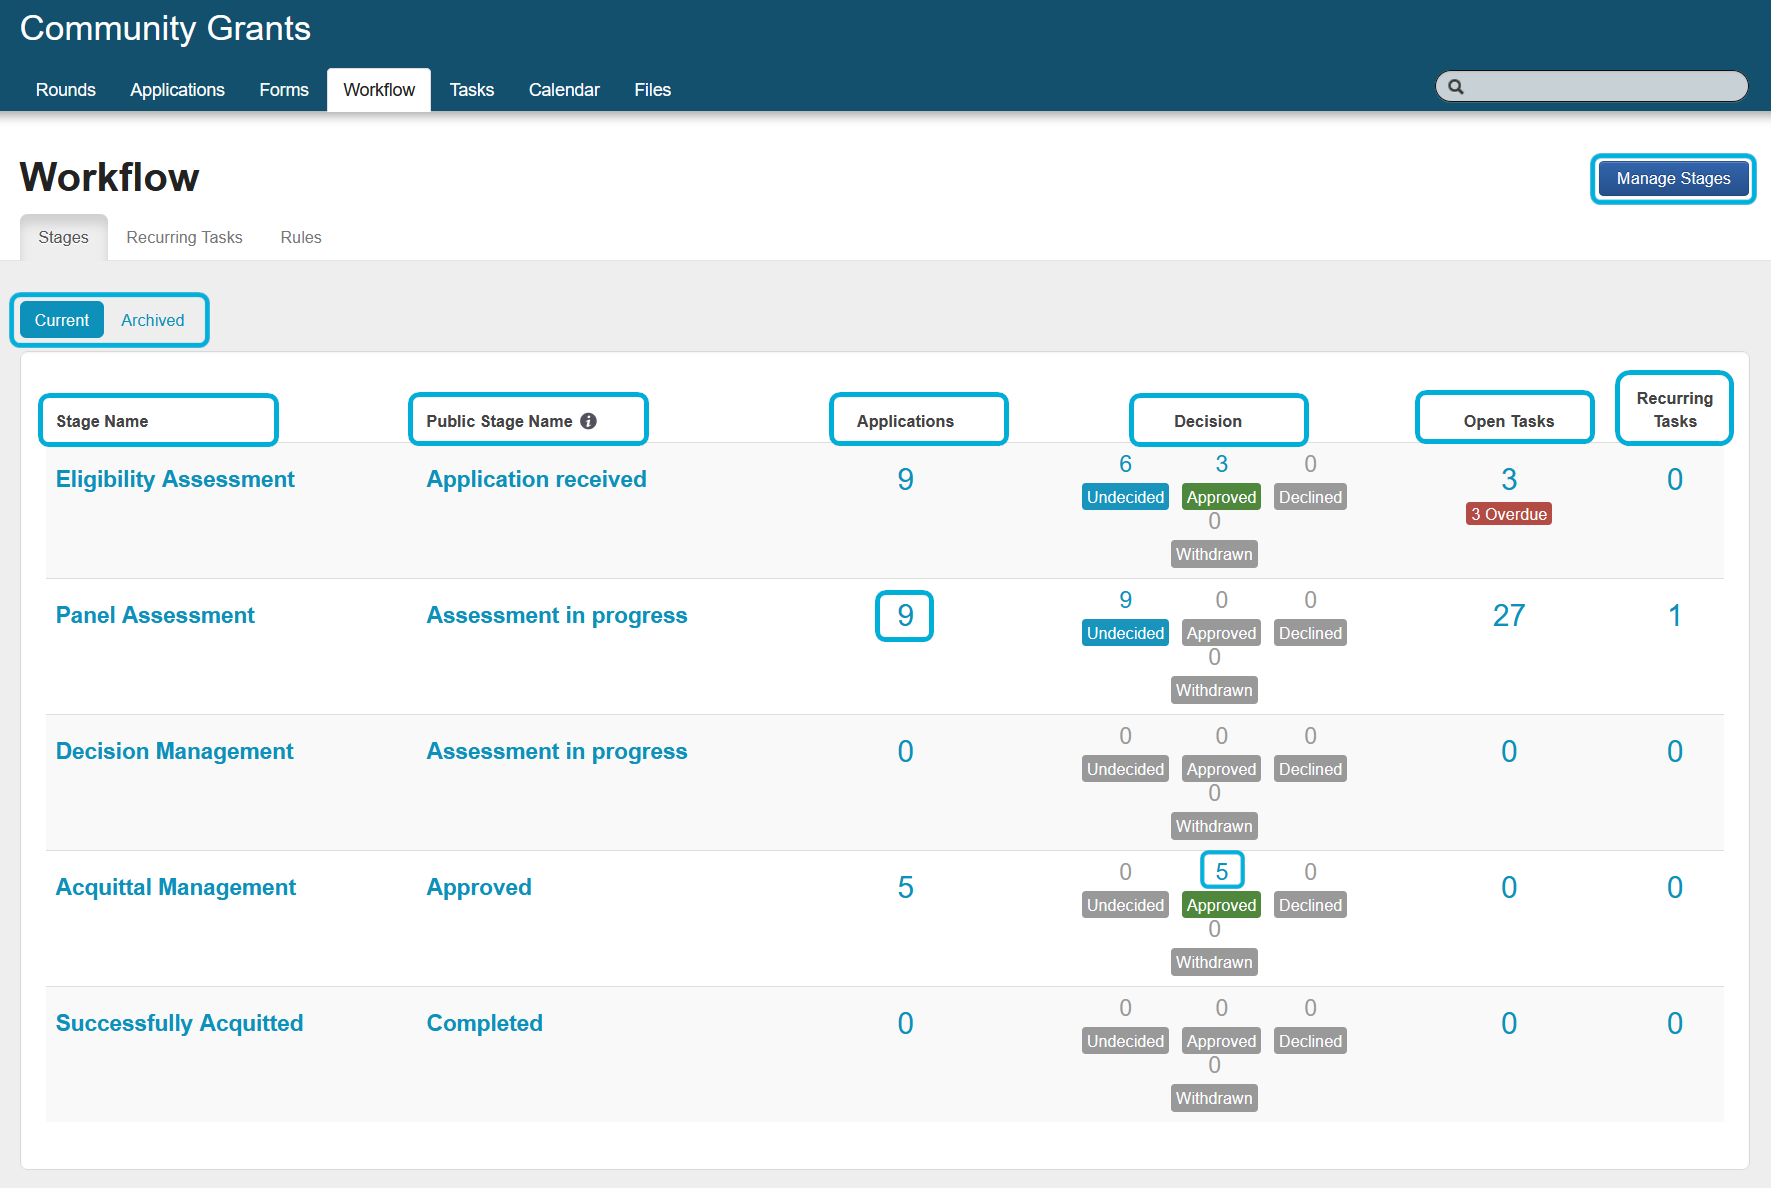
Current or Archived: you can archive stages to move them from the current list of stages to the archived list. Archiving a stage does not delete it, it simply removes it from view. You can switch between the lists by selecting either Current or Archived.
Stage Name: this column displays stage names. Select Manage Stages to customise their order to suit the program workflow. Select a stage name to access the stage overview screen.
Public Stage Name: if populated, the Public Stage Name is what the applicant will be able to see on their application summary when logged into the applicant site or SmartyFile. You can select the Public Stage Name from a pre-defined set list which is maintained by SmartyGrants (and may be added to/updated over time).

Applications: this column displays the number of applications in the stage. Selecting a hyperlink (e.g., 9) will open the applications tab filtered by the stage.
Decision: this column displays the decisions against applications in the stage. Selecting a hyperlink (e.g., 5) will open the applications tab filtered by both the stage and decision.
Open Tasks: this column displays open tasks against applications in the stage. Selecting a hyperlink will open the tasks tab filtered by the stage.
Recurring Tasks: this column displays recurring tasks against the stage. Selecting a hyperlink will open the recurring tasks tab filtered by recurring tasks where the stage is a trigger.
Manage Stages: select this button to manage the stages, as per the below screenshot.
The following functions are available from the Current tab of the Manage Stages screen:
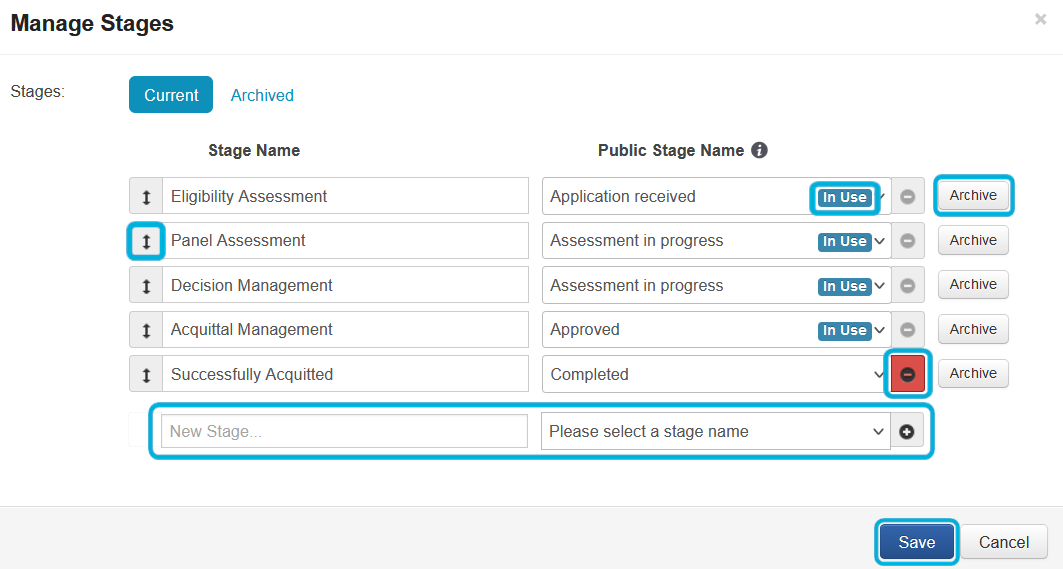
Add a stage: in the New Stage... box, enter the name of the new stage and, optionally, select a Public Stage name from the dropdown, and select +. Repeat this until you have added all of your stages.
Delete a stage: to delete a stage that is not in use, select -.
If a stage is displaying In Use then it is being used by either applications or recurring tasks. The stage will no longer be in use if the applications are moved out of it, or if the associated recurring tasks and tasks are deleted.
Note that deleting a stage does not delete any applications.
Info: note that deleting a stage will also delete any workflow rules that are configured to use that stage.
ⓘ Info: note that deleting a stage will also delete any workflow rules that are configured to use that stage.
Archive a stage: you may decide that you no longer want to use an existing stage in future rounds of the program. You can archive stages at any time, even if they are In Use. Once archived, the stage will be listed under the archived tab. It will no longer be available to be selected in relation to workflow rules or recurring tasks. Note that an archived stage can always be reactivated.
Important: before archiving a stage, ensure that you delete or modify any workflow rules or recurring tasks that are using this stage.
Reorder the stages: select ↕ (drag and drop) to the left of the stage names to reorder the stages.
Save: to save any changes.
The following functions are available from the Archived tab of the Manage Stages screen:
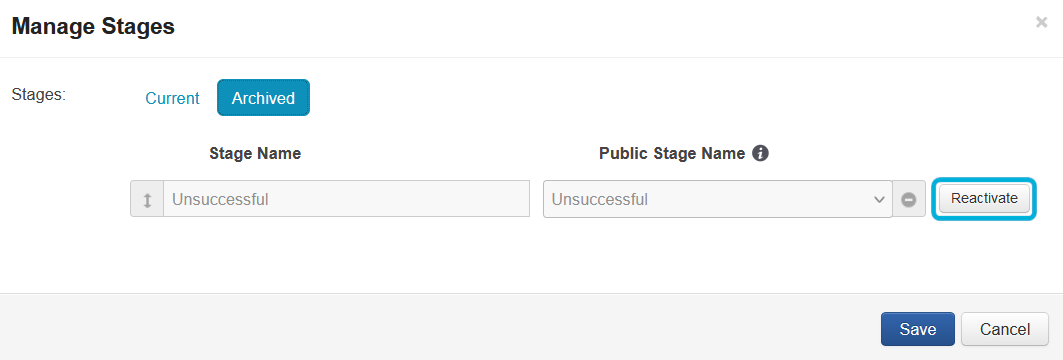
Reactivate: select this to list the stage under the Current tab, and to make the stage available to be selected in relation to workflow rules or recurring tasks.
Stage overview screen
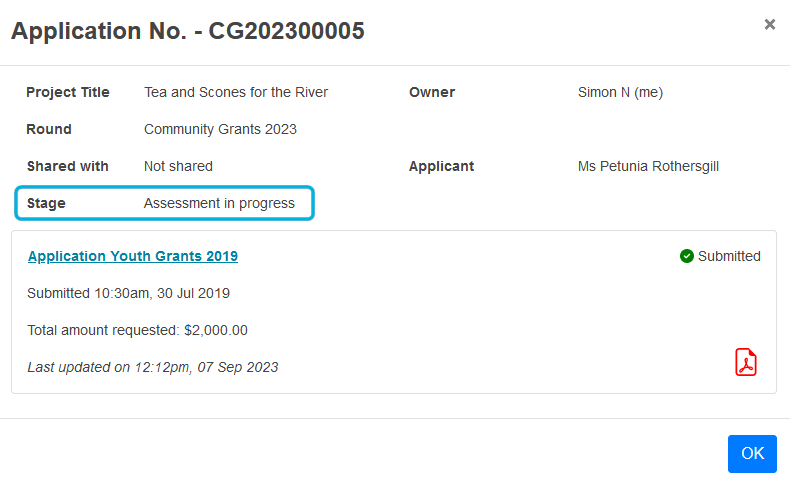
The Stage overview page shows information about applications and tasks in the current stage. Select a stage name under the stages tab to access this page. Tasks can be displayed by assignee or task name. The overview page can be useful to monitor the progress of assessment processes for example. You are able to see, at a glance, how many applications are in the stage, the tasks that have been created for applications within the stage, their completion status, and more. Should you be using the stage as a trigger in a recurring task, you will also see the tasks that have been created as a result of this trigger.
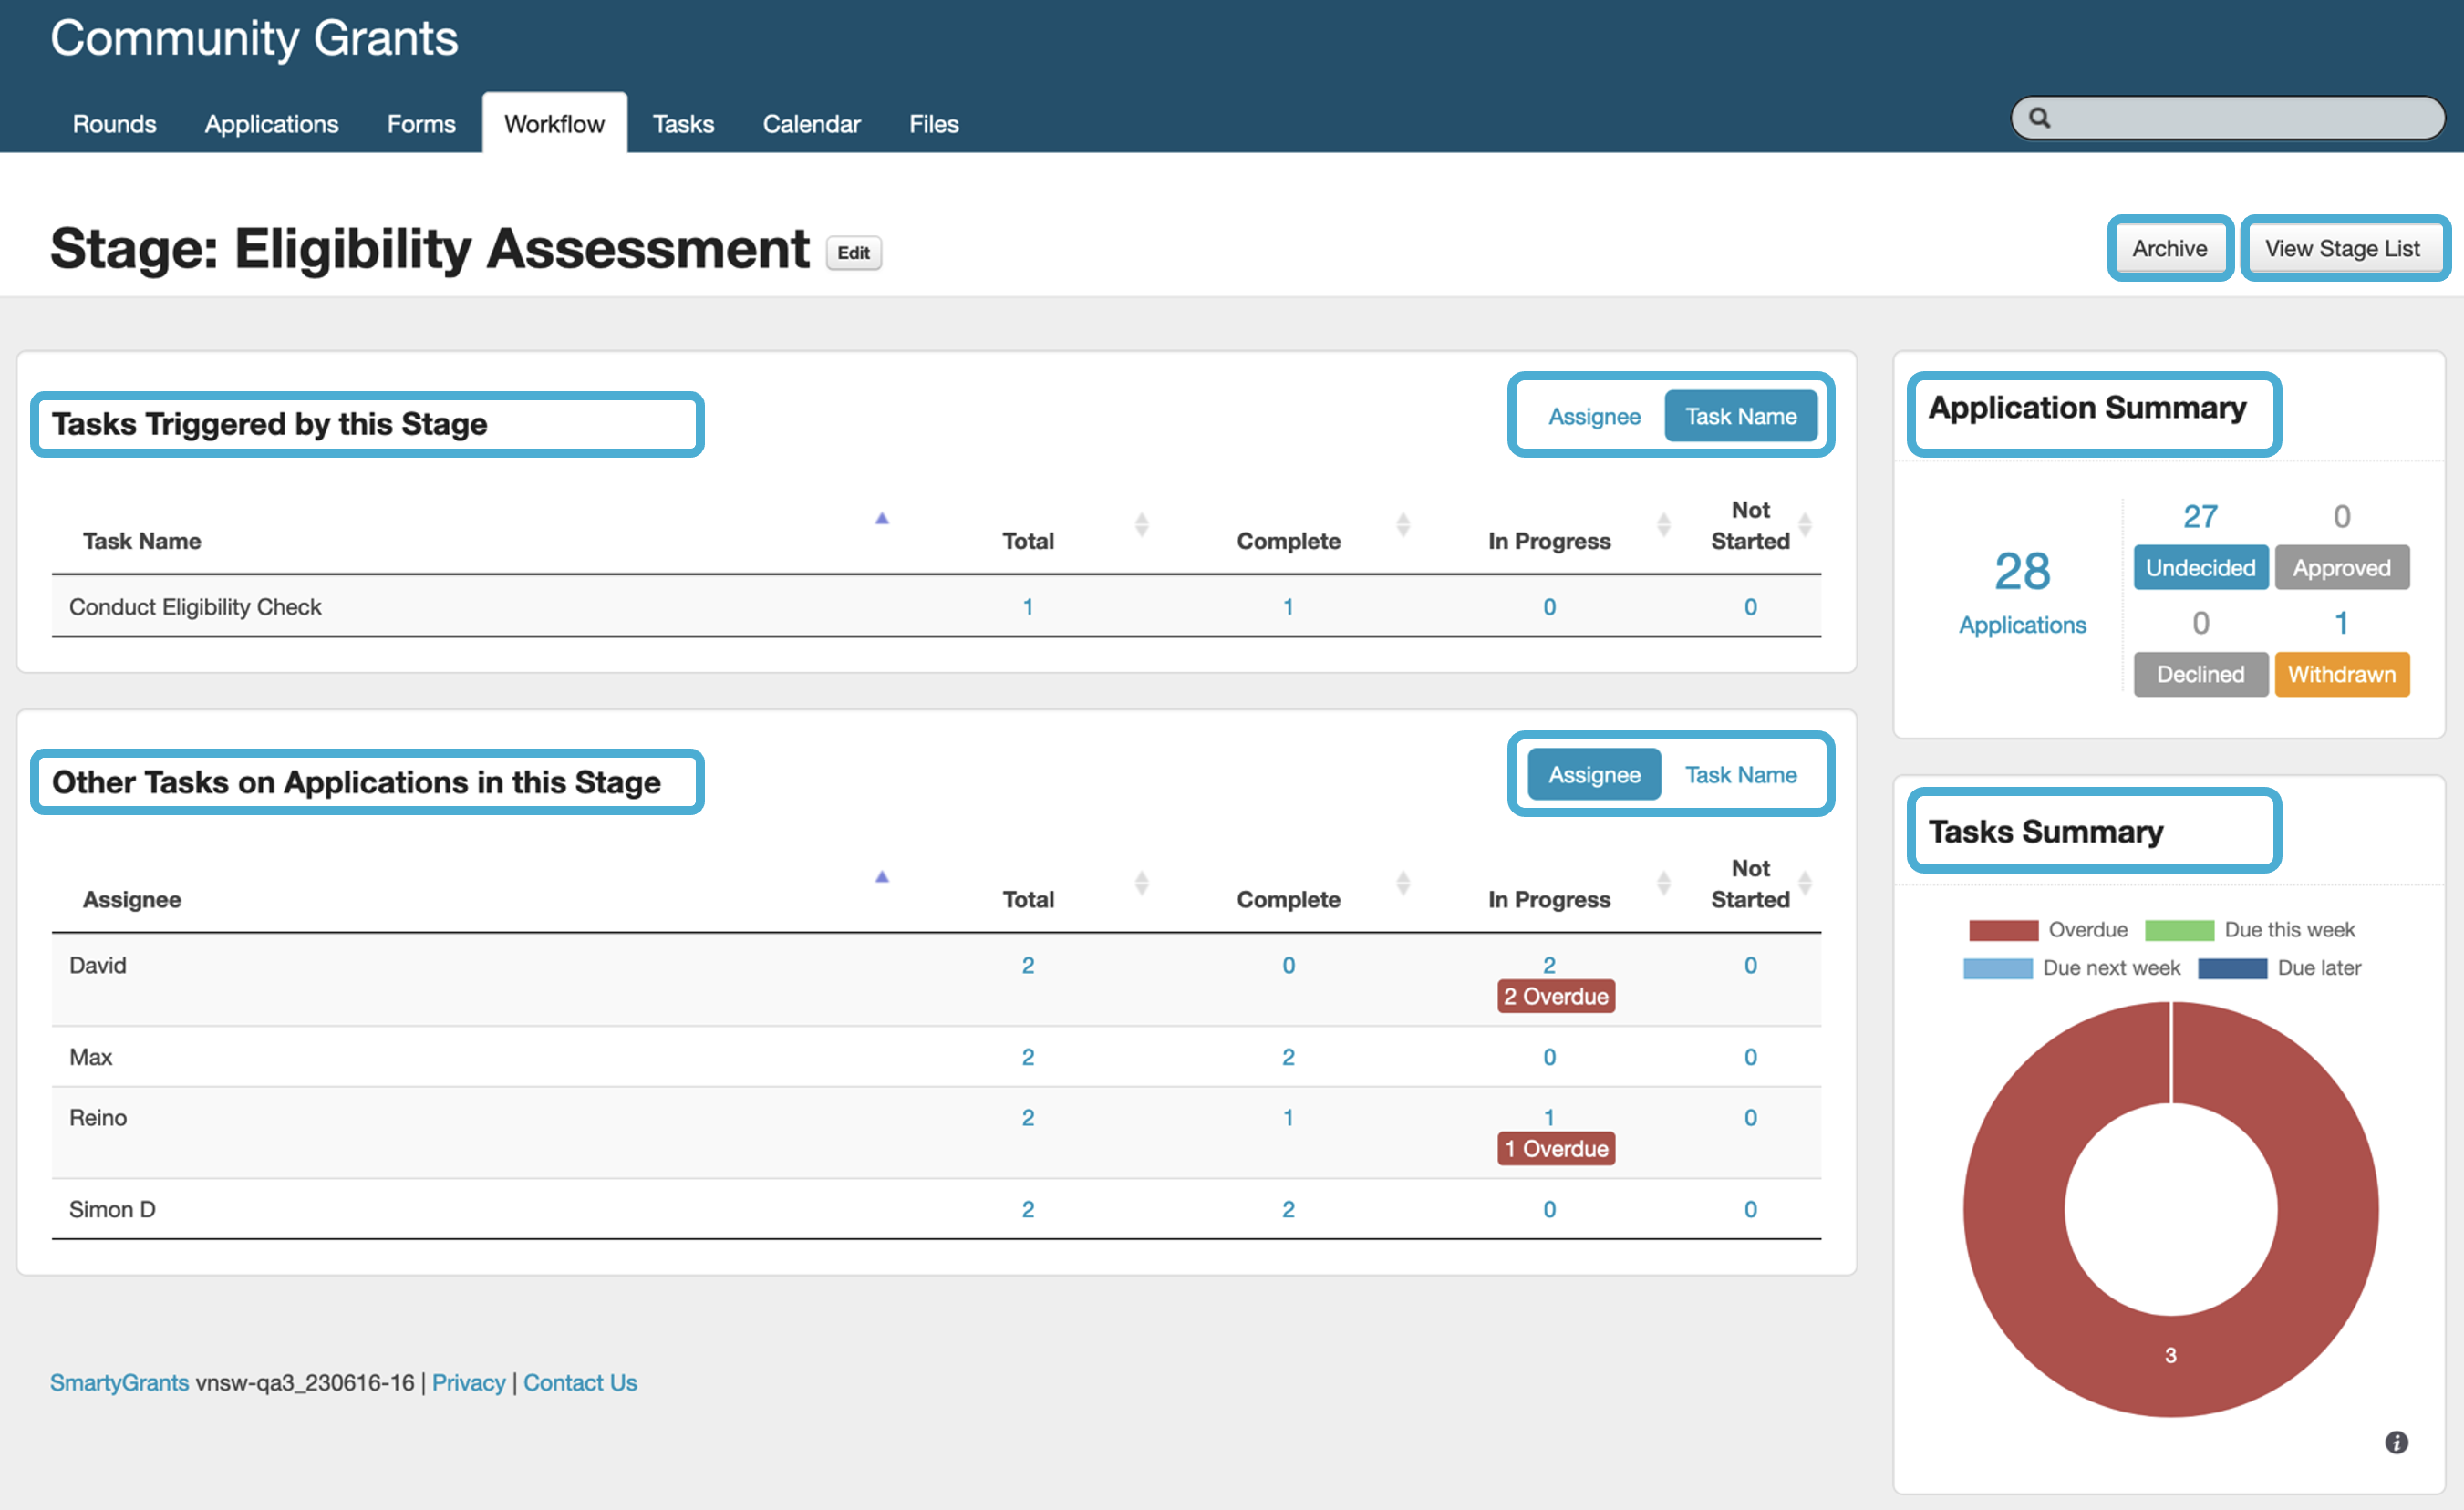
Archive: this will allow you to archive the stage if it is no longer required. You can also archive a stage from the manage stages screen (see important information noted above).
View Stage List: this returns you to the stages tab, showing a list of all the current stages in the program.
Tasks Triggered by this Stage: displays all tasks created by any recurring tasks which used this stage as a trigger. There are columns showing the assignee or task name, the total number of tasks, and their completion status. The In Progress and Not Started columns will also display a warning for any tasks that are Overdue. You are able to display these tasks by Assignee or Task Name.
Other Tasks on Applications in this Stage: functionally similar to the previous section, but displays all tasks created for all applications in this stage, excluding those tasks created via recurring tasks.
Application Summary: displays the total number of applications in the stage, along with a breakdown of their decisions. Selecting any of the hyperlinks will take you to the applications list filtered by stage and decision.
Tasks Summary: this widget provides a summary of the task deadlines for all tasks within the stage. It is separated into four colours:
Green: tasks due this week.
Light blue: tasks due next week.
Dark blue: tasks due later (than the end of next week).
Red: tasks that are now overdue.
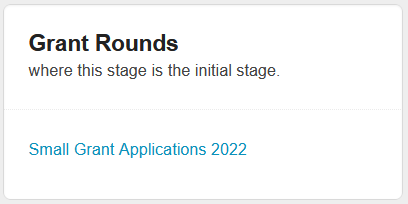
Grant Rounds: displays a list of rounds using this stage as the initial stage for the round. Selecting the name of the round will take you to the round.
Assigning applications to a stage
Applications can be moved into a stage either individually or in bulk. They can only be located in one stage at a time. When an application is assigned to a stage, this will trigger any tasks configured via a recurring task. Applications can be moved:
Individually:
Open the application you want to assign to a stage.
In the side summary panel, select Change Stage and then the stage you would like the application to be assigned to:
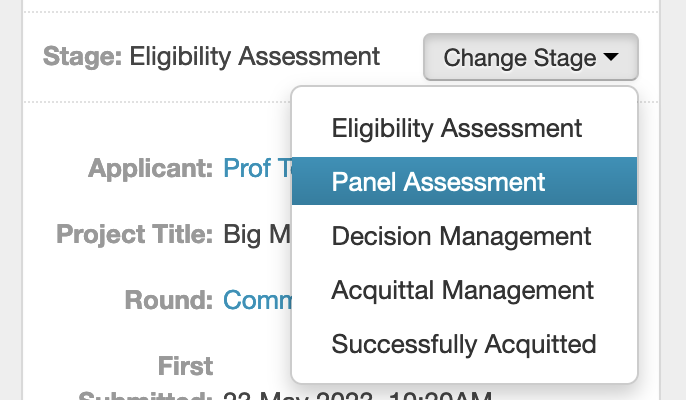
The application will change stages.
Tip: if the new stage has been set as a trigger in a recurring task, then tasks will be created for the application. You will see any tasks for the application at the bottom of the side summary panel.
In bulk: to assign applications to a stage in bulk, see bulk action options.
Using a stage as a trigger (recurring tasks)
Using recurring tasks, a stage can be configured as a trigger for the creation of tasks on an application, when the application enters the stage.
Rounds and stages
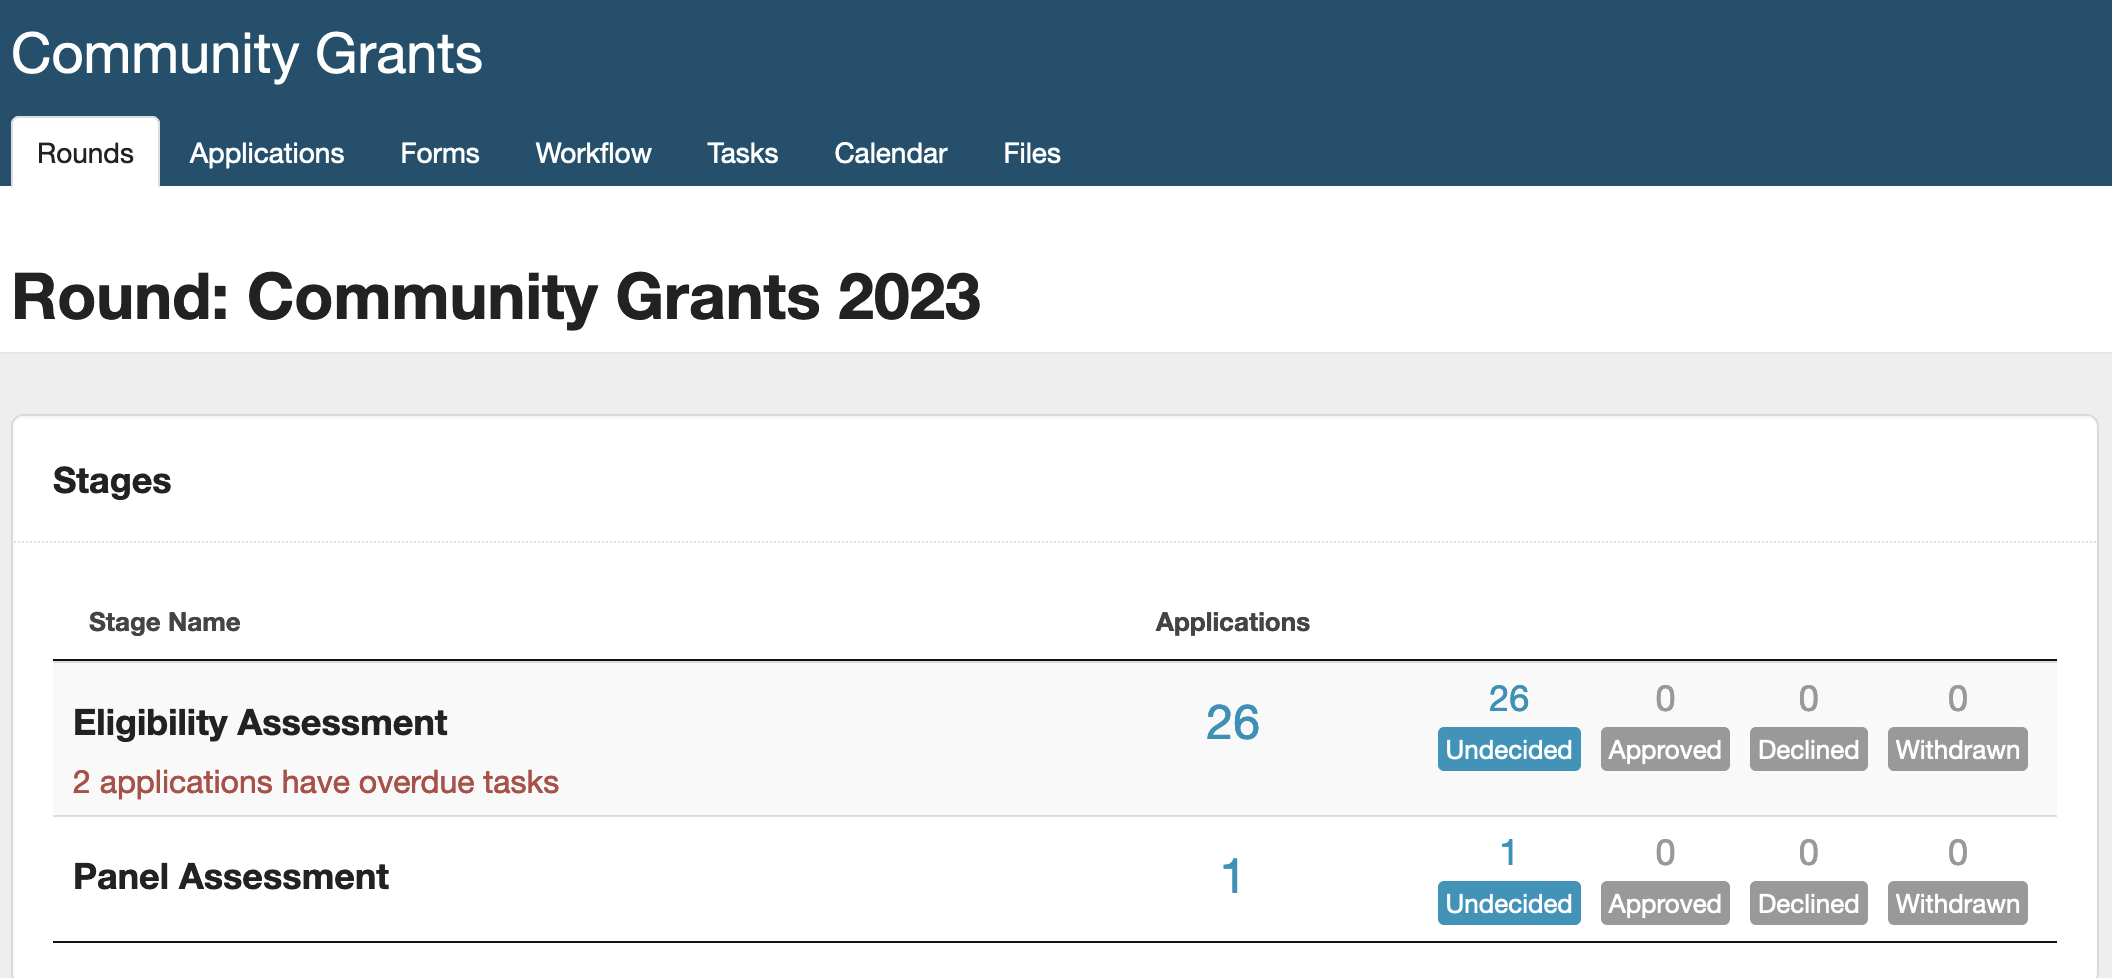
When you access a round on the Rounds tab, you can also view the list of Stages currently in use by applications within the round. This might be a more useful view of stages than the one at the program level, as it will only show stages relevant to the round being viewed:
Public stage
If populated, the Public Stage Name is what the applicant will be able to see when logged into the applicant site or SmartyFile:
As described above, you can select the Public Stage Name within the Manage Stages screen, from a pre-defined single-choice list maintained by SmartyGrants (this may be added to/updated over time).
Creating and managing rules
Rules
Rules are an important component of managing workflow throughout the grantmaking lifecycle. A rule triggers one event to take place in the system on the occurrence of another event. For example, to move an application into a stage on a decision or payment being recorded.
You can create and manage workflow rules here on the Workflow tab. The below screenshot explains the format of the Rules tab:
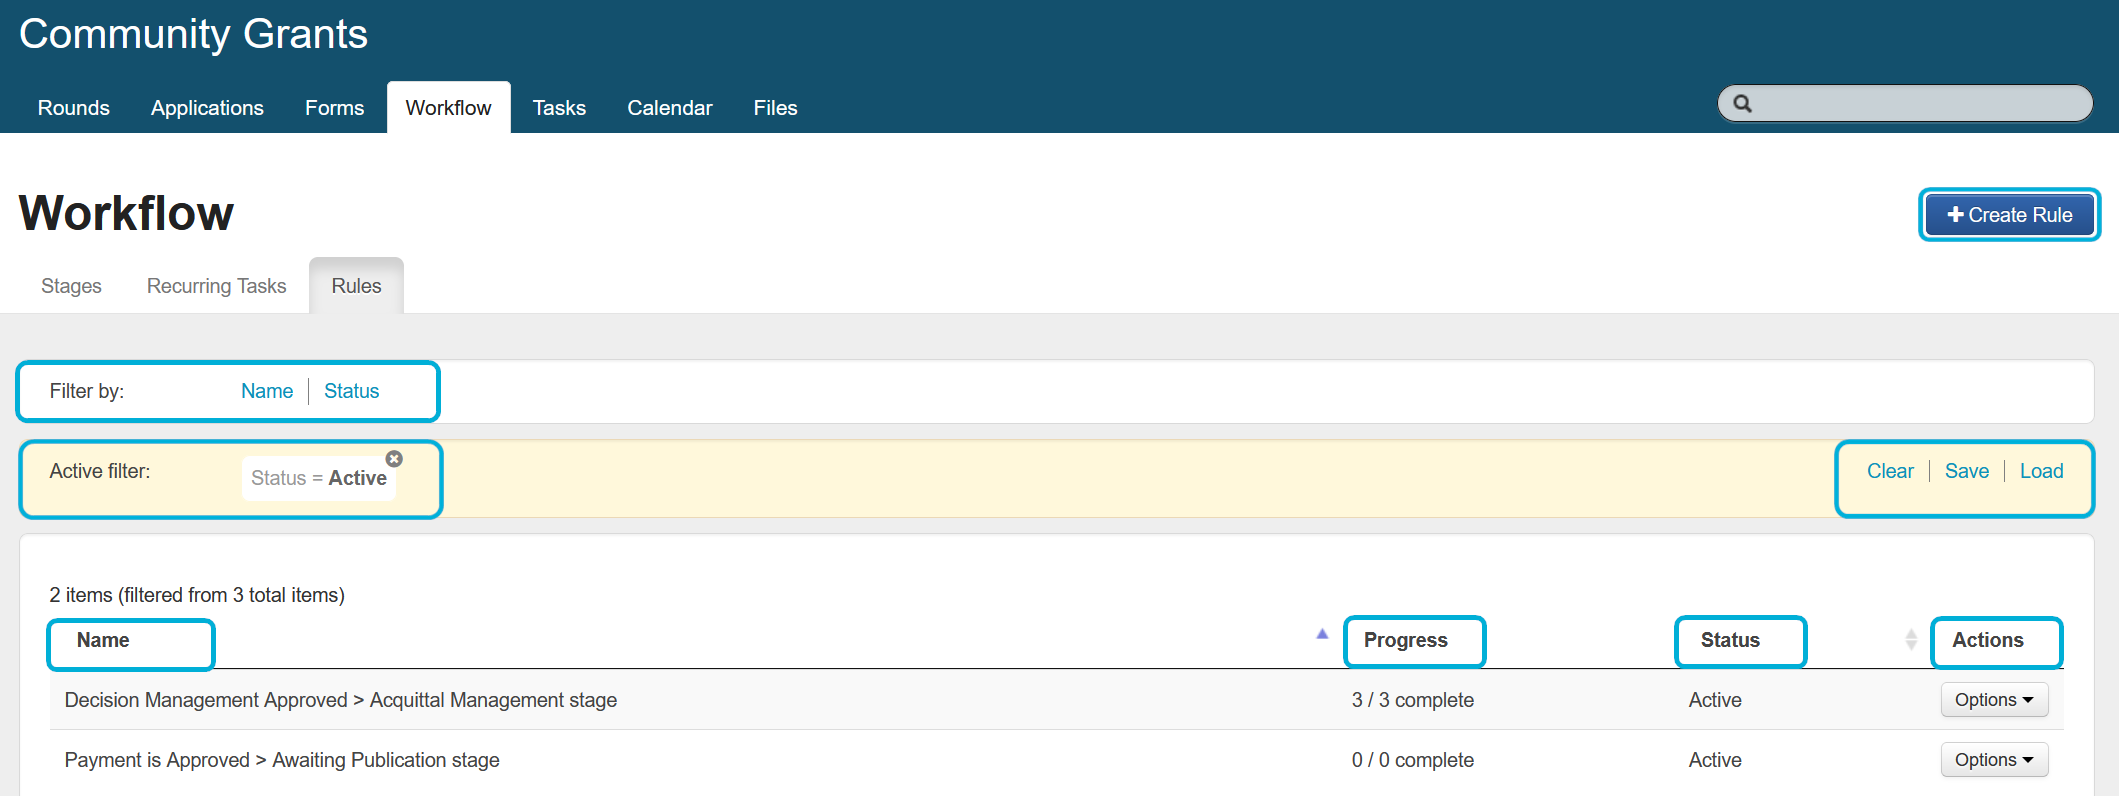
Name: the name of the rule.
Progress: shows the number of events triggered by the rule (e.g., 3/3 means 3 of 3 events triggered).
Status: the status of the rule, either active or inactive.
Actions: see editing, deleting, or deactivating a rule below.
Filter by:
Name: filter the list of rules by name (one or multiple).
Status: filter by status (active or inactive).
Active Filter:
Clear: to clear the currently active filter.
Save: if you regularly use the same filter, select save to save a filter only visible to you.
Load: this will list all previously saved filters so they can be recalled. You can also delete any previously saved filters from here.
Create Rule: to create a rule. For more information, see the below section.
Creating a rule
The following functions are available from the Create Rule menu of the Rules screen:
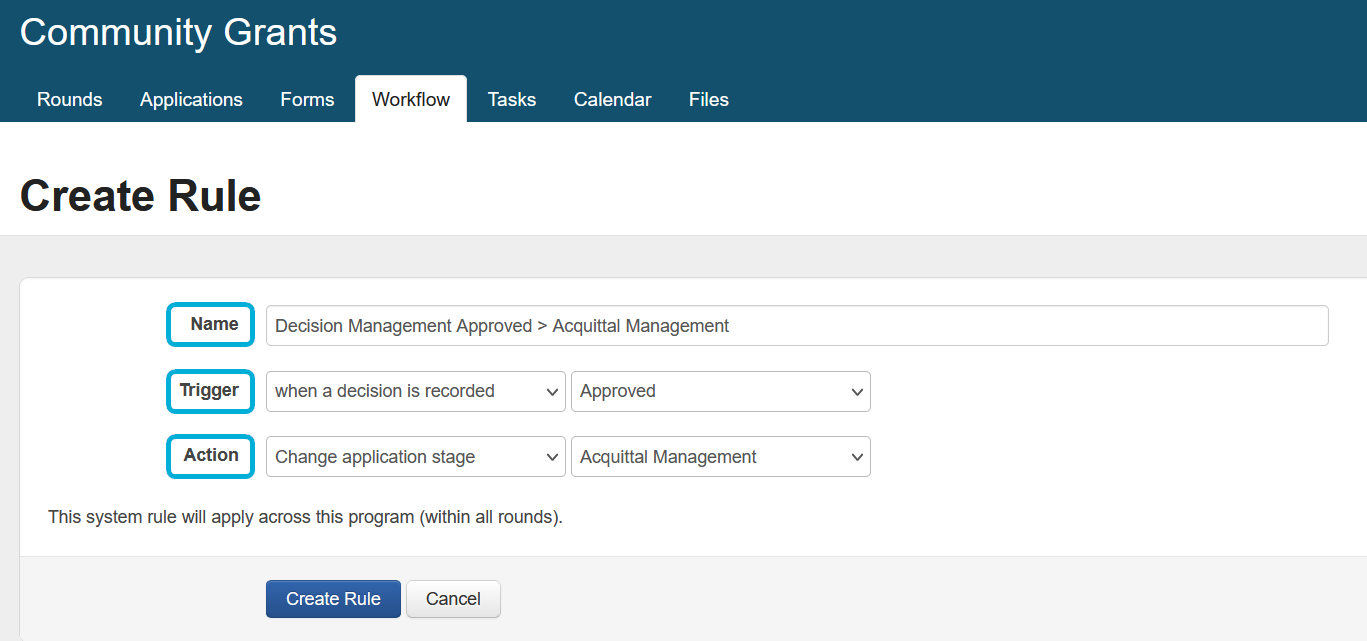
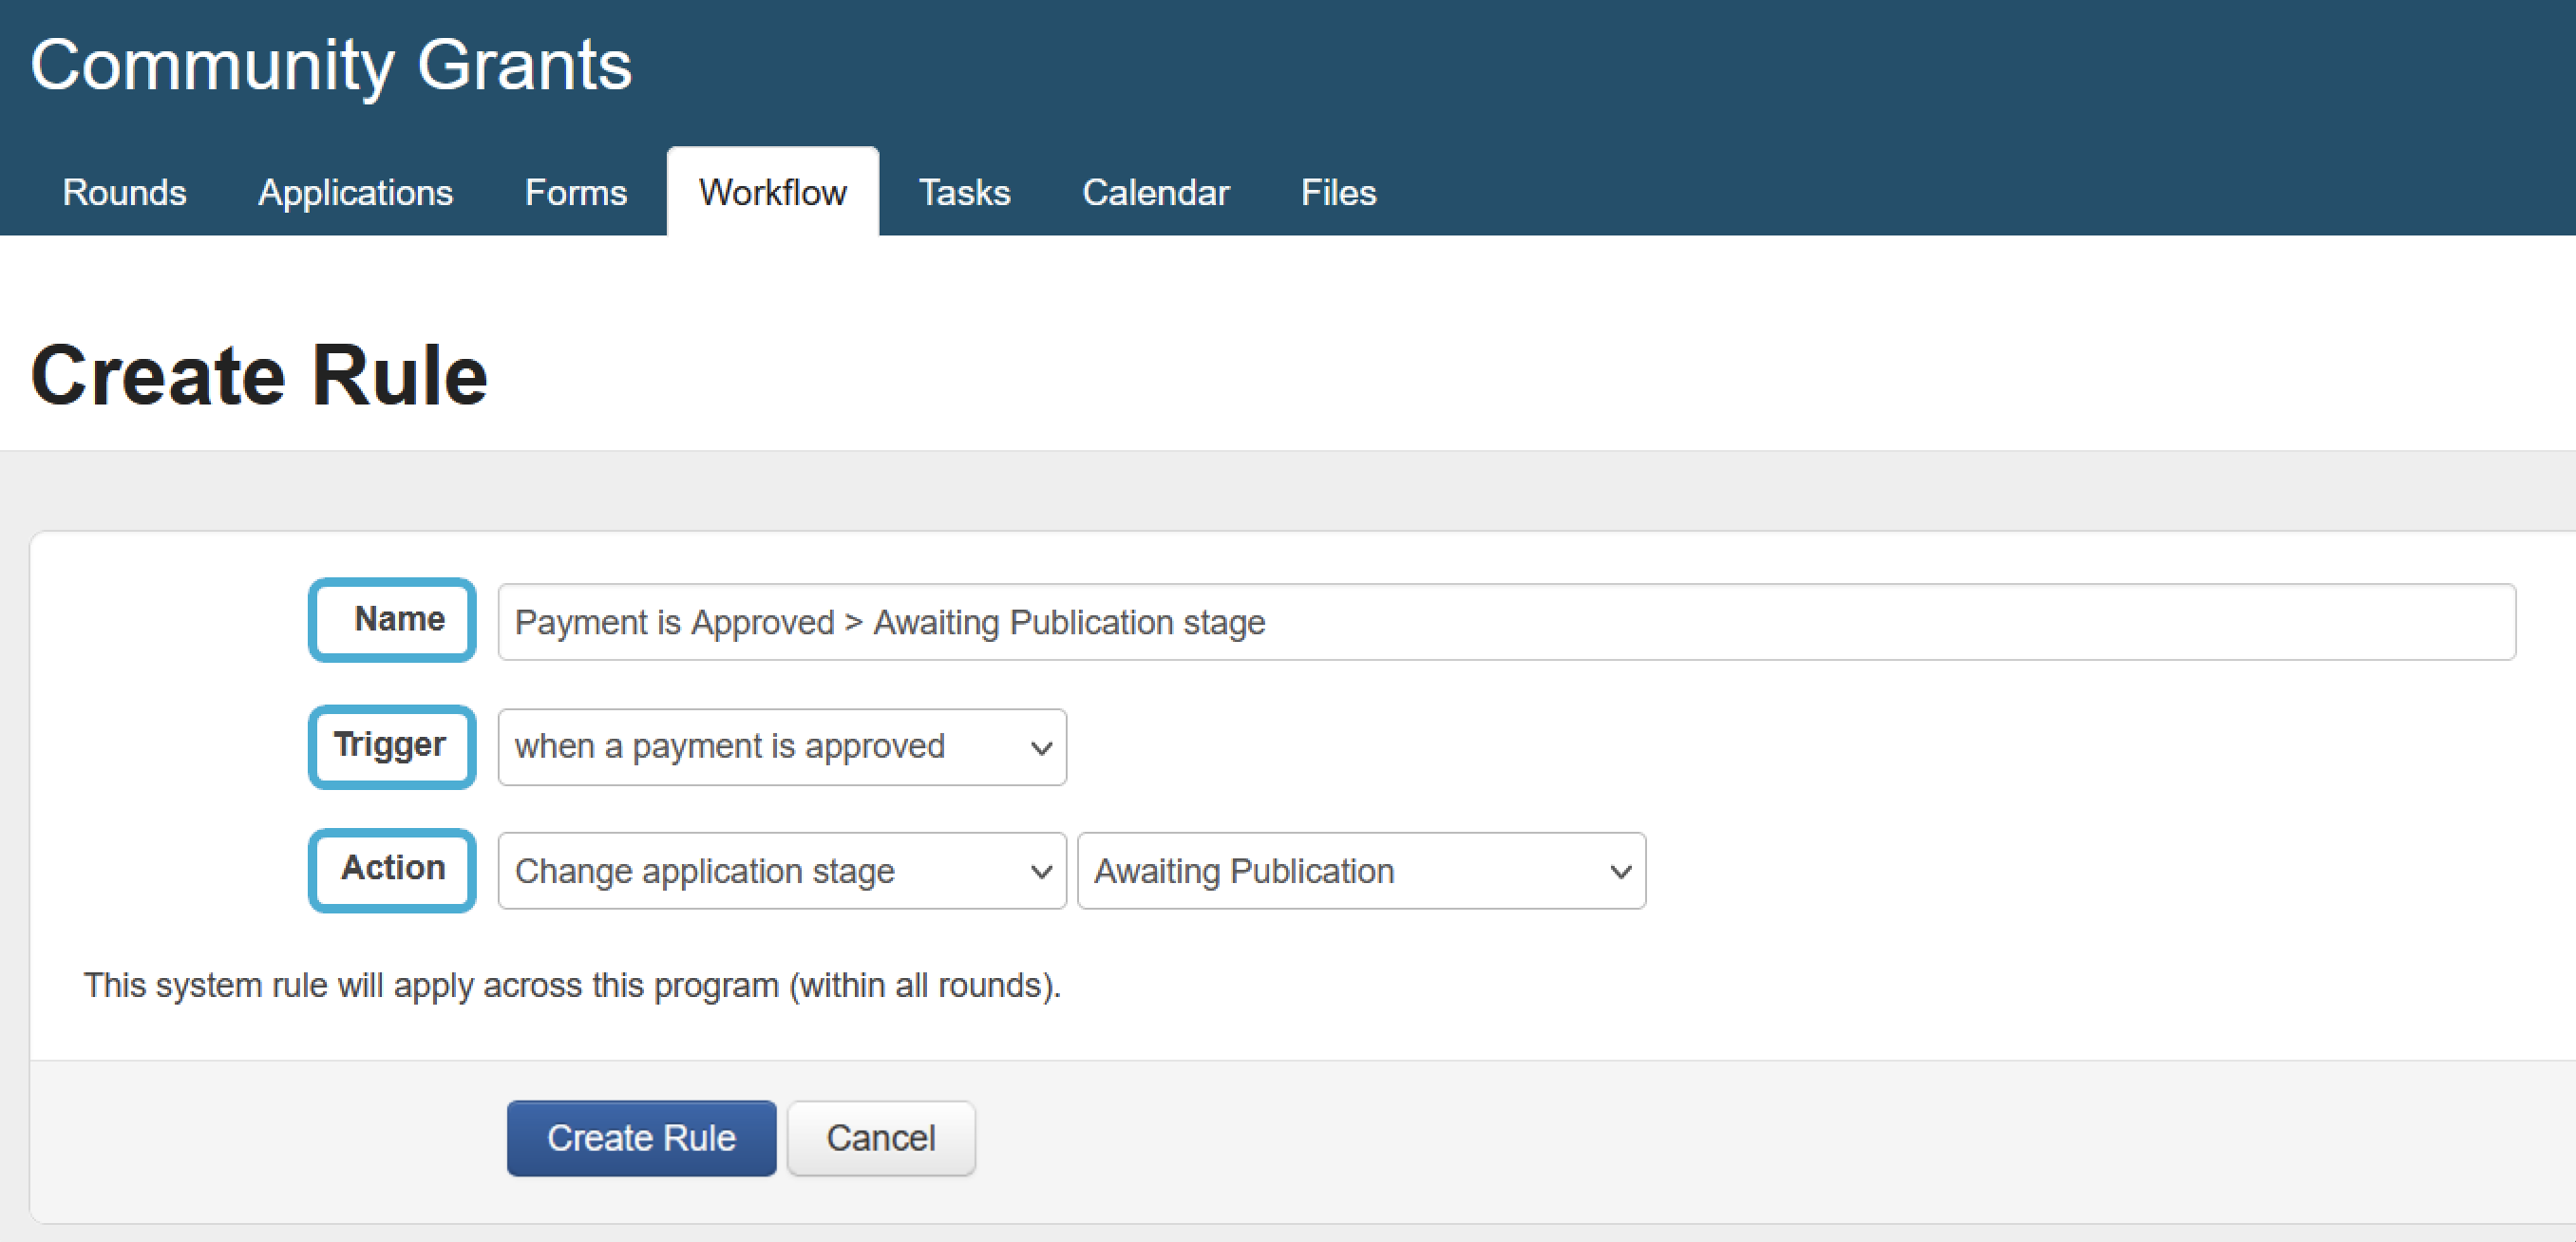
Name: the name of the rule.
Trigger: there are two options available for triggering a rule:
when a decision is recorded: triggers an event when the specified application decision is recorded:
Approved; or
Declined; or
Withdrawn; or
Undecided.
when a payment is approved: triggers an event when a payment is approved (i.e., the status is updated). If multiple payments are present against an application, the rule could be triggered in relation to any payment.
Action: the subsequent action will now take place when a rule is triggered. Currently, there is only one action available, and that is Change application stage. The application will move to that stage when the rule is triggered.
Info: this action cannot be reversed by changing the decision or payment status (i.e., reverting the decision or payment status will not move the application back to its previous stage).
Editing, deleting or deactivating a rule
The following functions are available from the Options menu of the Rules screen:
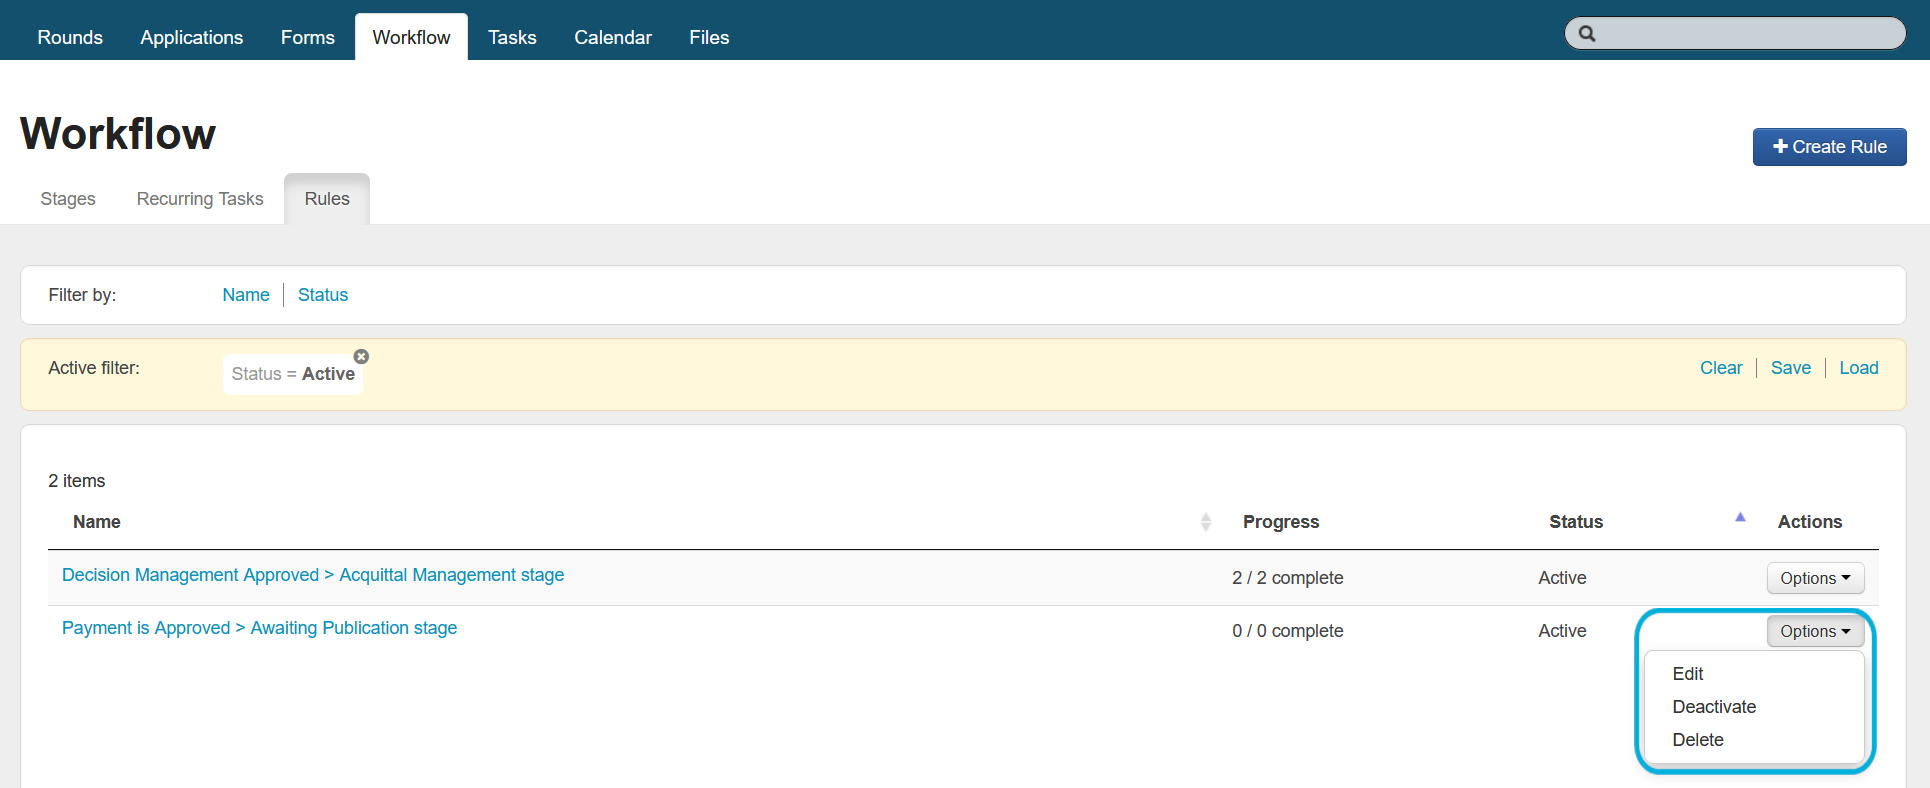
Actions (Options):
Edit: edit the existing rule to make changes for new events triggered (not any existing events).
Deactivate: after deactivation, no further events will be triggered. You can reactivate the rule any time.
Reactivate: after reactivation, events will again be triggered using the rule.
Delete: to delete a rule.
Info: you can only delete a rule if it has not yet been triggered in the account. Alternatively, you can deactivate the rule.