Templates and Rules
What are templates and how do they work?
SmartyGrants uses templates to run reports. You are in complete control of these templates so you can pull together whatever data you need into either a Microsoft Word document or Excel workbook. To run a report and extract data, you will always need a template.
Every field recorded in the system can be extracted into a report. For example, on an application form, every single question asked of an applicant is available for me to specifically include in my template.
Users can select which fields they want included when creating a template, that template can be downloaded and further customised to achieve the desired layout, look and feel.
For example:
For a Notification Letter, you might want individual pieces of data to be inserted into the relevant places throughout a document; much like a traditional mail merge.
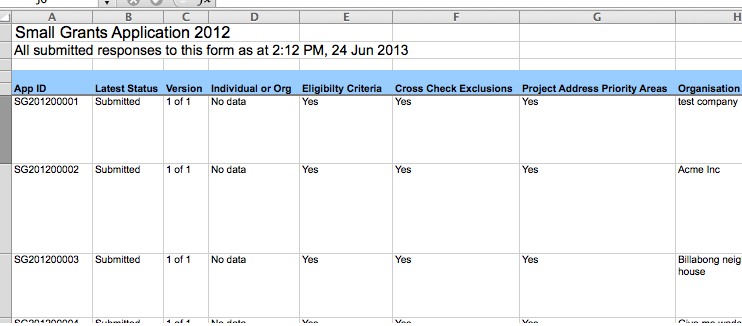
For a Council, Committee or Board report, you may wish to create a spreadsheet containing summary information about each application, such as the applicant name, project title, amount requested, and the amount recommended.
You may further wish to stipulate a sort order, text formatting, page headers and footers, inclusion of graphs and so on.
You do this by opening the Template in Word or Excel and manipulating these components as you would when working with a regular document and uploading the customised templates back into SmartyGrants.
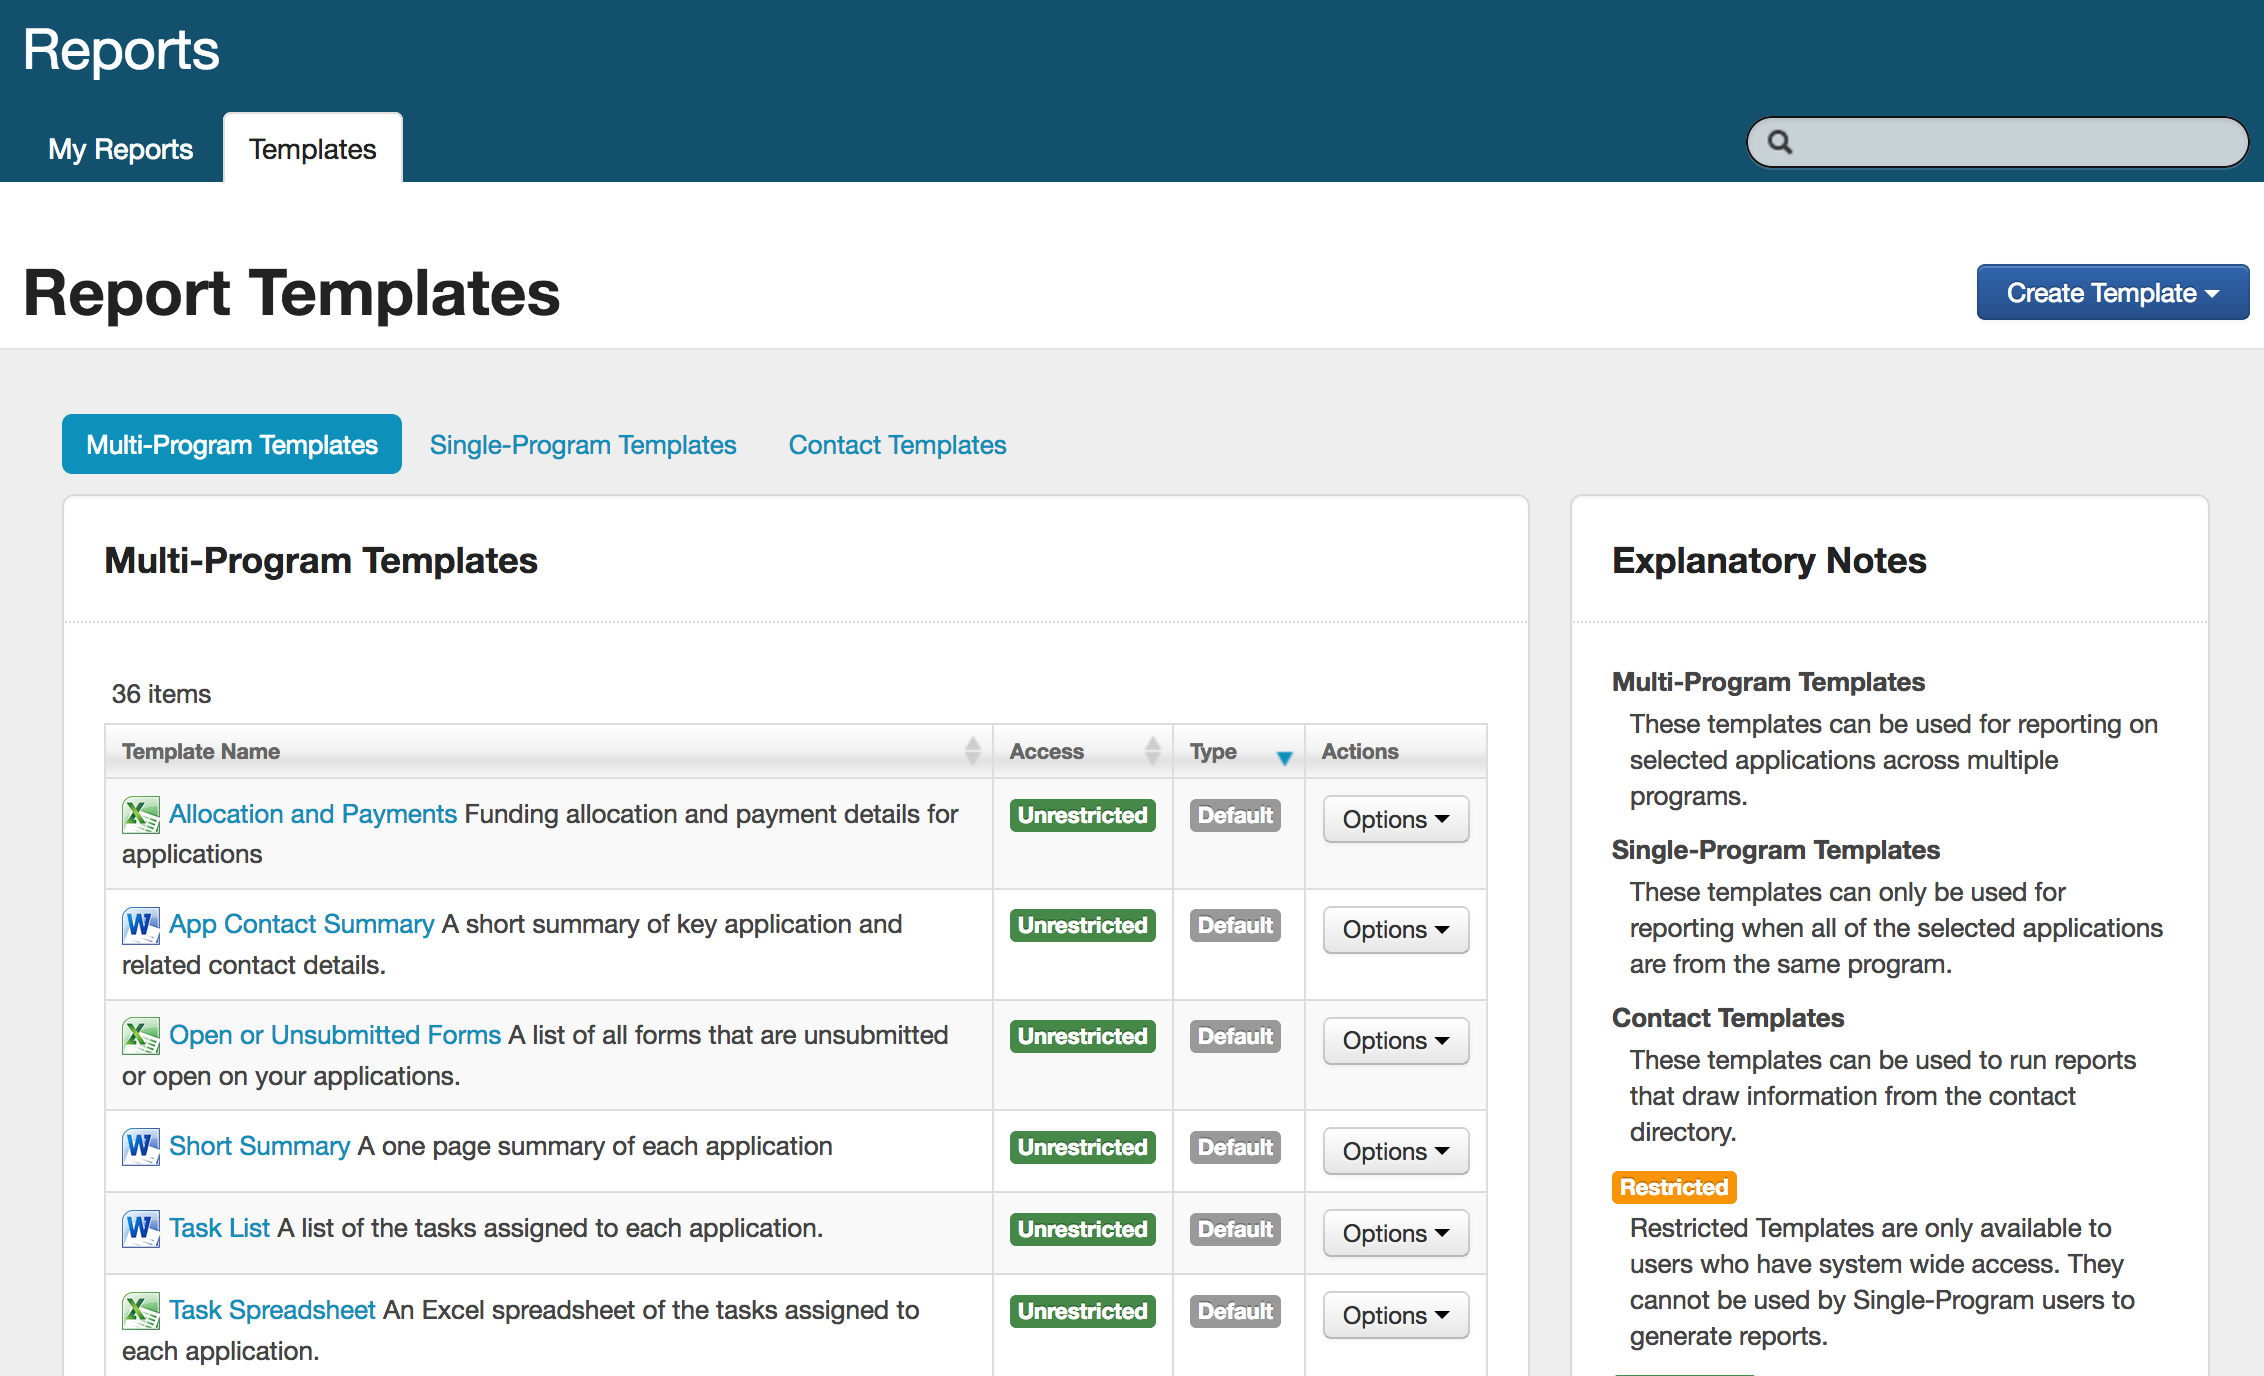
Template Types
There are three different types of templates that can be created:
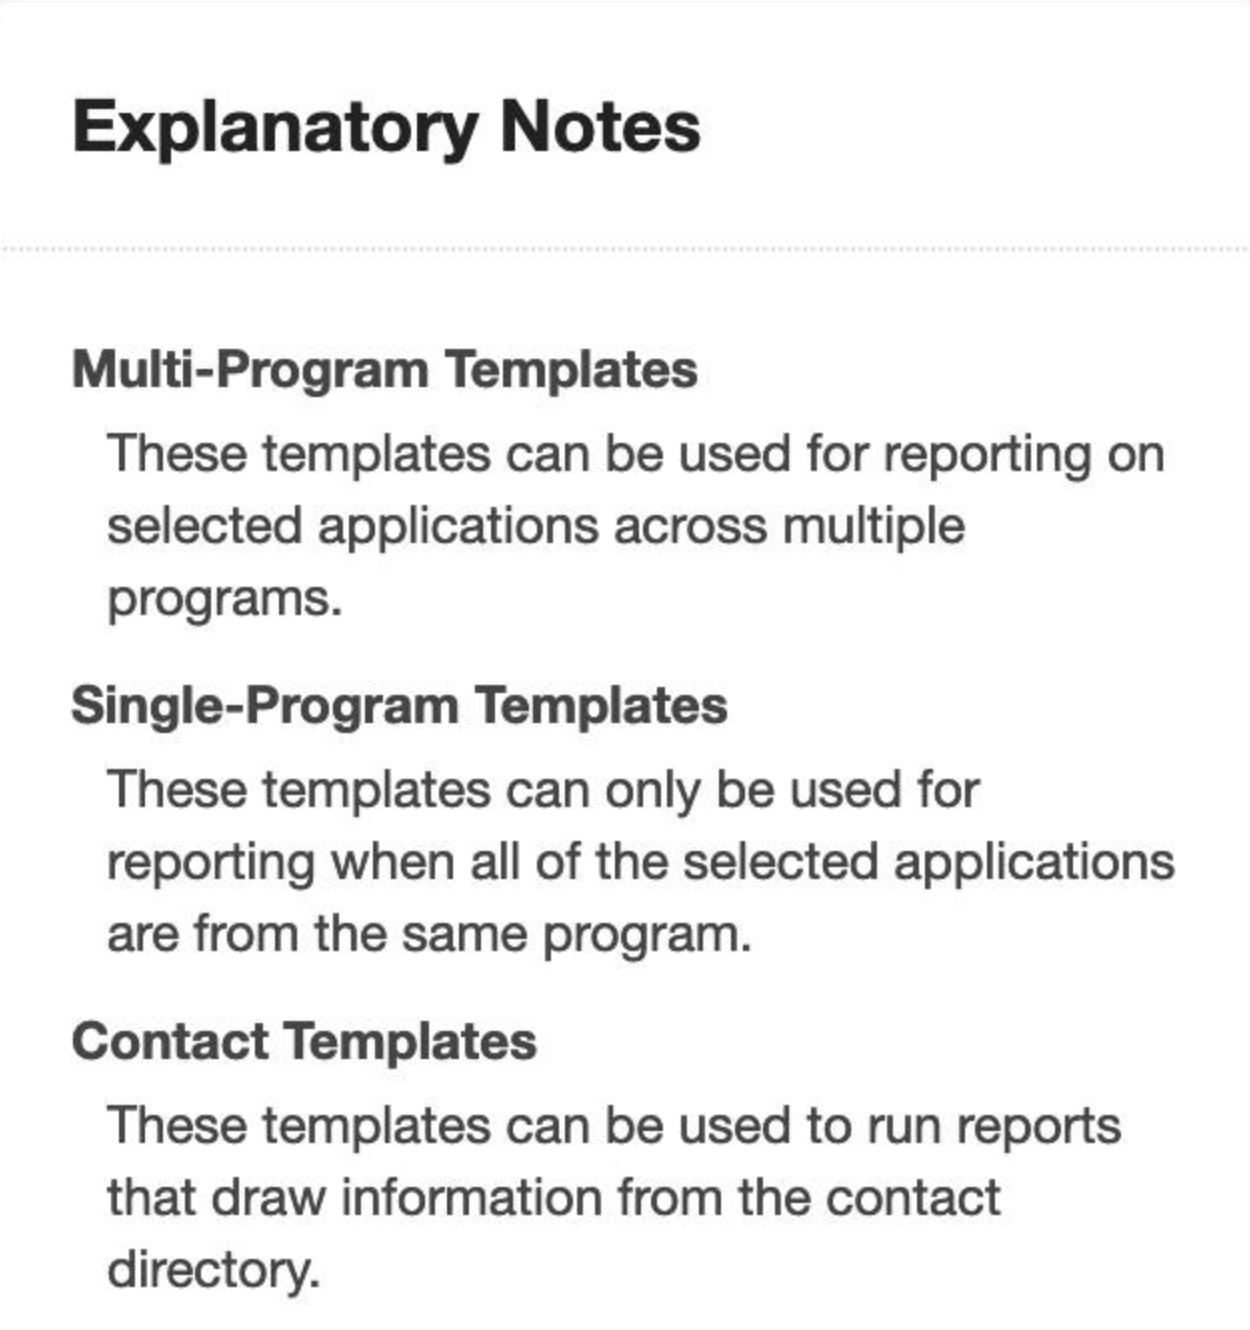
Multi-Program Templates
These templates can be used for reporting on selected applications across multiple programs. The fields available to include in these templates only include Standard or common fields you would find across all programs.
Single-Program Templates
These templates can only be used for reporting when all of the selected applications are from the same program. The fields available to include in these templates include fields from forms (Application, Assessment, Acquittal and Administration) specific to a program, this is the only difference compared to a multi-program template.
Contact Templates
These templates can be used to create reports that draw information specifically from the contact directory. Available fields include any custom contact fields that may have been created.
Template Formats
When a template it created, SmartyGrants will automatically generate the data fields in an automated format (plain Excel spreadsheet or table format in Word).
In the following two examples, a template was created asking for specific fields to be included and was not customised any further. A report was then run and generated using those templates.
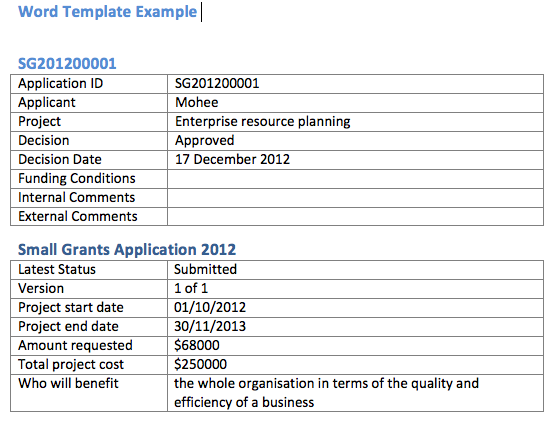
This format may suit your needs, however, users have the ability to customise these templates further. For example, you may wish to alter the order of the fields, add a logo, amend font, size and colour, page headers and footers, inclusion of graphs and so on. You may also want to use the information to create notification letters.
To customise a template, you need to download and amend it in Word or Excel first. Once customised, you can then upload it back into SmartyGrants and then run a report to retrieve the data.
Info: SmartyGrants provides users with a set of formatted Default Templates that may also suit your needs. You can check them out by running a report and selecting a default template or visit our Default Templates Available page to see samples.
Templates and Tags
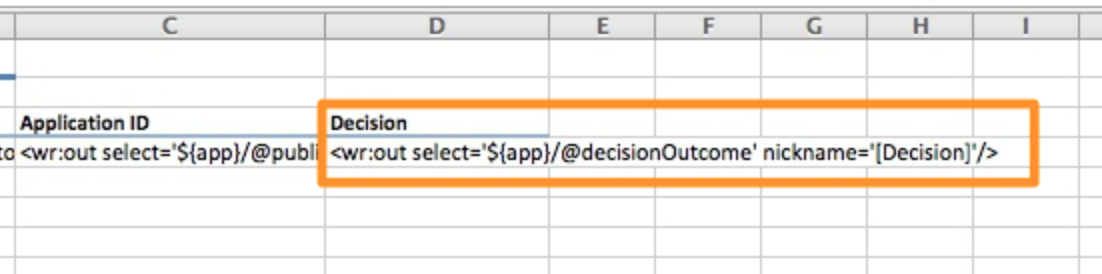
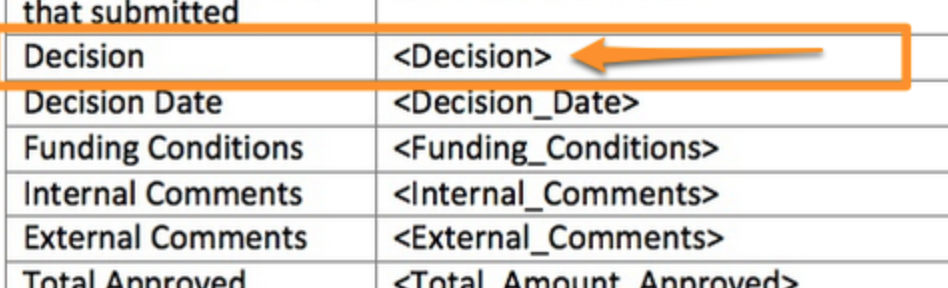
Templates use what are known as tags to retrieve data from the SmartyGrants database. Most of these tags relate to specific fields in the database.
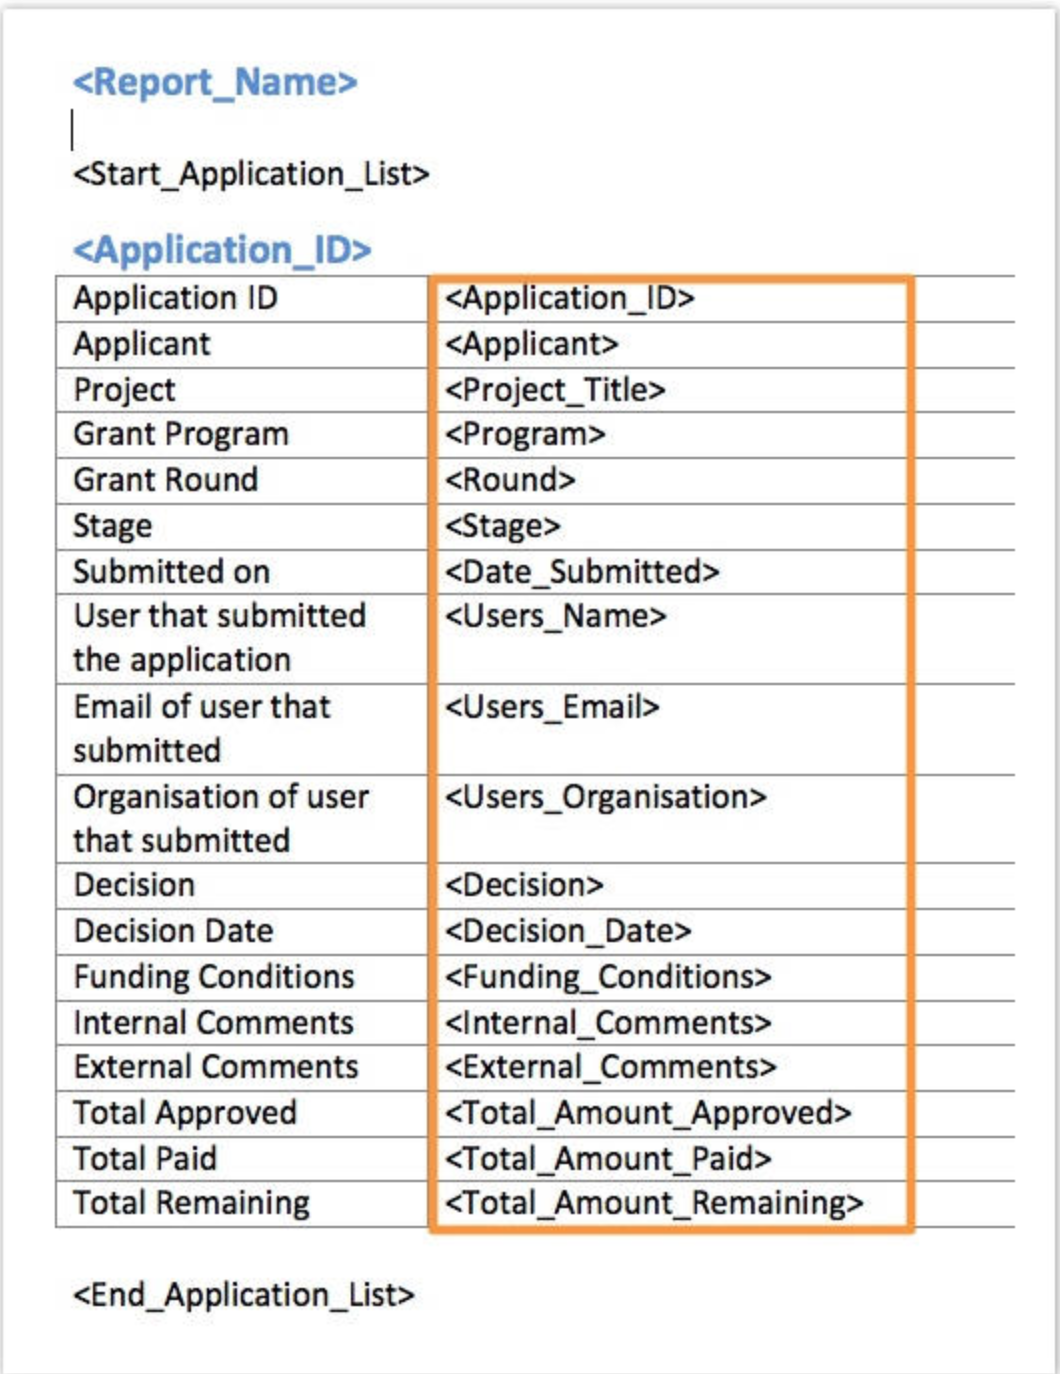
For example: If you are extracting the Decision recorded against an Application, your template will include the heading Decision and a tag either next to or below the decision heading.
Tag shown in an Excel template:
Tag shown in Microsoft Word template:
Some additional tags do not relate to specific fields - instead, they help the system retrieve your data.
Start & End Tags
Certain tags are automatically generated; you may notice them sitting in your 'Column A' in Excel, or in Word they will appear at the beginning and end of the relevant tables. These particular code tags are referred to as <start> and <end> tags, and are critical to ensuring a report generates successfully.
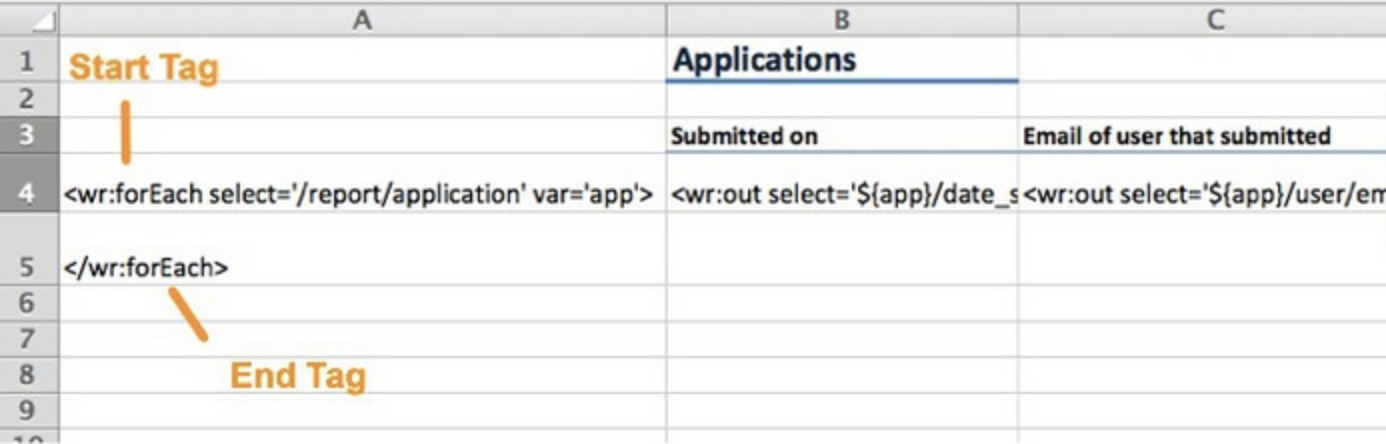
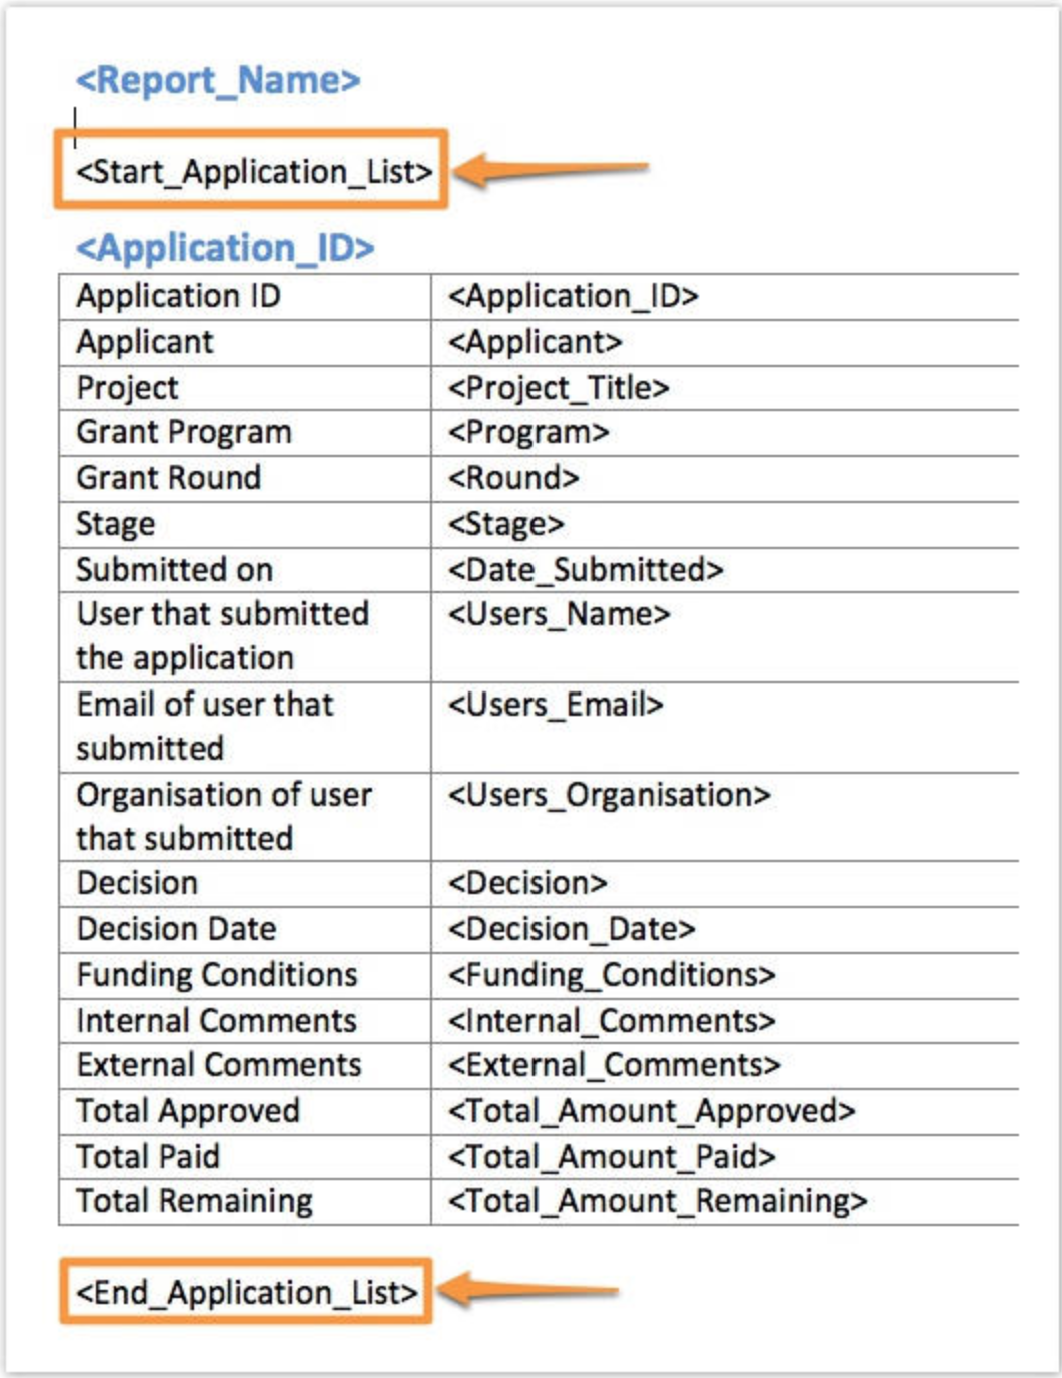
Users have the ability to move (copy and paste) tags around in a template to where you want them to appear, as long as they remain between their relevant <start> and <end> tags.
Tags can be copied and pasted from one document to a new one. For example, tags from this template pictured below could be copied and pasted into a Successful Letter (similar to how a mail merge would work). The relevant tags wanted and the <start> and <end> tags would need to be copied and pasted as well.
Once this customisation is complete, the document or workbook can be saved and uploaded as a new template or used to override an existing one.
Warning: There are rules that must be followed when customising templates. In particular, when trying to include multiple sources on one tab in excel (for example, assessment and acquittal form information). It is important that users are familiar with these rules before attempting to customise a template - see section below.
Template Rules for Customisation
Images | Accepted Image formats: PNG, JPG and GIF. Where can the image be placed? Images can be placed in the main document/spreadsheet area or in the header/footer. Images cannot be used as watermarks. |
|---|---|
Header/Footer (Word) | Headers and footers can be edited as usual. Tags cannot be included in a header or footer. |
Bullet/Numbered Lists (Word) | These lists should work in compatible versions of Microsoft Word, however, how they appear/work may alter depending on the version of Word being used. To ensure you get lists looking the way you want them to, run a report using the template and test the appearance of the report, then alter the results if necessary in the template. |
Tag Rules - understanding tag generation | When a template is created, the system will automatically insert tags into the relevant areas of the reporting hierarchy. In Excel, a new worksheet tab is generated for each separate area of the system where the fields were chosen from. he same rules apply in Word, but instead of a separate worksheet tab, these will appear as a separate table/element. In the below Excel example, the following elements generated their own tab - funding allocations, payments, forms (any type of form), contact types, and tasks.  While this is how the system automatically generates and organises information for reports, this can be customised, provided that certain rules are followed. For example, you may want tags (information) from the application and assessment form to all appear on the one worksheet tab. You would be able to copy the tags from the assessment form worksheet tab/table and paste them into the application form tab/table, but you could not do this in reverse. In the below Word example, the tag <SGA2: Project start date> could be copied from the 'Application' table and pasted into the 'Assessment' table, and the report would run successfully. However, this cannot be done in reverse, as an application form tag cannot be inserted into an assessment form table (copying the <SGAF: Amount Recommended> tag and pasting it into the 'Application' table - as the 'Assessment' tag/field would end up missing its own <start> and <end> tag). 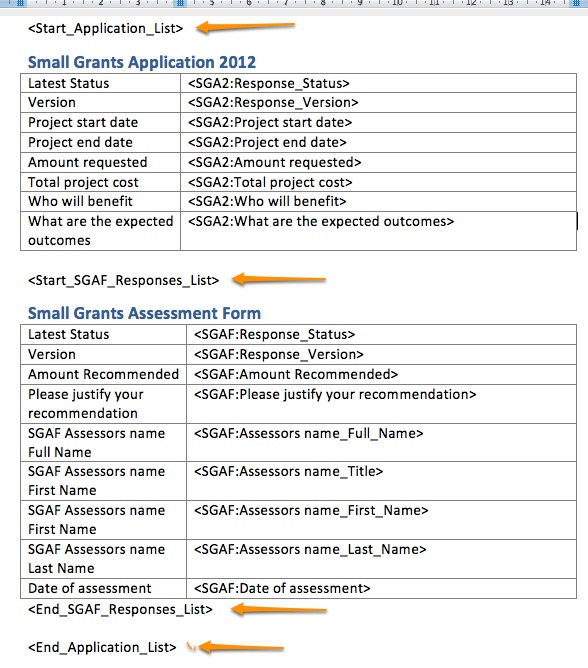 |
Tag Rules - understanding customisation rules | In the above examples we have used application and assessment forms to demonstrate how rules work, however, sets of rules also apply across other SmartyGrants elements and areas. Each of the below elements have their own <start> and <end> tags:
Info: The below rules reference the ability to include either information from the stated sources into the same tab in an excel report, and within the same element (for example a table) in a word report. For details on how to make more advanced templates that ignore these rules please see Customise Templates For further information on creating and customising templates, see create templates or check out reporting video tutorials. 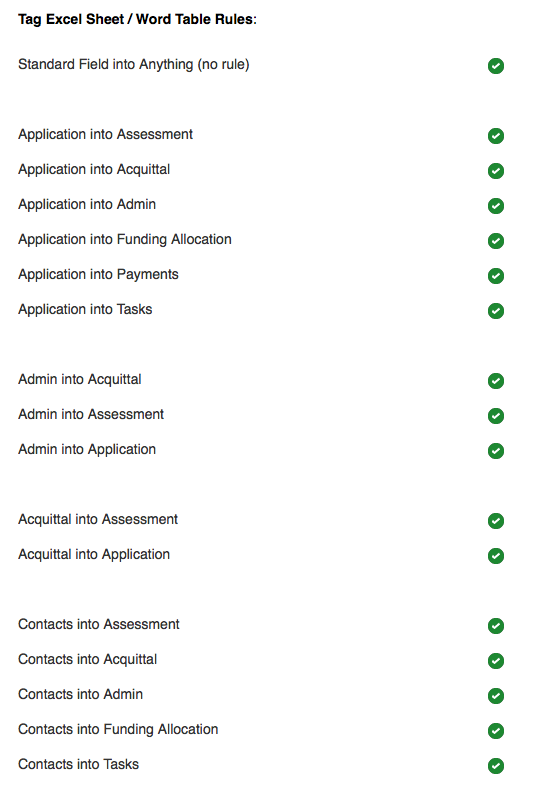 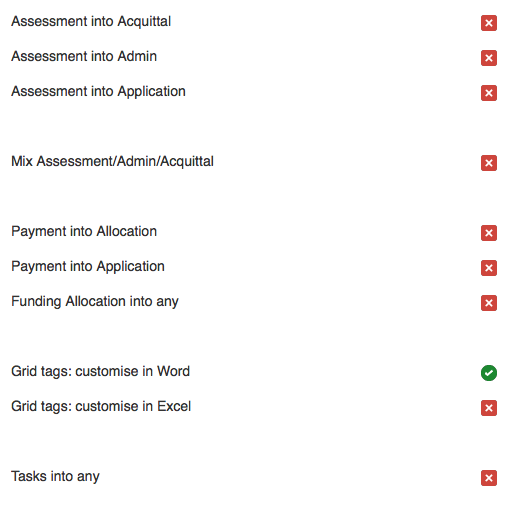 |
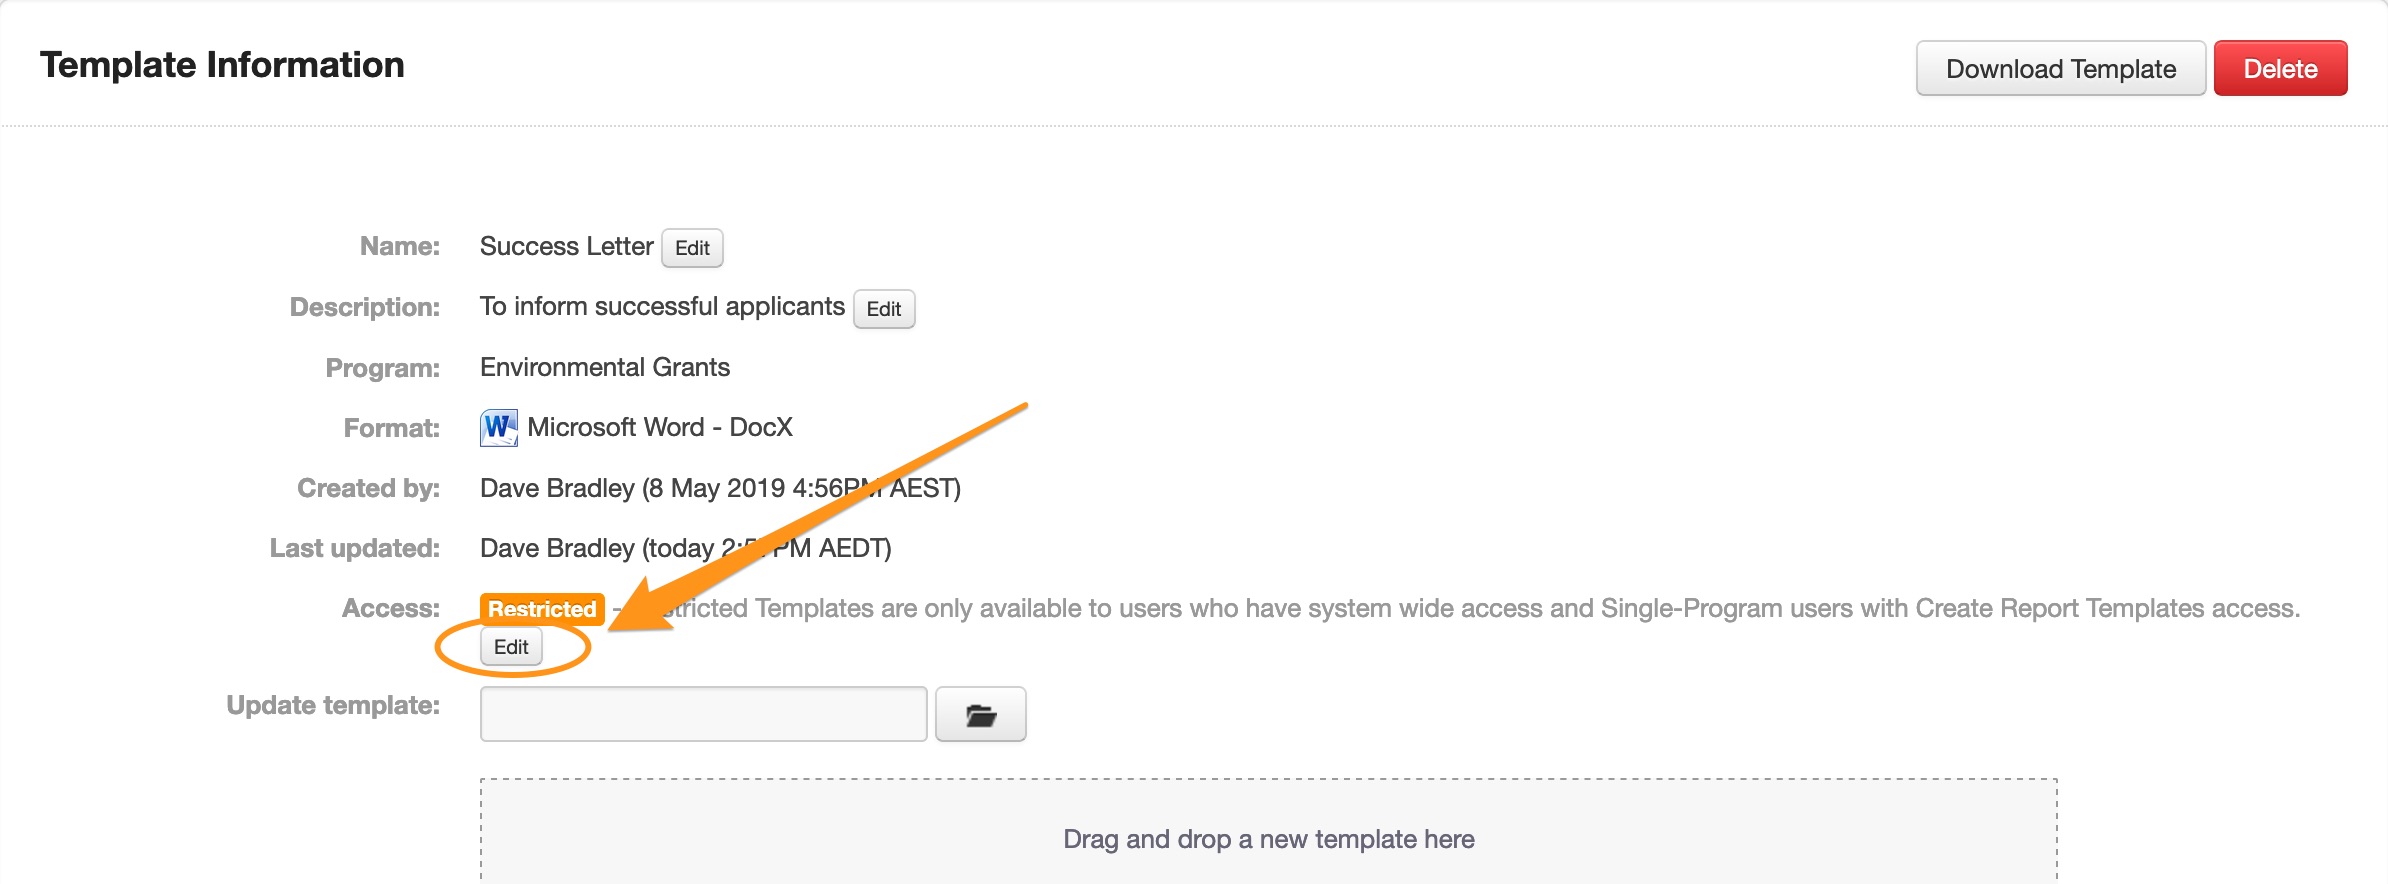
Template Access
Users who have System Wide access have access to run reports using all templates. However, unrestricted access to report templates can be given to Program Specific users if needed.
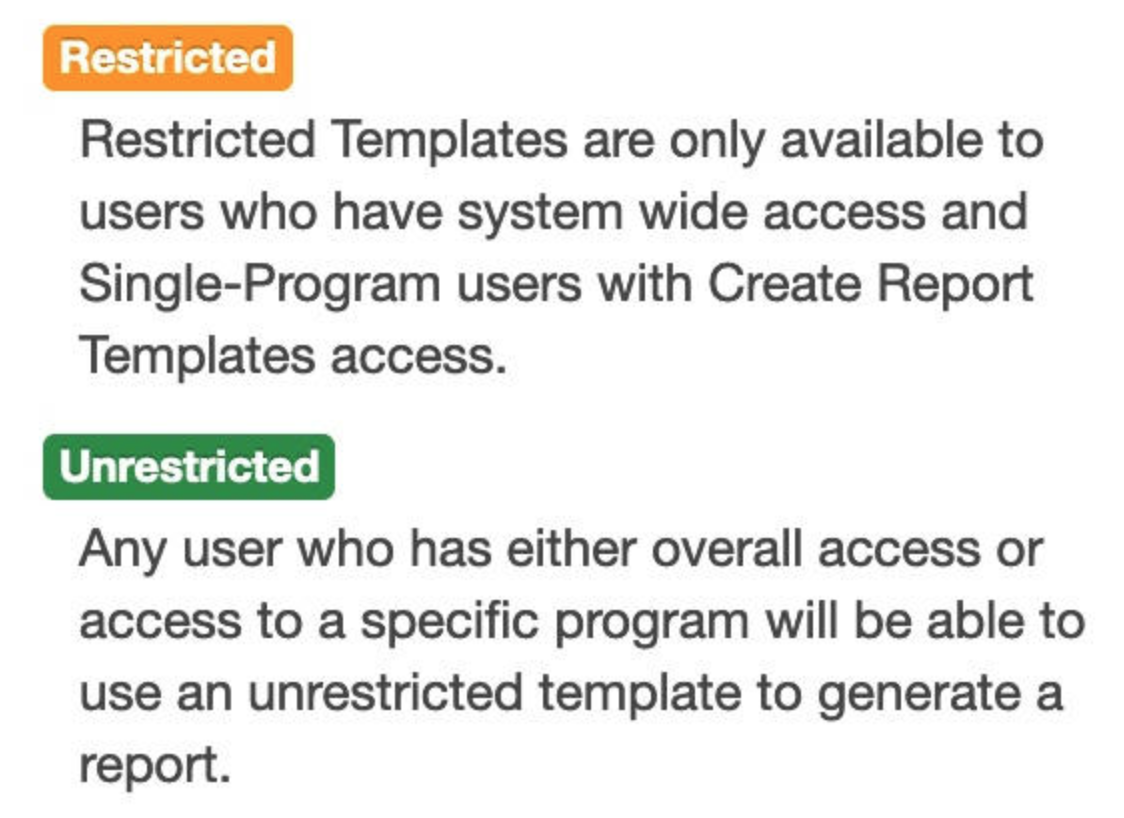
Restricted: Templates are only available to users who have System Wide access or Program Specific, Program Manager users with Create Report Templates access.
Unrestricted: Templates can be run by any user who has either overall System Wide access or Program Specific access to a specific program, regardless of their user role.
To adjust the the access level on a template:
Go to the Reports tab (the graph icon on the taskbar at the top of the page).

Go to the Templates tab, and click on the Options button next the template you wish to adjust. Select View Details.
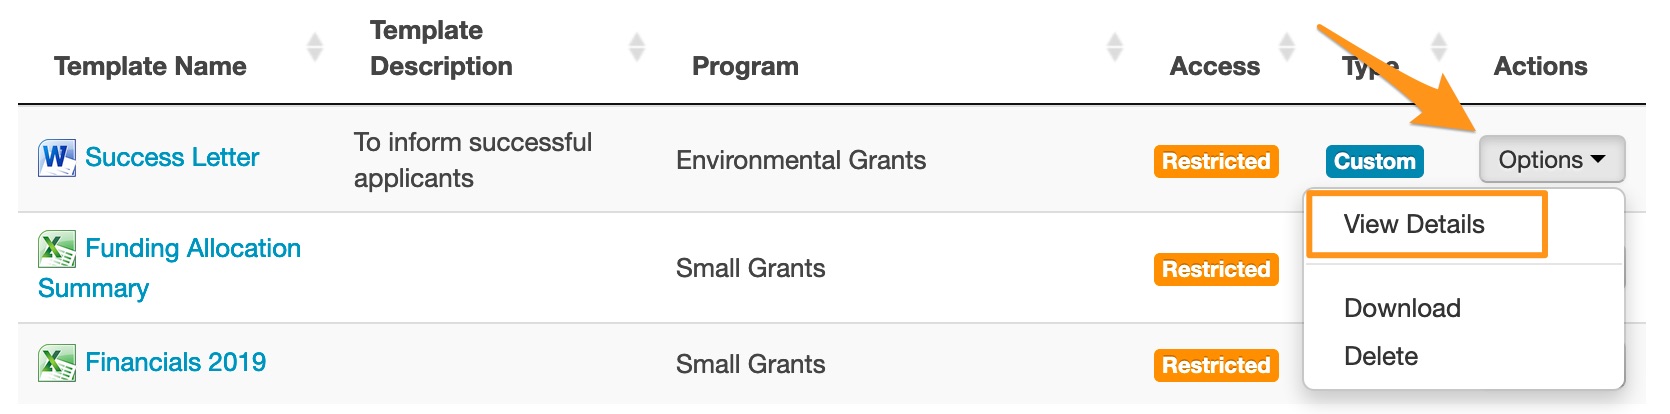
Select Edit under the access tag, select the relevant access level, and select Save.