Customise Templates
Important: Before customising a template, it is important you become familiar with how templates work and the rules that apply to customising templates. See Templates and Rules for more information.
Word Templates
Open/Download your Template
There are a few ways you can open/download a template.
Either via:
Template Settings:
Immediately after creating a template, you are taken to the Template Settings page automatically.
Alternatively, you can get to Template Settings by visiting the Templates tab in the Reporting screen, and next to the template you wish to view, click on Options and then View Details.
From the Template Settings page, click on the Download Template button.
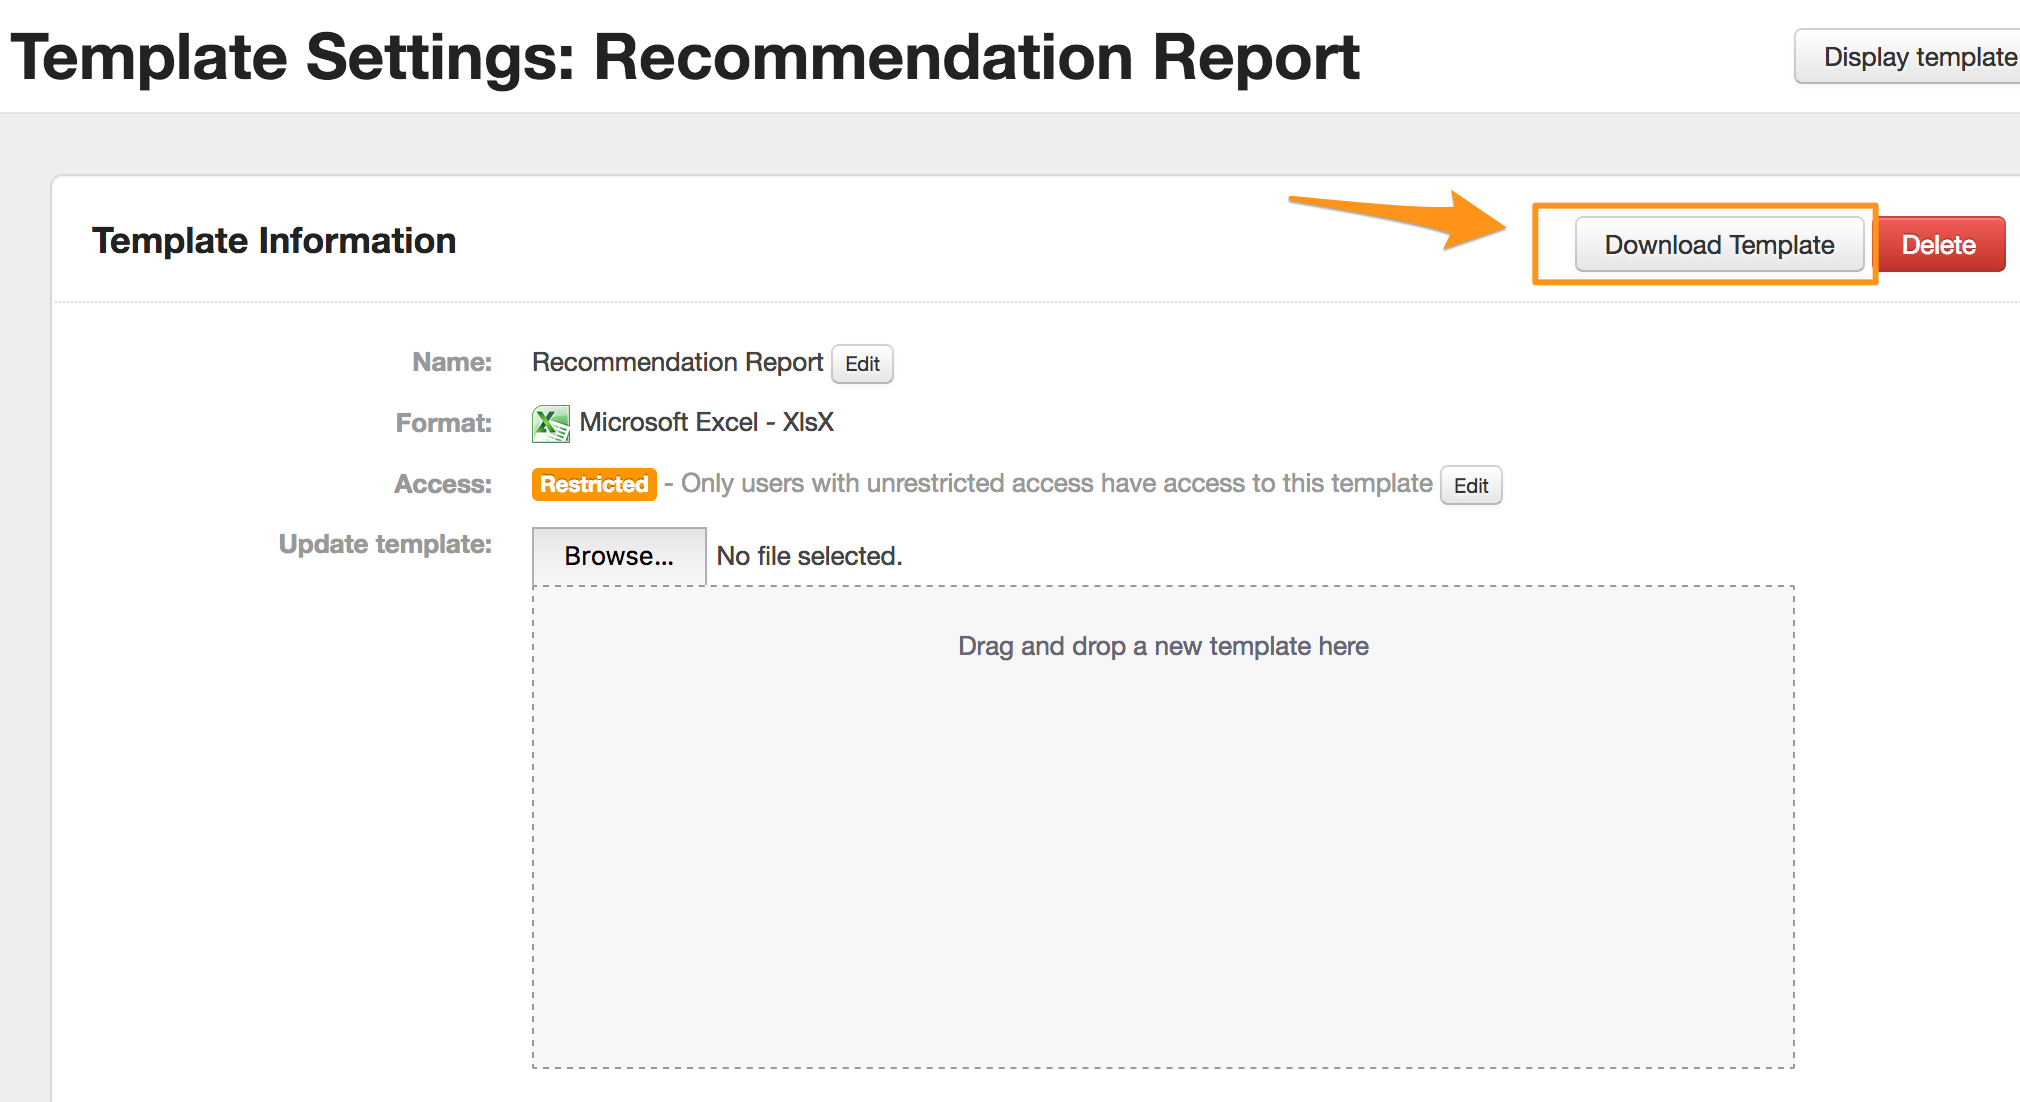
or
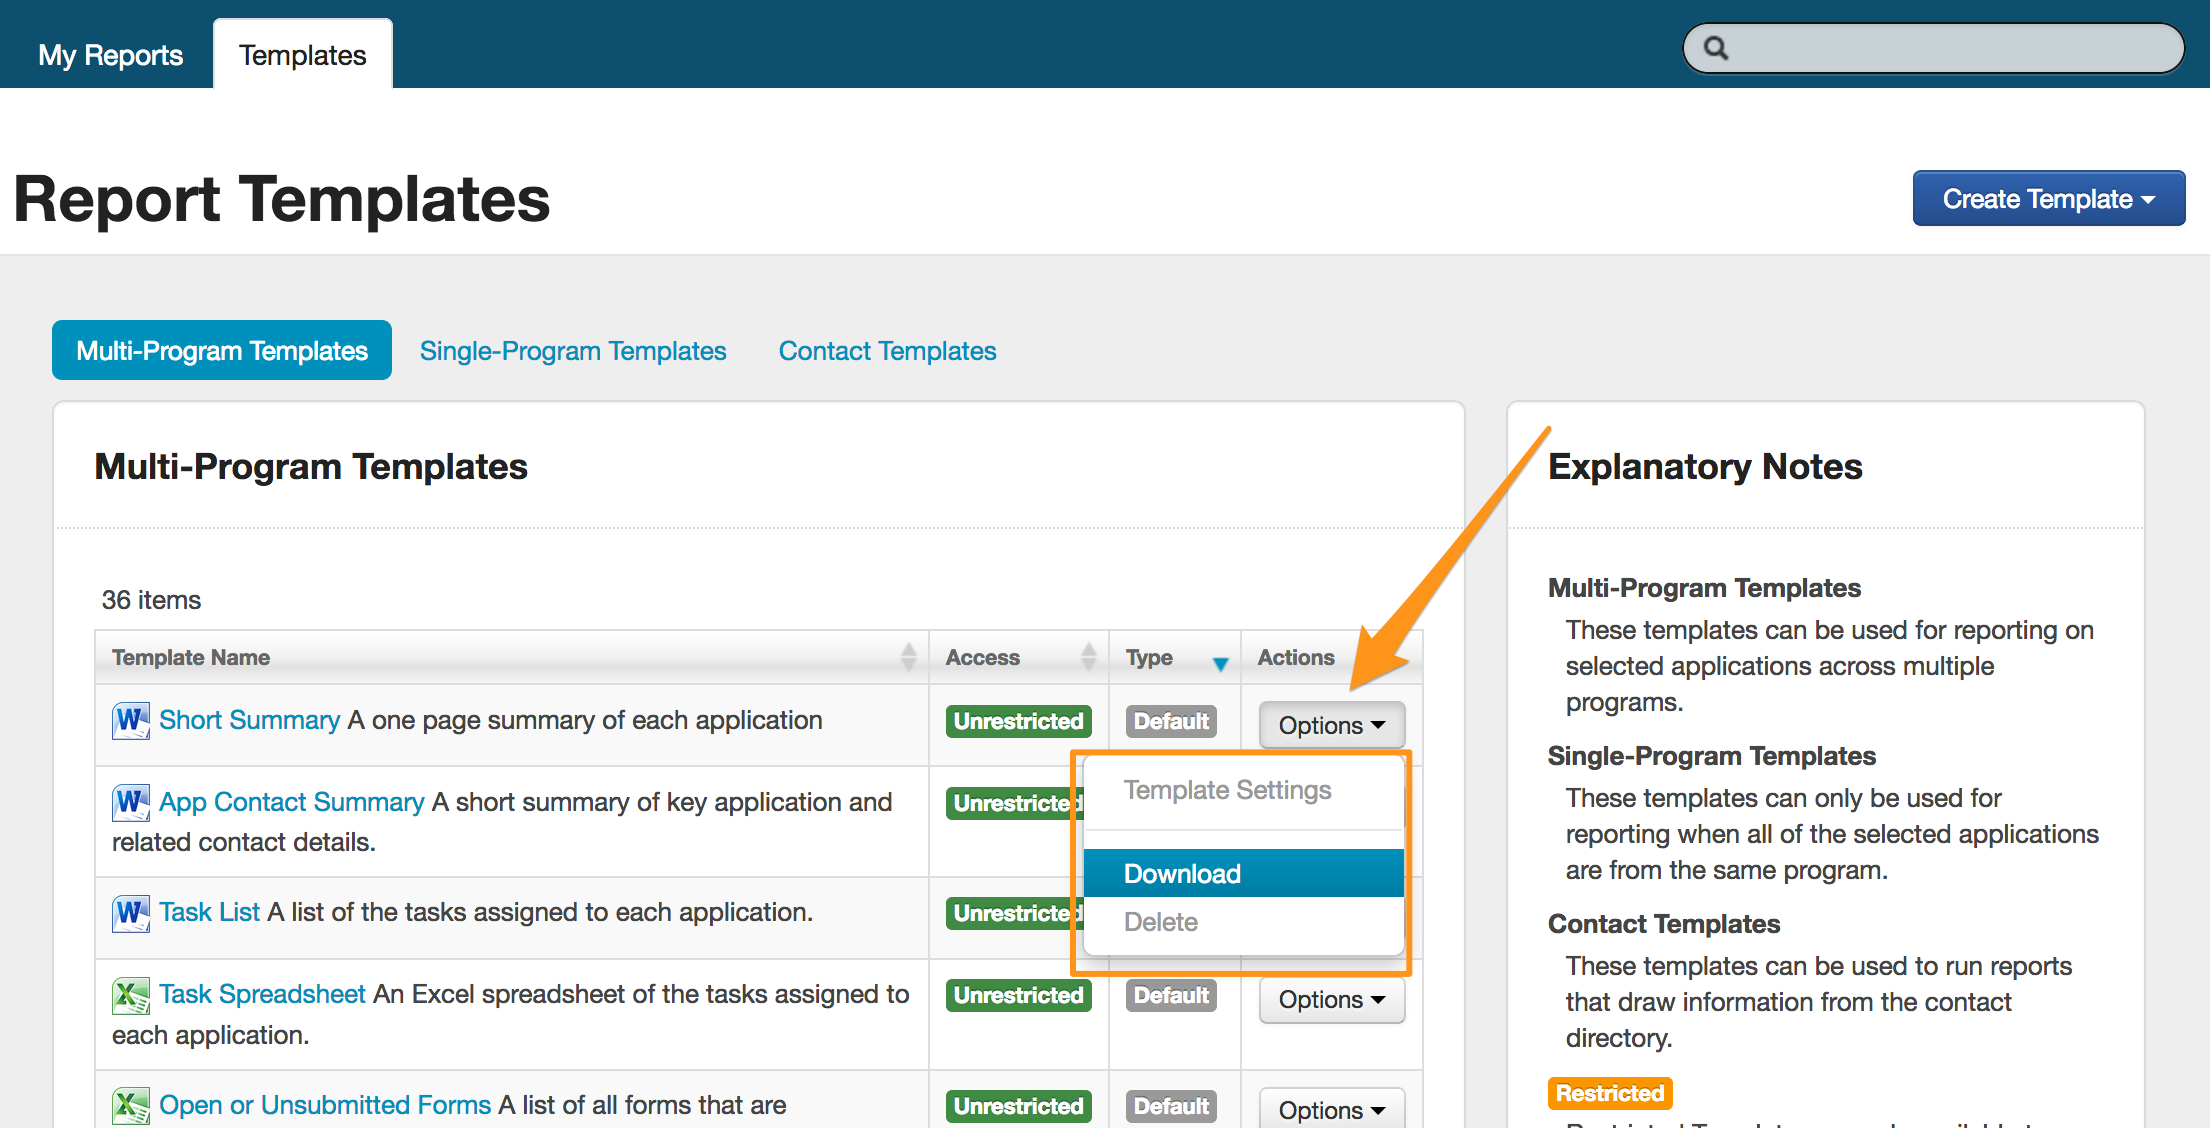
Download Shortcut:
Go to the Templates tab in the Reporting screen.
Next to the template to want to view, select Options and then click on Download.
Note: If you have not already created a template see Create Template to learn how.
Understanding Word Tags
Word templates use Tags to retrieve data from the SmartyGrants database. Most of these tags relate to specific fields in the database.
For example, if you have a question in your Application Form called "Project Title", your Template will include a Tag called <Project_Title> to retrieve the answers to this question.
Some additional tags do not relate to specific fields. Instead, they help the system to process your data in the correct order.
They all start with <Start_ or < End_.
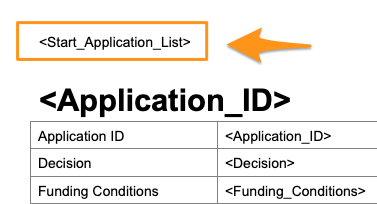
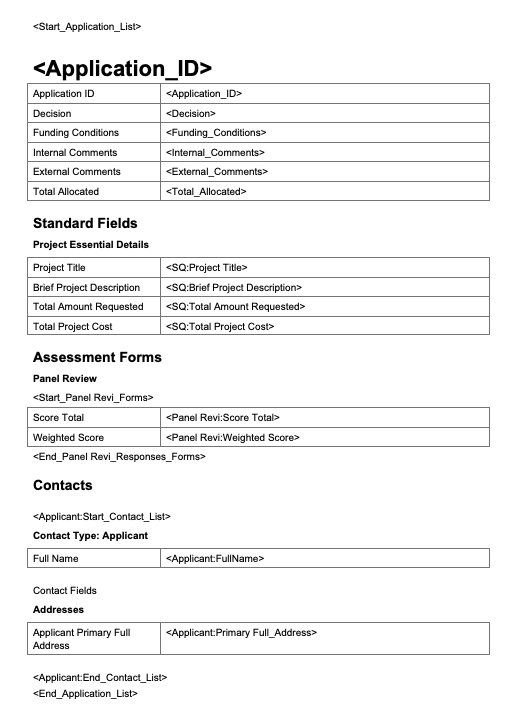
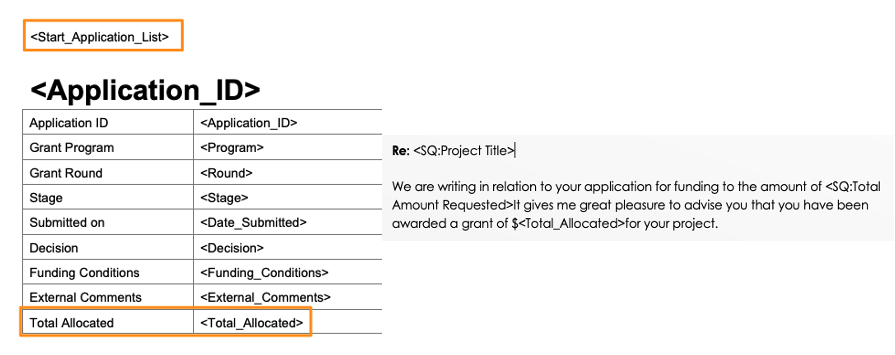
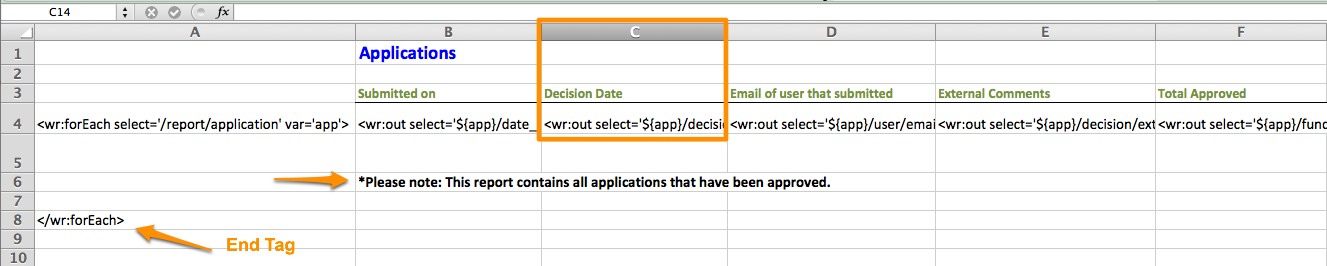
All Word Templates include the Application List Tags (see screenshot below).
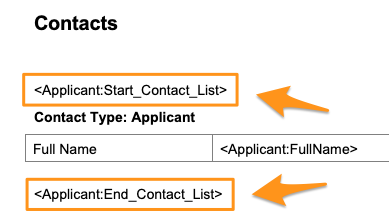
The <start> and <end> tags for other Forms, Funding Allocations, Payments and Contacts are only included if fields from those areas were selected when creating the template.
For example, in the report below, the Assessment form and Contact fields were selected when creating the template, therefore the <start> and <end> tag for them appear in the template.

Warning: <start> and <end> tags are critical to a report running successfully. Improper use will cause a report to fail, or to not generate the data you need. Follow the instructions below to ensure you use them correctly.
Customising your Word Template
There are two different ways you can customise your template:
Customise your existing template: Edit the formatting, heading colours, edit, cut and paste rows/columns/tags.
Make sure that the tags remain between the relevant <start> and <end> tags.
Copy tags into a different document: Copying tags from your template you just created into a different document, e.g. an existing letter or contract that you’ve created.
Make sure that you copy across the relevant <start> and <end> tags and the field tags that sit between those.
Once you’ve finished your customisation, you can then upload the document is then uploaded back into SmartyGrants either as a new template, or you can replace the existing template.
Instructions on both of the above methods are outlined below:
Option 1: Customise Existing Template
Once the template is open, you will see that by default the fields requested are generated into a table format. For example: field labels in the left column, and responses (tags) in the right column. A new table is generated in the document for each main area of the system you selected fields to be included from.
Microsoft Words' standard features can now be utilised to apply appropriate fonts, formatting, text alignment, formatting tables, headers/footers and so on.
The template and tags can be manipulated just like any other document. For example, the fields and tags do not have to remain within tables, nor in the order they were automatically generated. You can copy and paste the fields and tags to where you would like them to appear, so long as you remember to correctly position them in between their relevant <start> and <end> tags.
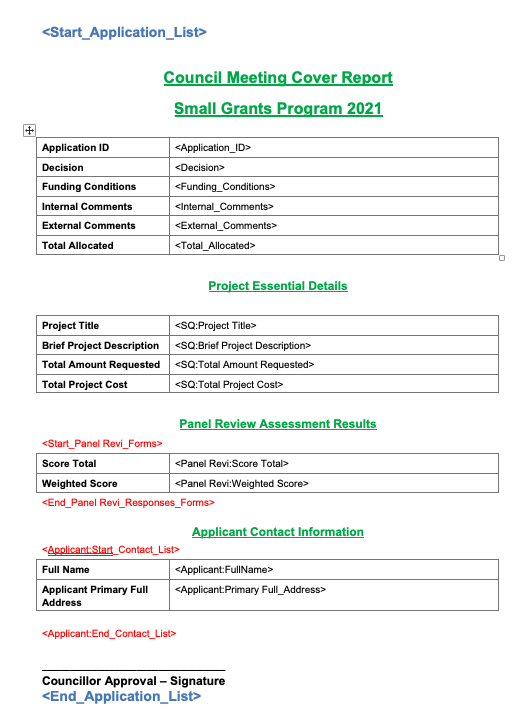
The above template screenshot has been manipulated in the example below to create a simple 'council meeting cover report'. You will note some headings have been changed, some rows have been deleted, and some formatting has been amended:
Once you have completed your amendments and are happy will the look of your customised Word template, Save the document to your computer. You will then need to upload the amended template back into SmartyGrants.
Option 2: Copy tags into a different document
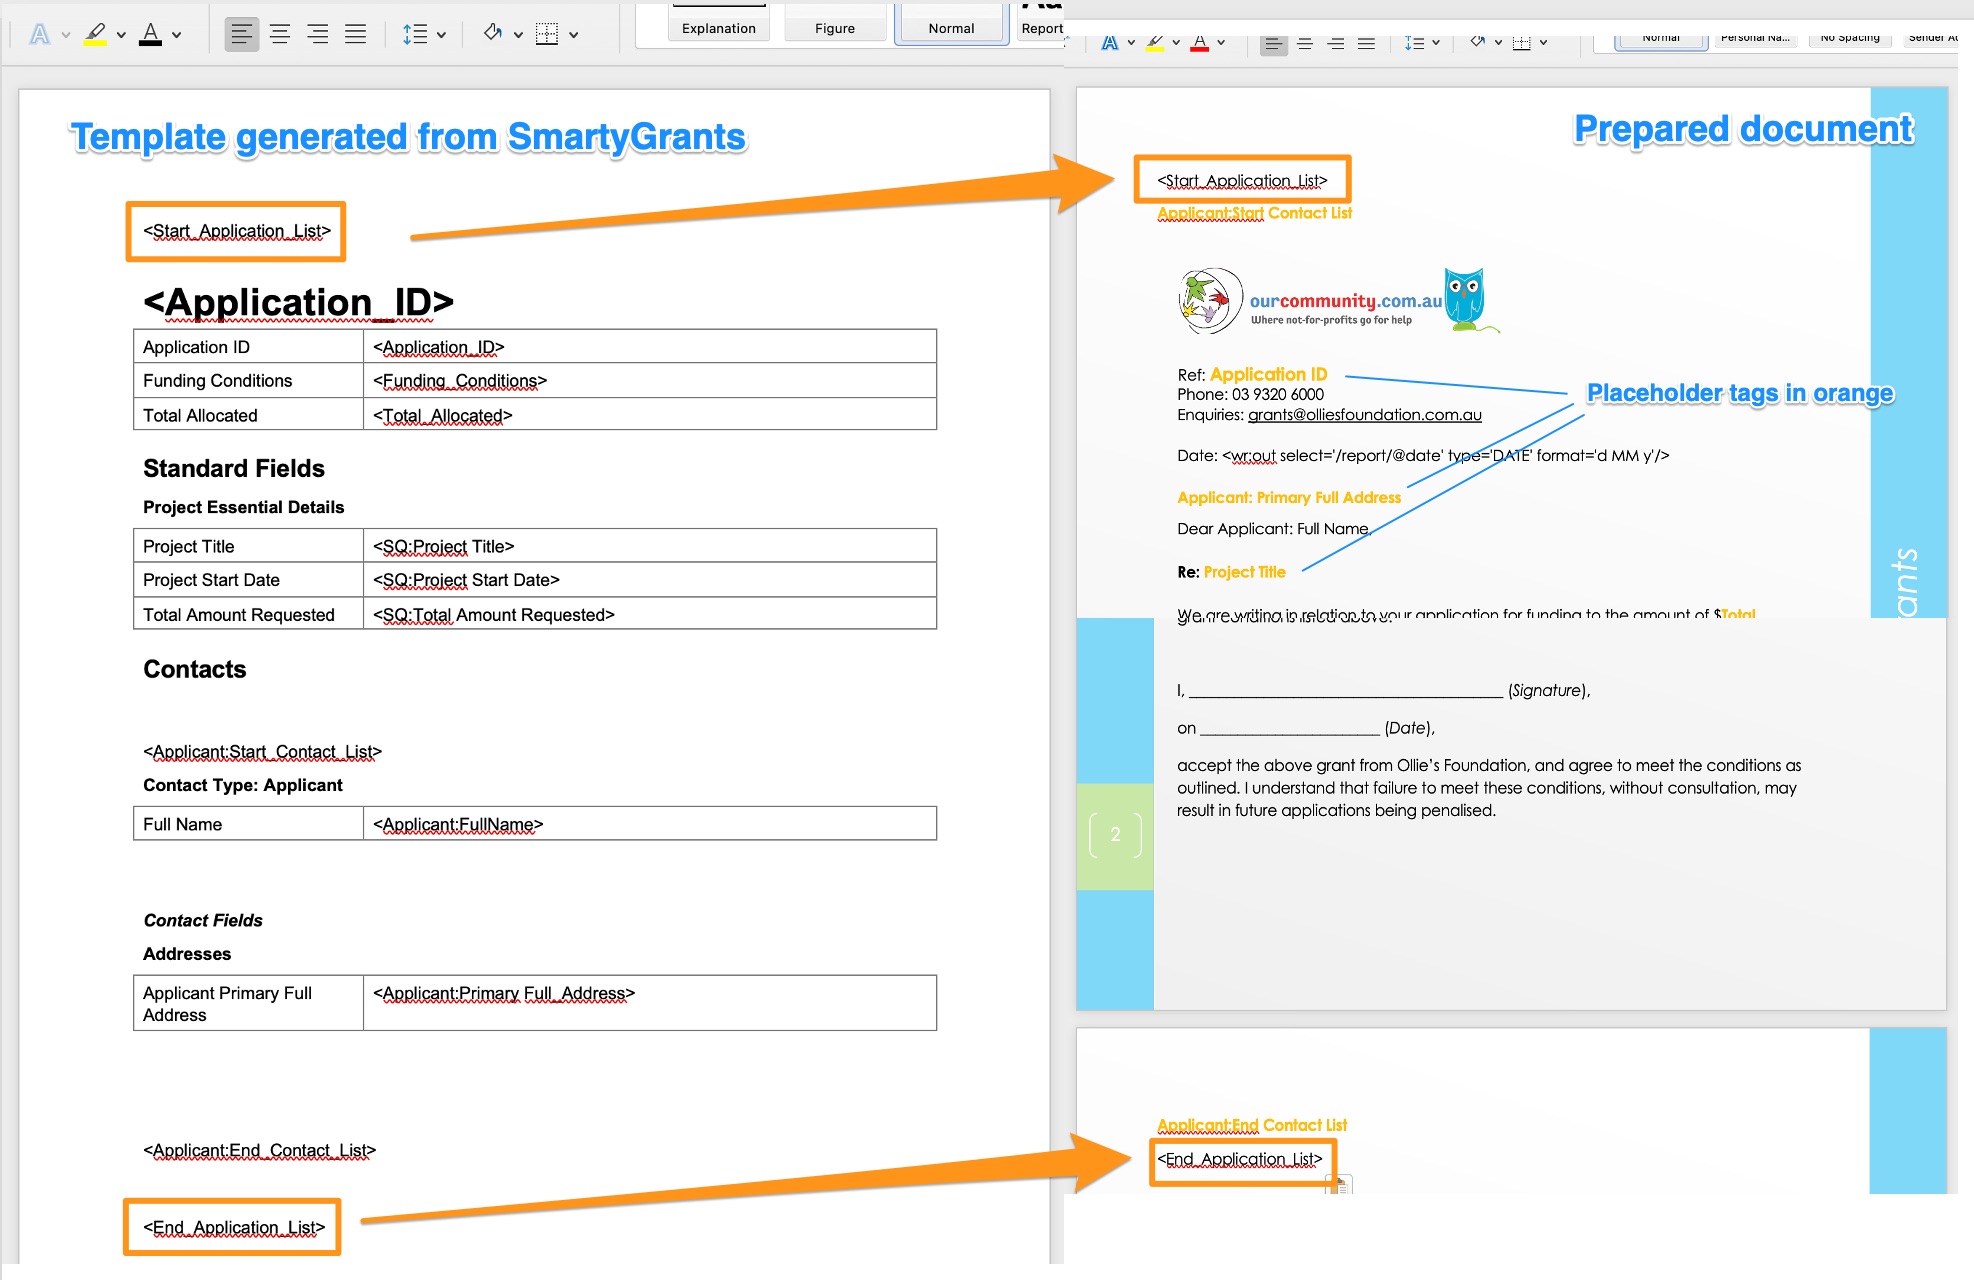
While keeping your original Template open in Word, start a new Word document or open up an existing document; for example, a letter or contract you wish to copy the tags into. This new document will eventually become your final, customised Template.
For this example, we will build a template for a Successful Letter.
We have first prepared an existing Word document to which we have added our letterhead, the plain text that will be included in the document, as well as placeholder tags (orange text in the screen shots below) which we will eventually replace with the correct tags from the Template.
Note: It is not necessary to pre-format by adding placeholder tags or stylising your Word document at this stage. However, it’s good practice to do it beforehand so that you don’t accidentally delete or rearrange tags when you format your document at a later time.
Copy and paste the <Start_Application_List> and <End_Application_List> tags from the original template into your new Word document. As you continue editing your document, everything you copy into the new Word file should go between these <Start> and <End> tags.
Now that the <Start_Application_List> and <End_Application_List> tags have been copied into the top and bottom of the customised template, it is now time to copy across all of the other required tags.
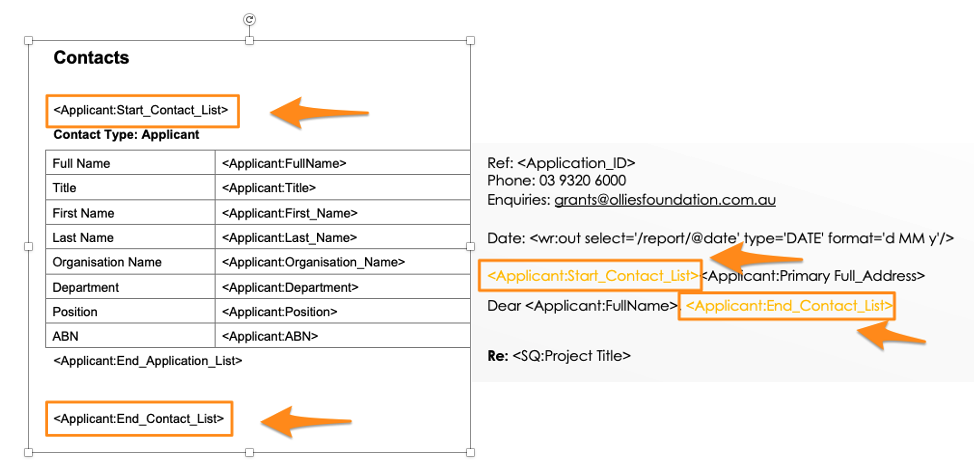
Depending on what information is required to be reported on, there may be other <Start> and <End> tags that need to be used. In this example Success Letter, we also need to report on information from the Contacts Directory - in particular, the Applicant's full address. This means we will also need to use <Start> and <End> tags for the Contact Fields, and as always, these <start> and <end> tags need to be on either side of the data tags.
To include these details, firstly find the relevant contact or organisation tags in the original template, then copy and paste those into the new document:
Next we want to include the date, a reference line, and an introduction. The date tag we have included here will populate with the date the report is generated. You can find examples of various date format tags here.
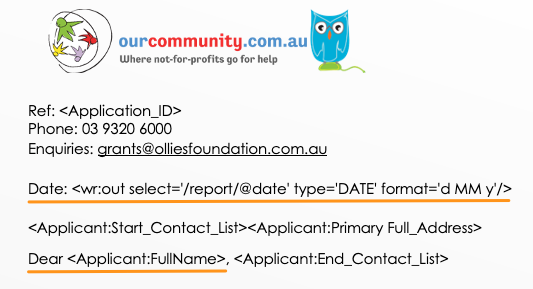
Note: Word has a special feature for including a dynamic date field. Since this differs between versions of Word, ask your IT department for help or give us a call for more information.
As next steps, we continue formatting our letter. In our next paragraph, we want to indicate the approved grant amount allocated. This field does not come from the Application Form - it comes from our Allocation & Payments area of SmartyGrants. However, as this field is accessed via the <Start_Application_List> and <End_Application_List> tags, we don't need to add any additional <start> or <end> tags for this field in our template. To understand why this works see Tag Rules to learn more.
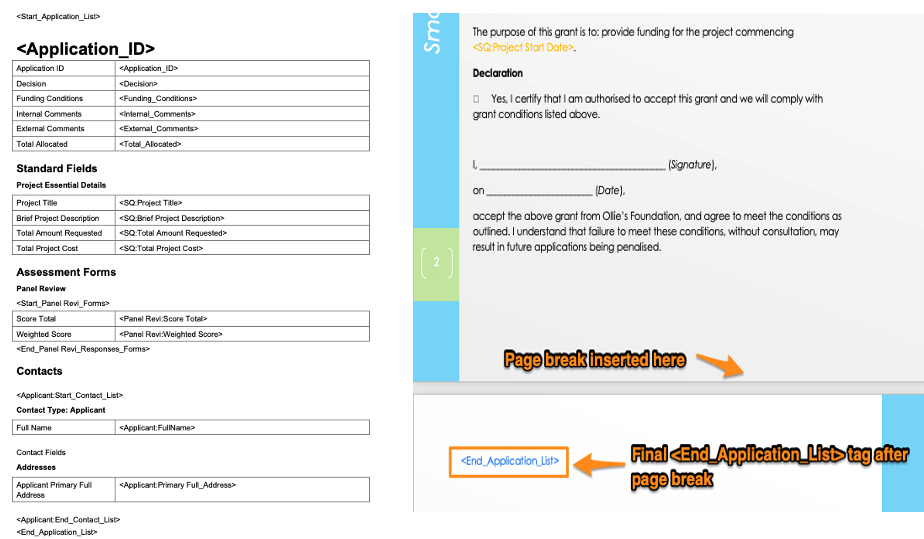
The rest of our letter is just standard text, so we simply type it in as we would a normal document, ensuring that if we need to reference any application record data, that we copy and paste in any necessary data tags in as we go (being very careful that we are using the required <start> and <end> tags for each source of data if applicable).
Important: If you want each of your reported Applications to start on a fresh page, include a Page Break just before the <End_Application_List> Tag. This will also prevent an additional ‘blank' page from being added to the report. In our example Successful Letter, this would be necessary as we don't want each Applicant's letter flowing mid-page into the next Applicant’s letter.
Apply finishing touches
You can now use Word's standard features to apply appropriate fonts, formatting, text alignment, headers/footers and so on.
You can manipulate the Template just like any other document, so long as you remember to correctly position the <Start> and <End> tags.
Info: Do you want to customise a Grid in your template? See Customise grid layout for more information.
Once you have completed your amendments and are happy will the look of your customised Word template, Save the document to your computer. You will then need to upload the amended template back into SmartyGrants.
Upload Template
There are a couple of ways you can upload a template: either upload the template as a new template, or replace an existing template.
Upload as a new template:
Go to the Templates tab.
Select Create Template, and then select the type of template.
Select the program (if applicable), and then name the new template.
Select upload an existing layout file from the Template Layout drop-down options.
Browse and attach your customised template and click on Create.
The template has now been uploaded.
Replace an existing template:
Go to the Templates tab.
Next to the template you want to update, click on the Options drop-down button and then select View Details.
You can either browse to attach the template, or drag and drop the template you wish to replace it with.
Confirm you would like to replace the template. Once confirmed, click Save.
Your template has now been successfully updated.
Info: Do you want to customise a Grid in your template? See Customise grid layout for more information.
Excel Templates
Open/Download your template
Understanding Excel Tags
Excel templates use what are known as code tags to retrieve data from the SmartyGrants database. Most of these code tags relate to specific fields in the database.
For example, if you are extracting the Decision recorded against an Application in SmartyGrants, your template will include a code tag under the Decision field heading in your template.
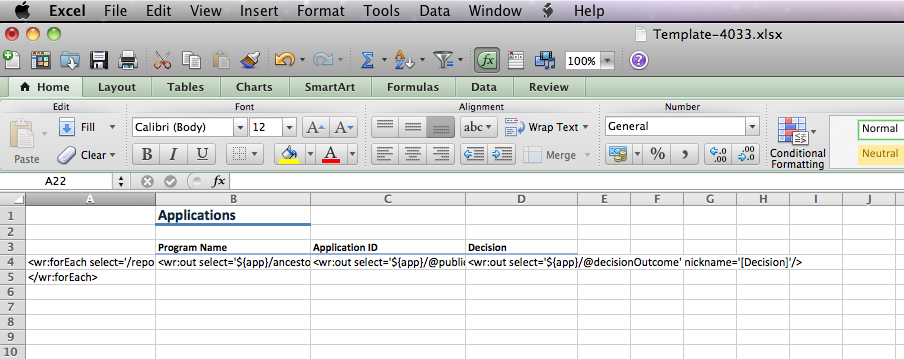
Some additional code tags do not relate to specific fields - instead, they help the system to process your data in the correct order. These code tags are automatically generated; you may notice them sitting in your Column A column in Excel (refer to the diagram below).
This particular data processing code tag is critical to ensuring a report generates properly. Note though that once the template is saved and the associated report is run, you will not see any of these code tags.
Important: Before customising a template it is important you become familiar with how templates work and rules that apply to customising templates. See Templates and Rules for more information.
Now that the template is open, you can begin to customise it. For example, you can change the font family, font size and colours, add a logo, change the order of the headings/columns, etc.
Warning: Regardless of the customisation you do, the tags must remain under the correct field headings AND the tags in Column A must remain the same.

In the example above, Decision Date appears in Column D. But I may want to move it to Column C for example, so that when I run the template to extract data, Decision Date always appears in Column C.
To do so, we cut and paste the heading, along with the tag from Column D, into a new column C. This change is shown in the example below - where the Decision Date heading and tag have been moved. This report will be able to run successfully because all the tags, formatting and extra notation sit between the <start> and <end> tags in column A.
Once you have completed your amendments and are happy will the look of your customised Word template, Save the document to your computer. You will then need to upload the amended template back into SmartyGrants.
Upload Template
Combining multiple tabs
This section explains how to combine information from multiple tabs in a template into one tab. While there are rules that effect how this is done, by using the <start> and <end> tags as well as the <data tags> correctly this is definitely achievable. Using the below techniques will allow you to combine all of the required information into one or more tabs for ease of viewing.
The initial template generated by the system will create a separate tab for each source of information. Each tab will include a unique start and end tag, as well as unique data tags for the selected information that you require. If you want multiple sources of information to populate into one tab, you will need to use the start/end tags, the data tags, and the headings from that other tab. You will also need to modify these tags to enable the system to find the required information.
To explain this concept, we’ll work through an example template. For this example, we want to create a template that requests information from both the assessment form and the acquittal form, and have these show in one tab.
Identifying tabs and Tags
To begin, we start by generating the initial template. This example's initial template has three tabs - the Application, the Aquittal form (Small Grants Progress Report), and the Assessment form (Panel Review Assessment Form).
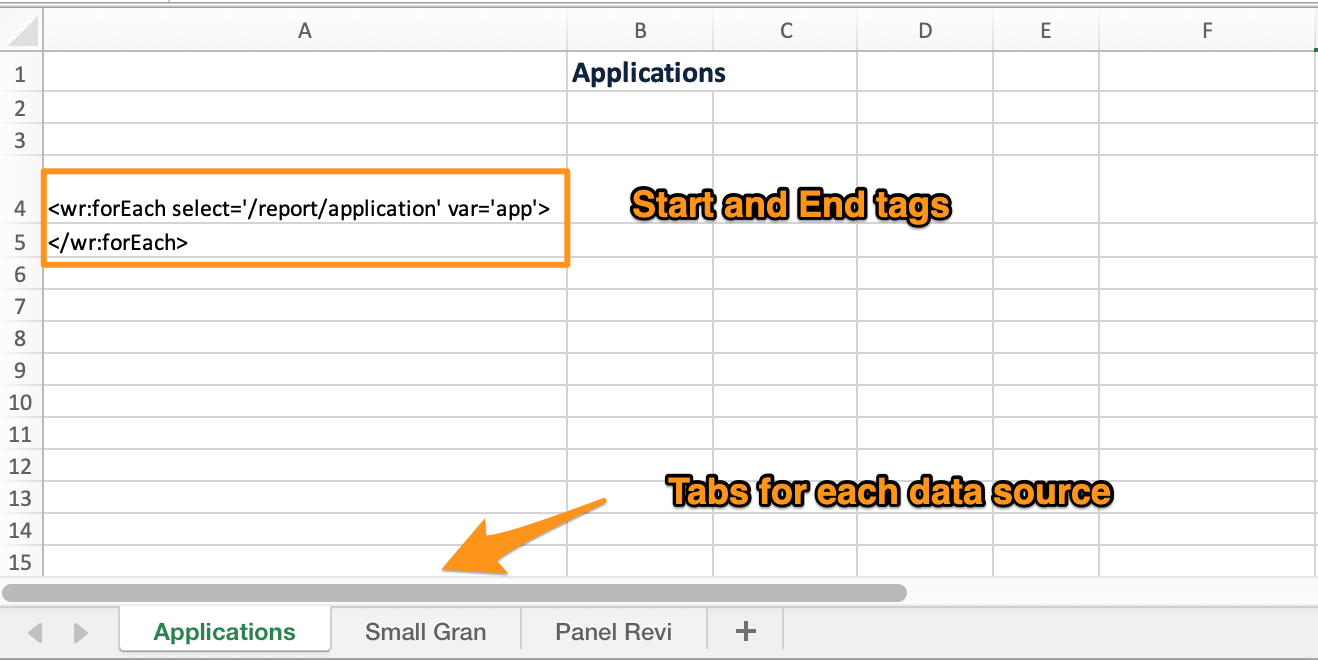
The first tab is the Applications tab. This contains the mandatory <start> and <end> tags to capture the data found in an application record.
Note: For all application based reports, the system will automatically generate the Applications tab.
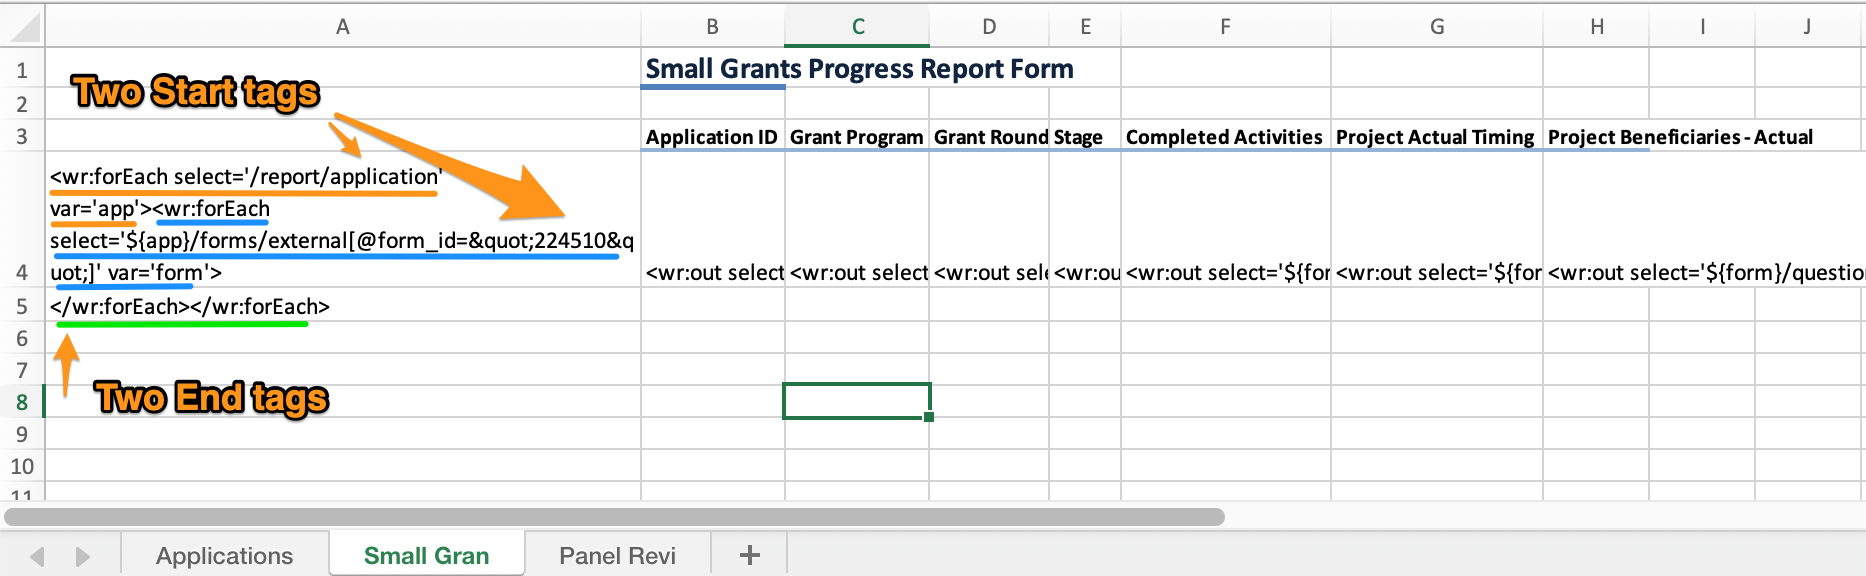
The second tab - Small Gran (stands for Small Grants Progress Reports) - shows the start tags and data tags for information from the acquittal form. The system will shorten the names so it fits onto the tab.
Please note that there are two start tags in cell A4, separated by carets ( < and > ) and two end tags in cell A5. You need an end tag for every start tag. In excel, end tags are always the same: </wr:forEach>.
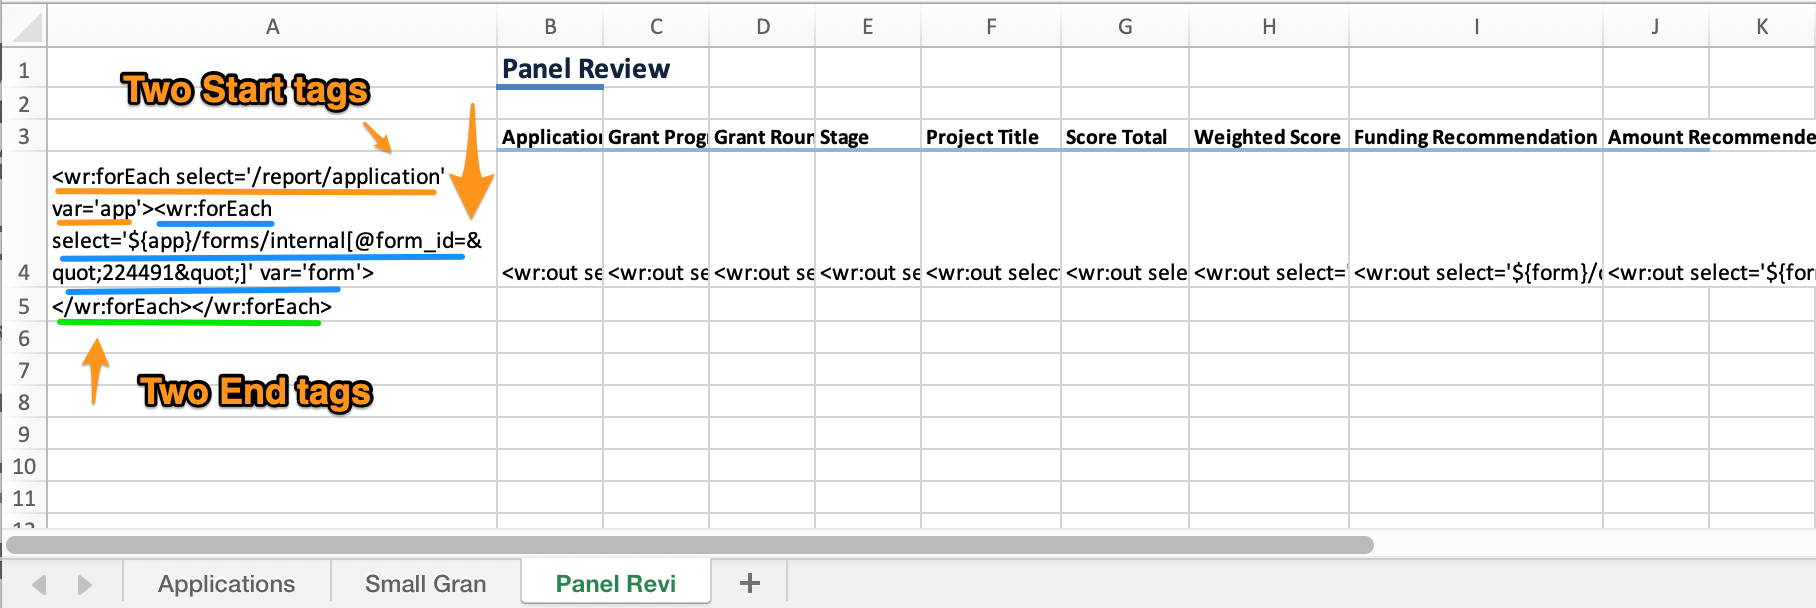
The third tab will have something very similar to the tab above; however in this case the form’s start tag will contain a Form ID that is completely unique to the Panel Review form.
Tip: Understanding how to differentiate tags is very helpful when creating more advanced report templates.
Regarding tags, let’s start with identifying the application start tag. Underlined in the image below you will see wr:forEach, which denotes this as a start tag, and var='app' which shows us that the information will be taken from applications. This section of the start tag will differ depending on where the information is coming from in the system
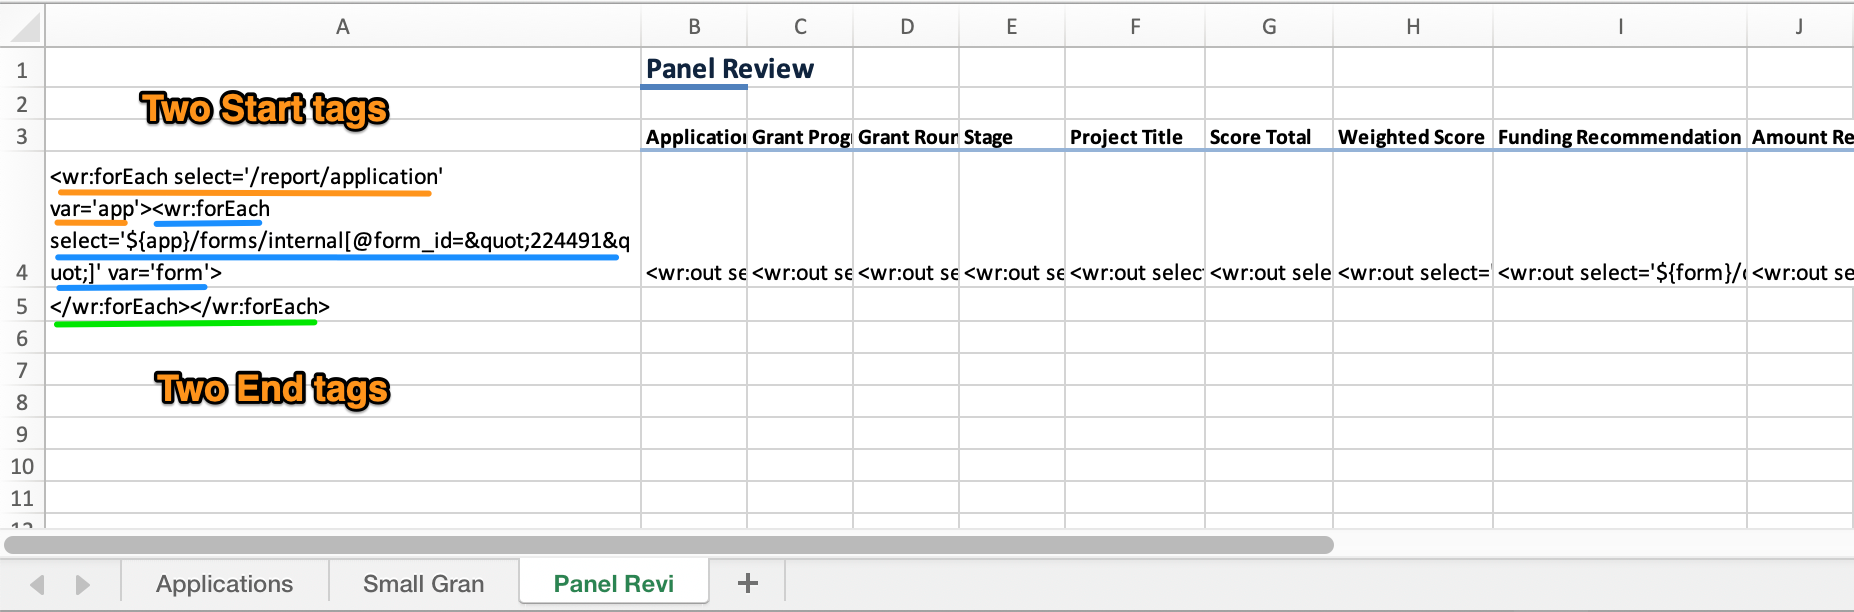
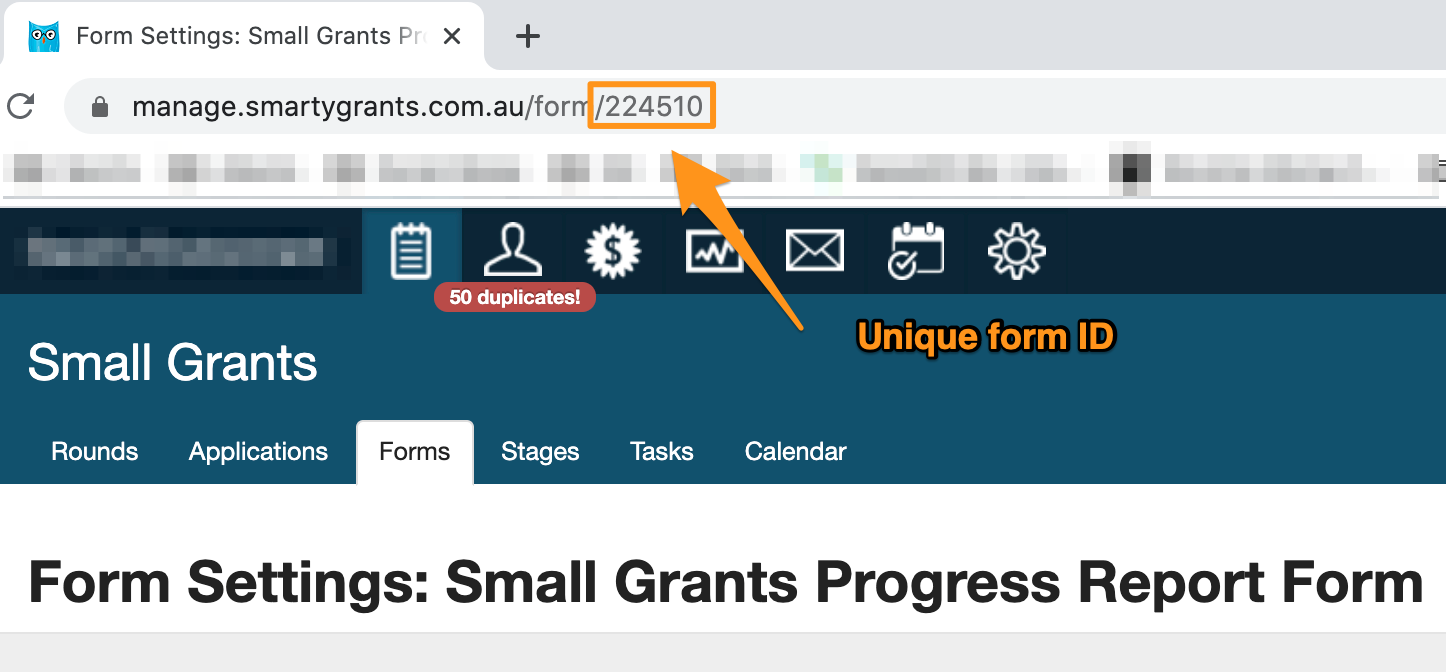
Next, let’s look at the start tag for the Small Grants Progress Report. Underlined is the wr:forEach showing it is a start tag, the var='form' showing this information is coming from a form and in the box is the unique form ID. For this form it is 245510.

Every form created in the system will have a unique Form ID. You’ll see this in the report tags (per the image above), but you’ll also be able to see this Form ID whenever you’re logged into the manage site and have the form open (https://manage.smartygrants.com.au/form/XXXXXX or https://manage.smartygrants.co.uk/form/XXXXXX) You can see an example below:
Now let’s look at the Panel Review start tag. If you compare the Panel Review start tag and the Small Grants Progress Report tag, you will see that they are almost identical as they are both form start tags. The key difference is the unique Form ID. For this form, the ID is 224491.

Format and copy/paste tags:
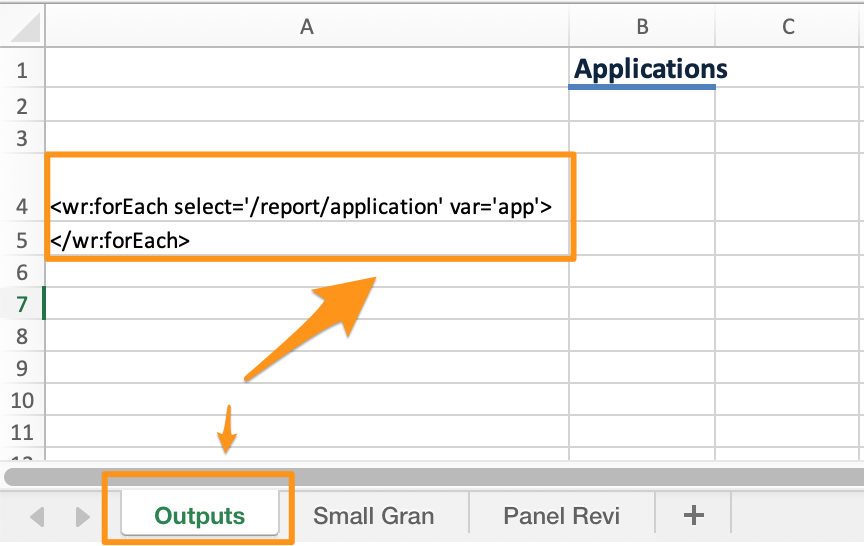
The first Applications tab is where we’ll be combining this information. We’ll re-name to Outputs.
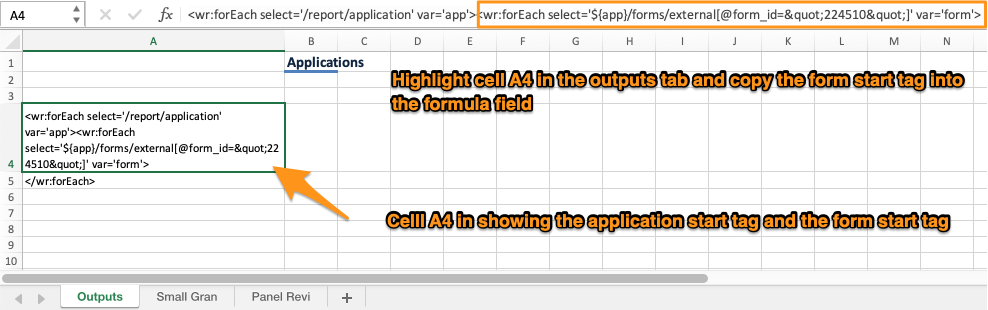
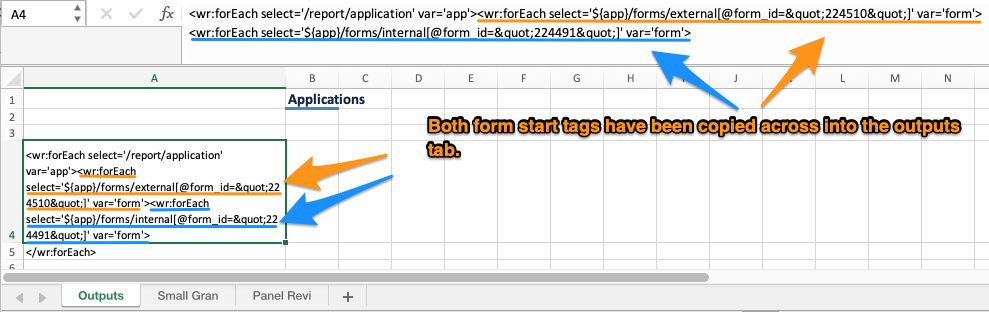
Then, we’ll take the start tags from the form tabs located in cell A4 and copy them across to cell A4 in our Outputs tab.
You'll notice that the application start tag is present in cell A4 in all three tabs and it is important that this remains in cell A4 in the 'Outputs' tab. You will only need one of each start tag. Be careful not to copy the application start tag each time!

In the first of the form tabs, highlight and copy the form start tag only from the formula field.
Moving back to the Outputs tab, copy the form start tag into cell A4 alongside the application start tag.
Repeat this process for any further tabs.
Now the template has the application and both form start tags in cell A4 of the Outputs tab. This will give you a total of three start tags in cell A4.
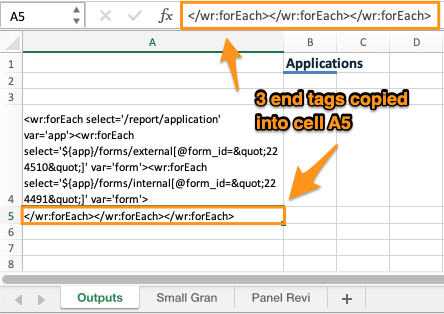
You need an end tag for every start tag in cell A5. As end tags are always the same in excel (</wr:forEach>) you can copy the existing one and paste it into the formula field with cell A5 highlighted. You will need to copy this twice to have a total of three end tags as there are three start tags in cell A4.
Now, copy the headings and data tags required into the Outputs tab. It is important to take both the heading and the data tag in this process. You need to make sure that all data tags are between the start and end tags, so copy the selected cells into B3. Note that row 3 is one line above where our start tags are so the headings are above the row of the start tags.

Highlight the required headings and data tags.
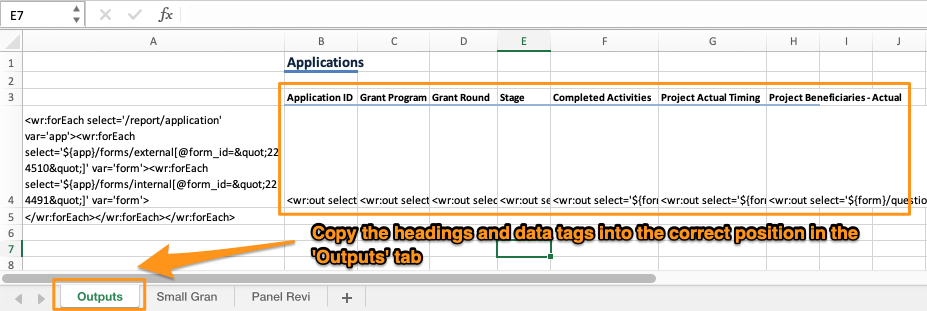
Copy the headings and data tags into the required position in the Outputs tab.
Repeat this process for the required tags from the any additional form tabs.
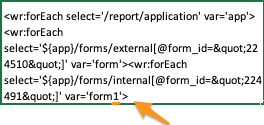
The tags now need to be edited. As this template uses two sets of form start tags and data tags, they need to be edited so that the system can distinguish between the two forms.
In this template the two form start tags have the same 'var='form' in them.
Small Grants Progress Report

Panel Review

Using two forms in a report template means that you will need to edit one of the start tags, and all of the data tags from that form, to differentiator it. To start, add a '1' to the start tag after the word 'form'.

Here's how that looks in cell A4 of the 'Outputs' tab in the template.
Now that this change has been made to the start tag, you need to make the same edit to all of the data tags for this form as well.
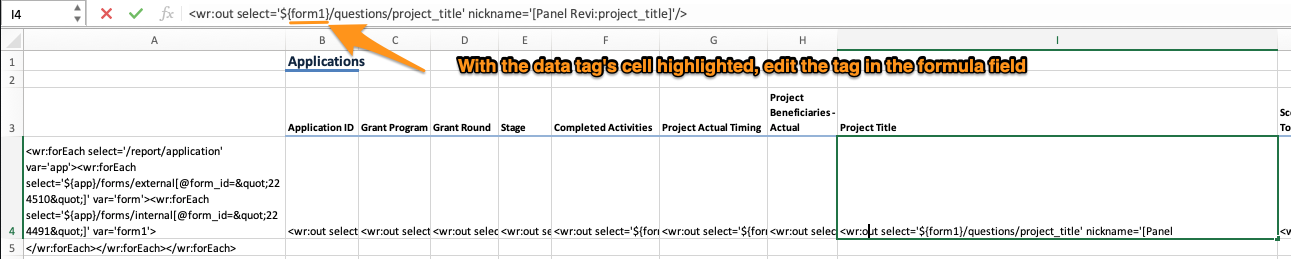
Here is the 'Project Title' data tag prior to editing.

And here after making the edit.

To make this edit, click into the data tag's cell and edit in the formula field.
You will need to do this for each of the data tags from this form to complete the template. Should you be creating a template using three forms, you will need to edit the start tags and data tags for two of them, three sets of edits will be required if using four forms, and so on.
You will then need to upload the amended template back into SmartyGrants by following the steps outlined here.
Customising Grid Layouts
By default, there are limitations in the way grids are presented in a report generated from SmartyGrants. However, you can customise the default layout in both Word and Excel to produce this data in a more desirable format.
Grids in Word
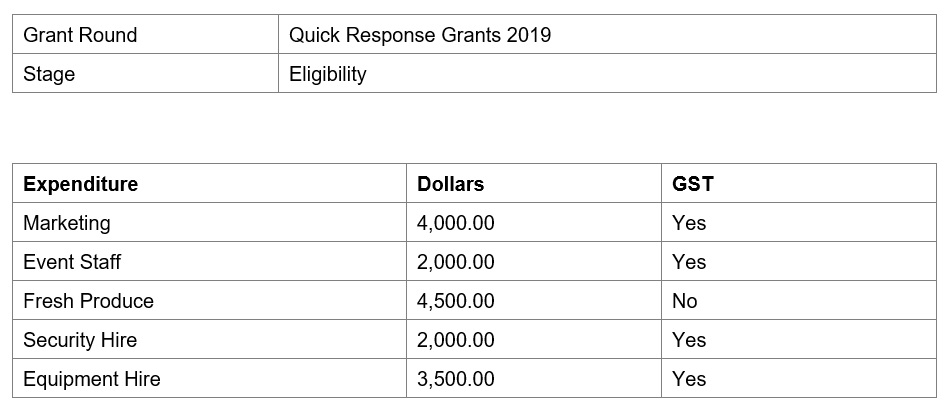
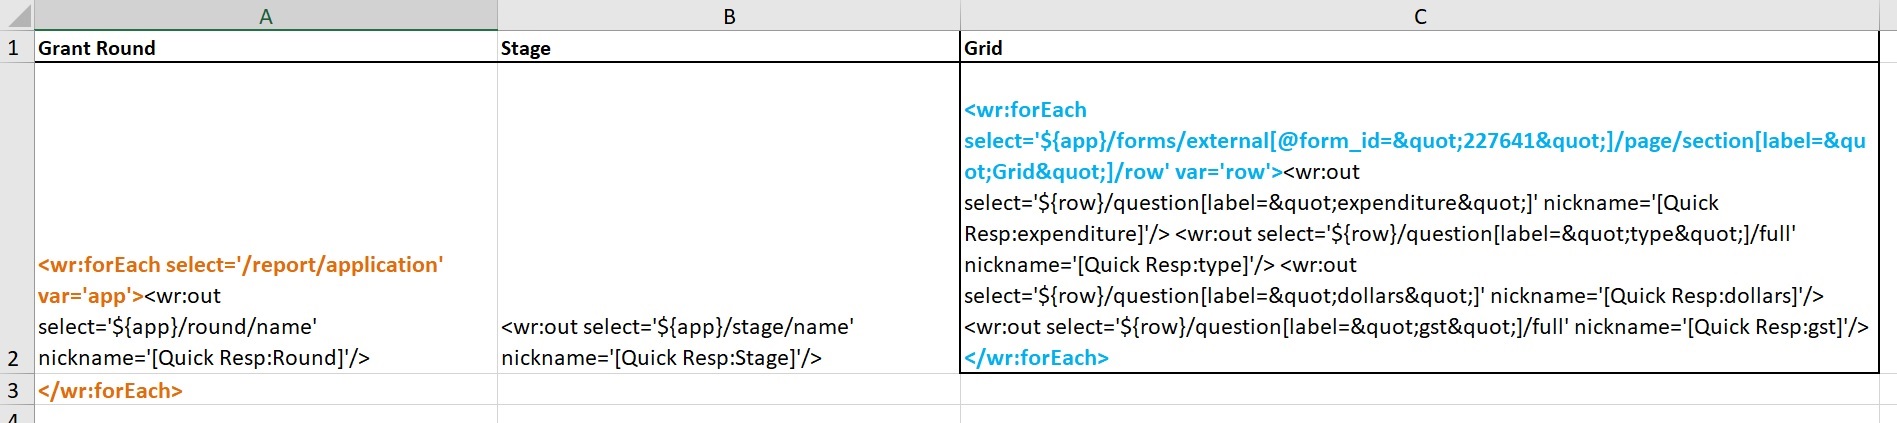
The following is an example of how a report template that includes a grid may look in Word by default:
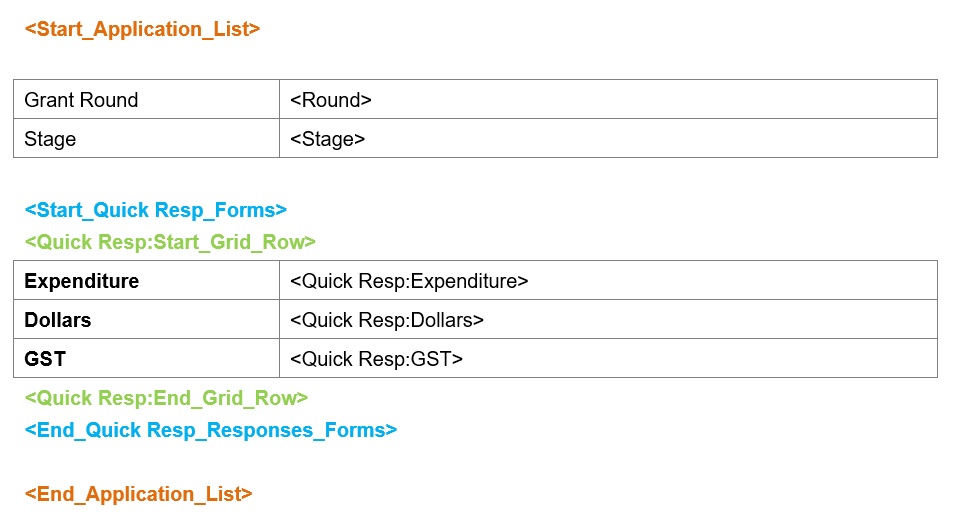
The report start and end tags in orange, the form start and end tags in blue, and the row start and end tags in green.
The following shows the default output of the template:
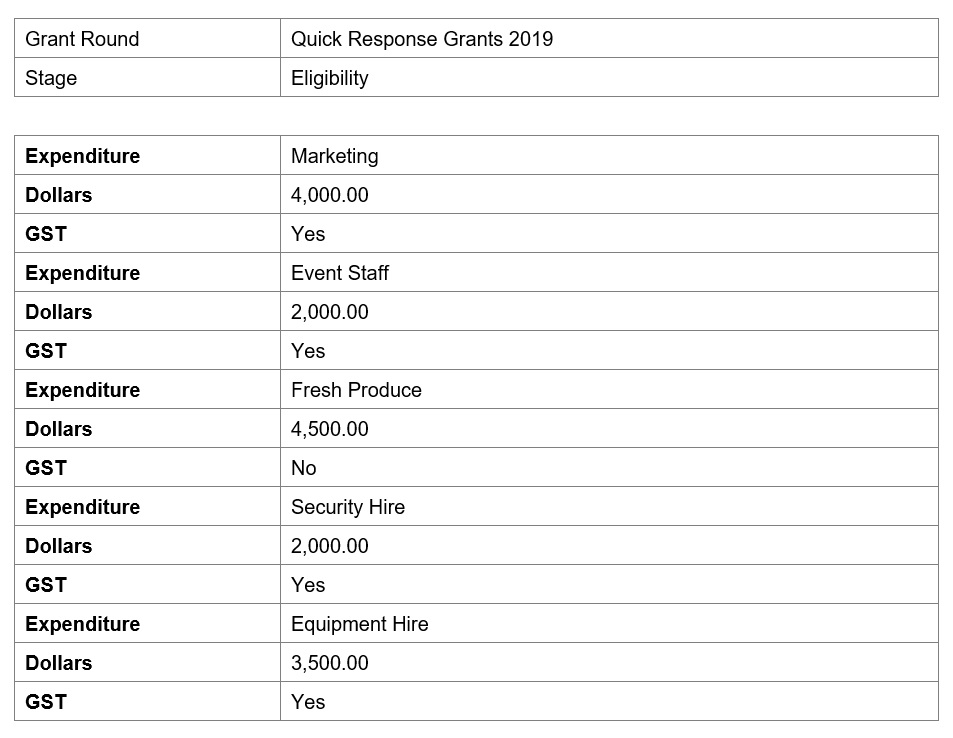
Note that the grid generates down the page. This is because by default, grid tags are bundled on top of one another, so the information appears vertically in the report output.
Ideally, if you would like this information to appear in a table format, you would set the report template up so that each tag is in a separate column.
The following is an example of how a report template that includes a grid may look in Word if modified:
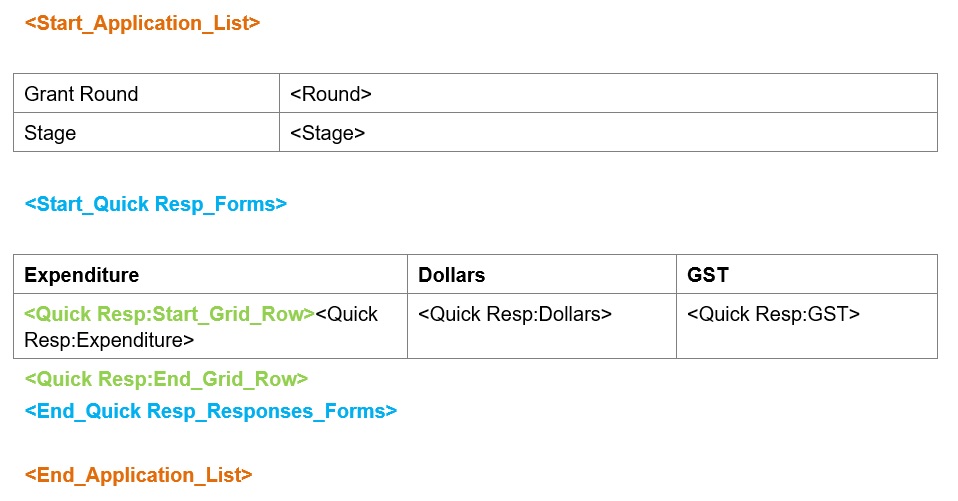
The report start and end tags in orange, the form start and end tags in blue, and the row start and end tags in green.
The following shows the output of the modified template:
Grids in Excel
The following is an example of how a report template that includes a grid may look in Excel by default:
The report start and end tags in orange, and the form start and end tags in blue.
The following shows the default output of the template:

Note that the grid generates in one cell. This is because by default, grid tags are bundled into one cell in the template (as indicated by the < and > symbols separating each tag in the cell), so the information appears in one cell in the report output.
Ideally, if you would like this information to appear in separate cells, you would set the report template up so that each tag is in a separate cell. If you wish, you could also create a column heading for each cell in the grid.
The following is an example of how a report template that includes a grid may look in Excel if modified:

The report start and end tags in orange, and the form start and end tags in blue.
The following shows the output of the modified template:

Important: When reporting on grid sections in Excel it is imperative that all of the relevant tags are placed in the final columns of the sheet. Please note that there can only be one grid section reported on per sheet.
Adding additional tags to existing report template
Should you have an existing template that you would like to update, you are able to do so. The steps to follow are:
Download the existing template.
Generate the required tags by creating a new template.
Copy the tags into the existing template, making sure that the correct <start> and <end> tags are copied across (if required).
Using numbered lists in a Word template
In a SmartyGrants Word report template, numbered lists may not behave as expected once the template is generated. Examples include numbered lists repeating unexpectedly, or numbers not being sequential. This is due to the different items of the list being formatted or styled differently. This can arise from copying and pasting items from one numbered list to another.
Example 1: Error with numbered list
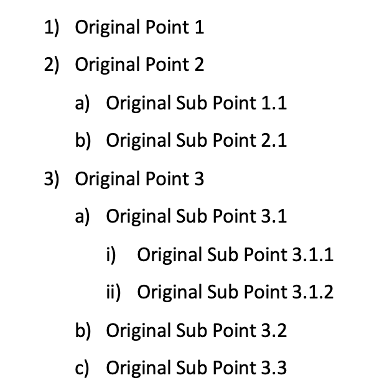
Here we have the original numbered list – 3 points, with multiple sub points under them:
Let us assume that we want to copy the last two points in the list to a different list.
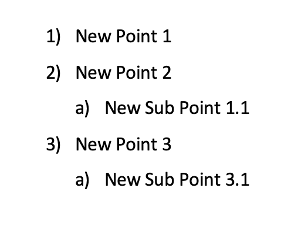
It may be that the two points are pasted into a blank unformatted line in the target document/list and the space is removed resulting in the list being in the incorrect order.
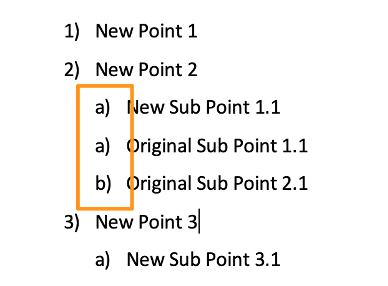
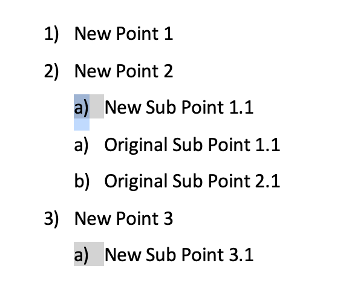
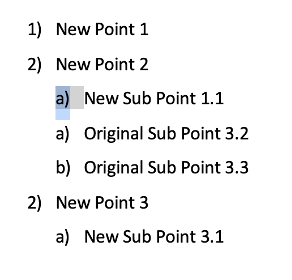
This results in Word creating two separate lists with different groups of points and subpoints despite appearing on the same level. To check this, click on the number/list identifier on the far left of the line. This will highlight all of the related sub points in that group. Given that we have done this in a way to create two separate lists, we see the two distinct groups at the 2nd level such as below.
Example 2: Copying list items from one list to another
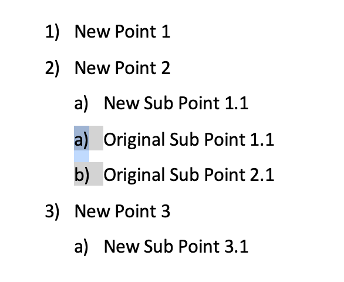
If copying items between different numbered lists create a new blank sub point, and paste the copied points at this point. The new sub point should show the next sequential indicator in the list. Word should merge both lists into 1 list. This can be checked by clicking the number/list identifier on the far left of the line. This will highlight all of the related sub points in that group showing all sub points at that level highlighted.
If there are any points at the same level that aren’t highlighted, then they belong to a separate group, and need to be corrected. Do not manually alter the number or letter in the list. This will not update the list functionality despite appearing to be correct.
Updating a list with incorrect formatting
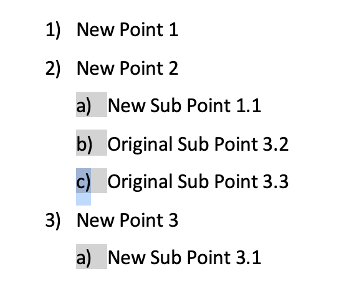
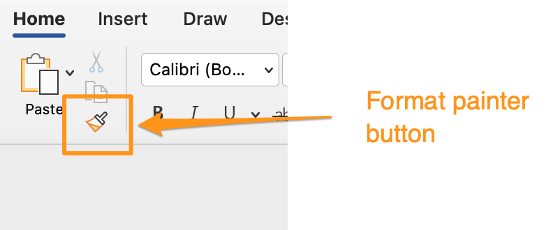
If you do have two separate lists, you can use the ‘Format Painter’ feature in Word to apply the numbered list formatting to another numbered list item.
Click on and highlight the list indicator for the line of a correct list item.
With this indicator highlighted, click the ‘Format Painter’ button in Word. This will copy the formatting for the currently selected indicator.
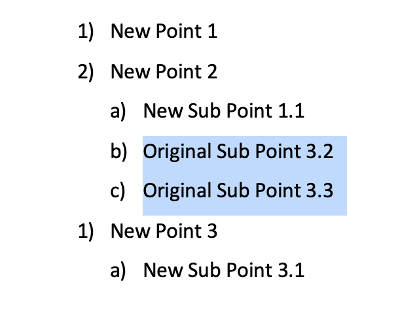
Highlight the entire line (or multiple lines) for the items for the incorrect items. Word will paste the copied formatting. After applying the correct formatting to each list item, click the list indicator again to confirm that all the correct list items are highlighted and are part of the one list item.
Pivot Tables
Excel allows users to insert Pivot Tables into the workbook which can help to calculate, summarise, and analyse data. They can help to see comparisons, patterns, and trends in your data. Please see below for some considerations when using Pivot Tables in your Excel templates.
When creating the Pivot Table, the ‘worksheet’ that the table is in must be to the right of the worksheet that contains the data used in the Pivot Table. By default, in Excel, when you create a Pivot Table it is placed in a new worksheet to the left of the existing worksheets. Knowing this, it is important to move the generated Pivot Table tab to be to the right of the data tab instead.

When selecting the data for the Pivot Table, select the column headers and the row containing the data tags.
When you aggregate some data in the template it will always use ‘count’ by default. If you want it to sum or take the average, you need to manually update this in the Pivot Table settings.