OData API Integration
Note: The OData integration requires an additional subscription fee. Please see our Pricing page for details. To have OData enabled on an instance, administrators can contact the support team at service@smartygrants.com.au.
What is OData?
OData (Open Data Protocol) is an open protocol with standardised descriptions of the data and data model for easy integration between data sources, applications, services and clients.
The OData connection allows SmartyGrants users to load data from their SmartyGrants account directly into software such as Excel and Power BI for reporting.
The SmartyGrants OData API provides the following functionality:
Seamless data integration with tools such as Excel and Power BI.
Simplifies data management and reporting.
Uses a standardised data format that many users are familiar with.
Examples of use
Generate comprehensive reports in PowerBI: Easily pull data directly from SmartyGrants to PowerBI to create detailed reports and dashboards.
Data analysis in Excel: Load data into Excel for advanced data analysis, pivot tables and visualisations.
Automate data updates: Set up automated data refreshes in your BI system to ensure your reports and dashboards always reflect the latest information from SmartyGrants.
Cross-system data integration: Combine data from SmartyGrants with other data sources for a holistic view of your operations.
Features
User-friendly: OData makes it straightforward to create and use data services using familiar web techniques which means quicker and easier development.
Handles large data: OData is designed to work well with large amounts of data allowing users to gather only the necessary pieces and handle big datasets efficiently.
Wide support: Many tools and software libraries support OData, making it easier to implement and use across different projects (e.g. Salesforce).
Easy integration: OData helps different software systems talk to each other smoothly, making it easier to combine and use data from various sources.
Consistency: It provides a standard way of accessing and managing data, so developers don’t need to create custom solutions for every new project.
OData data model
OData uses a relational data model. This means that data in SmartyGrants is organised and stored in various tables that relate to one another. The name of a table generally describes the subject of its fields/columns.
For example, a model contains a Payee table with fields:
payee id
full name
address
organisation name
AND a Payment table with fields:
payee id
amount
date
Tables can be joined through their common fields. In the above example by connecting the Payee and Payment tables through the payee id column, we can relate the data across both tables and draw insights.
See below for the Entity Relationship Diagram, OData Table Summary, and the Data Dictionary.
Entity Relationship Diagram and Data Dictionary
The available tables and the relationship between them can be seen in the Entity Relationship Diagram below:
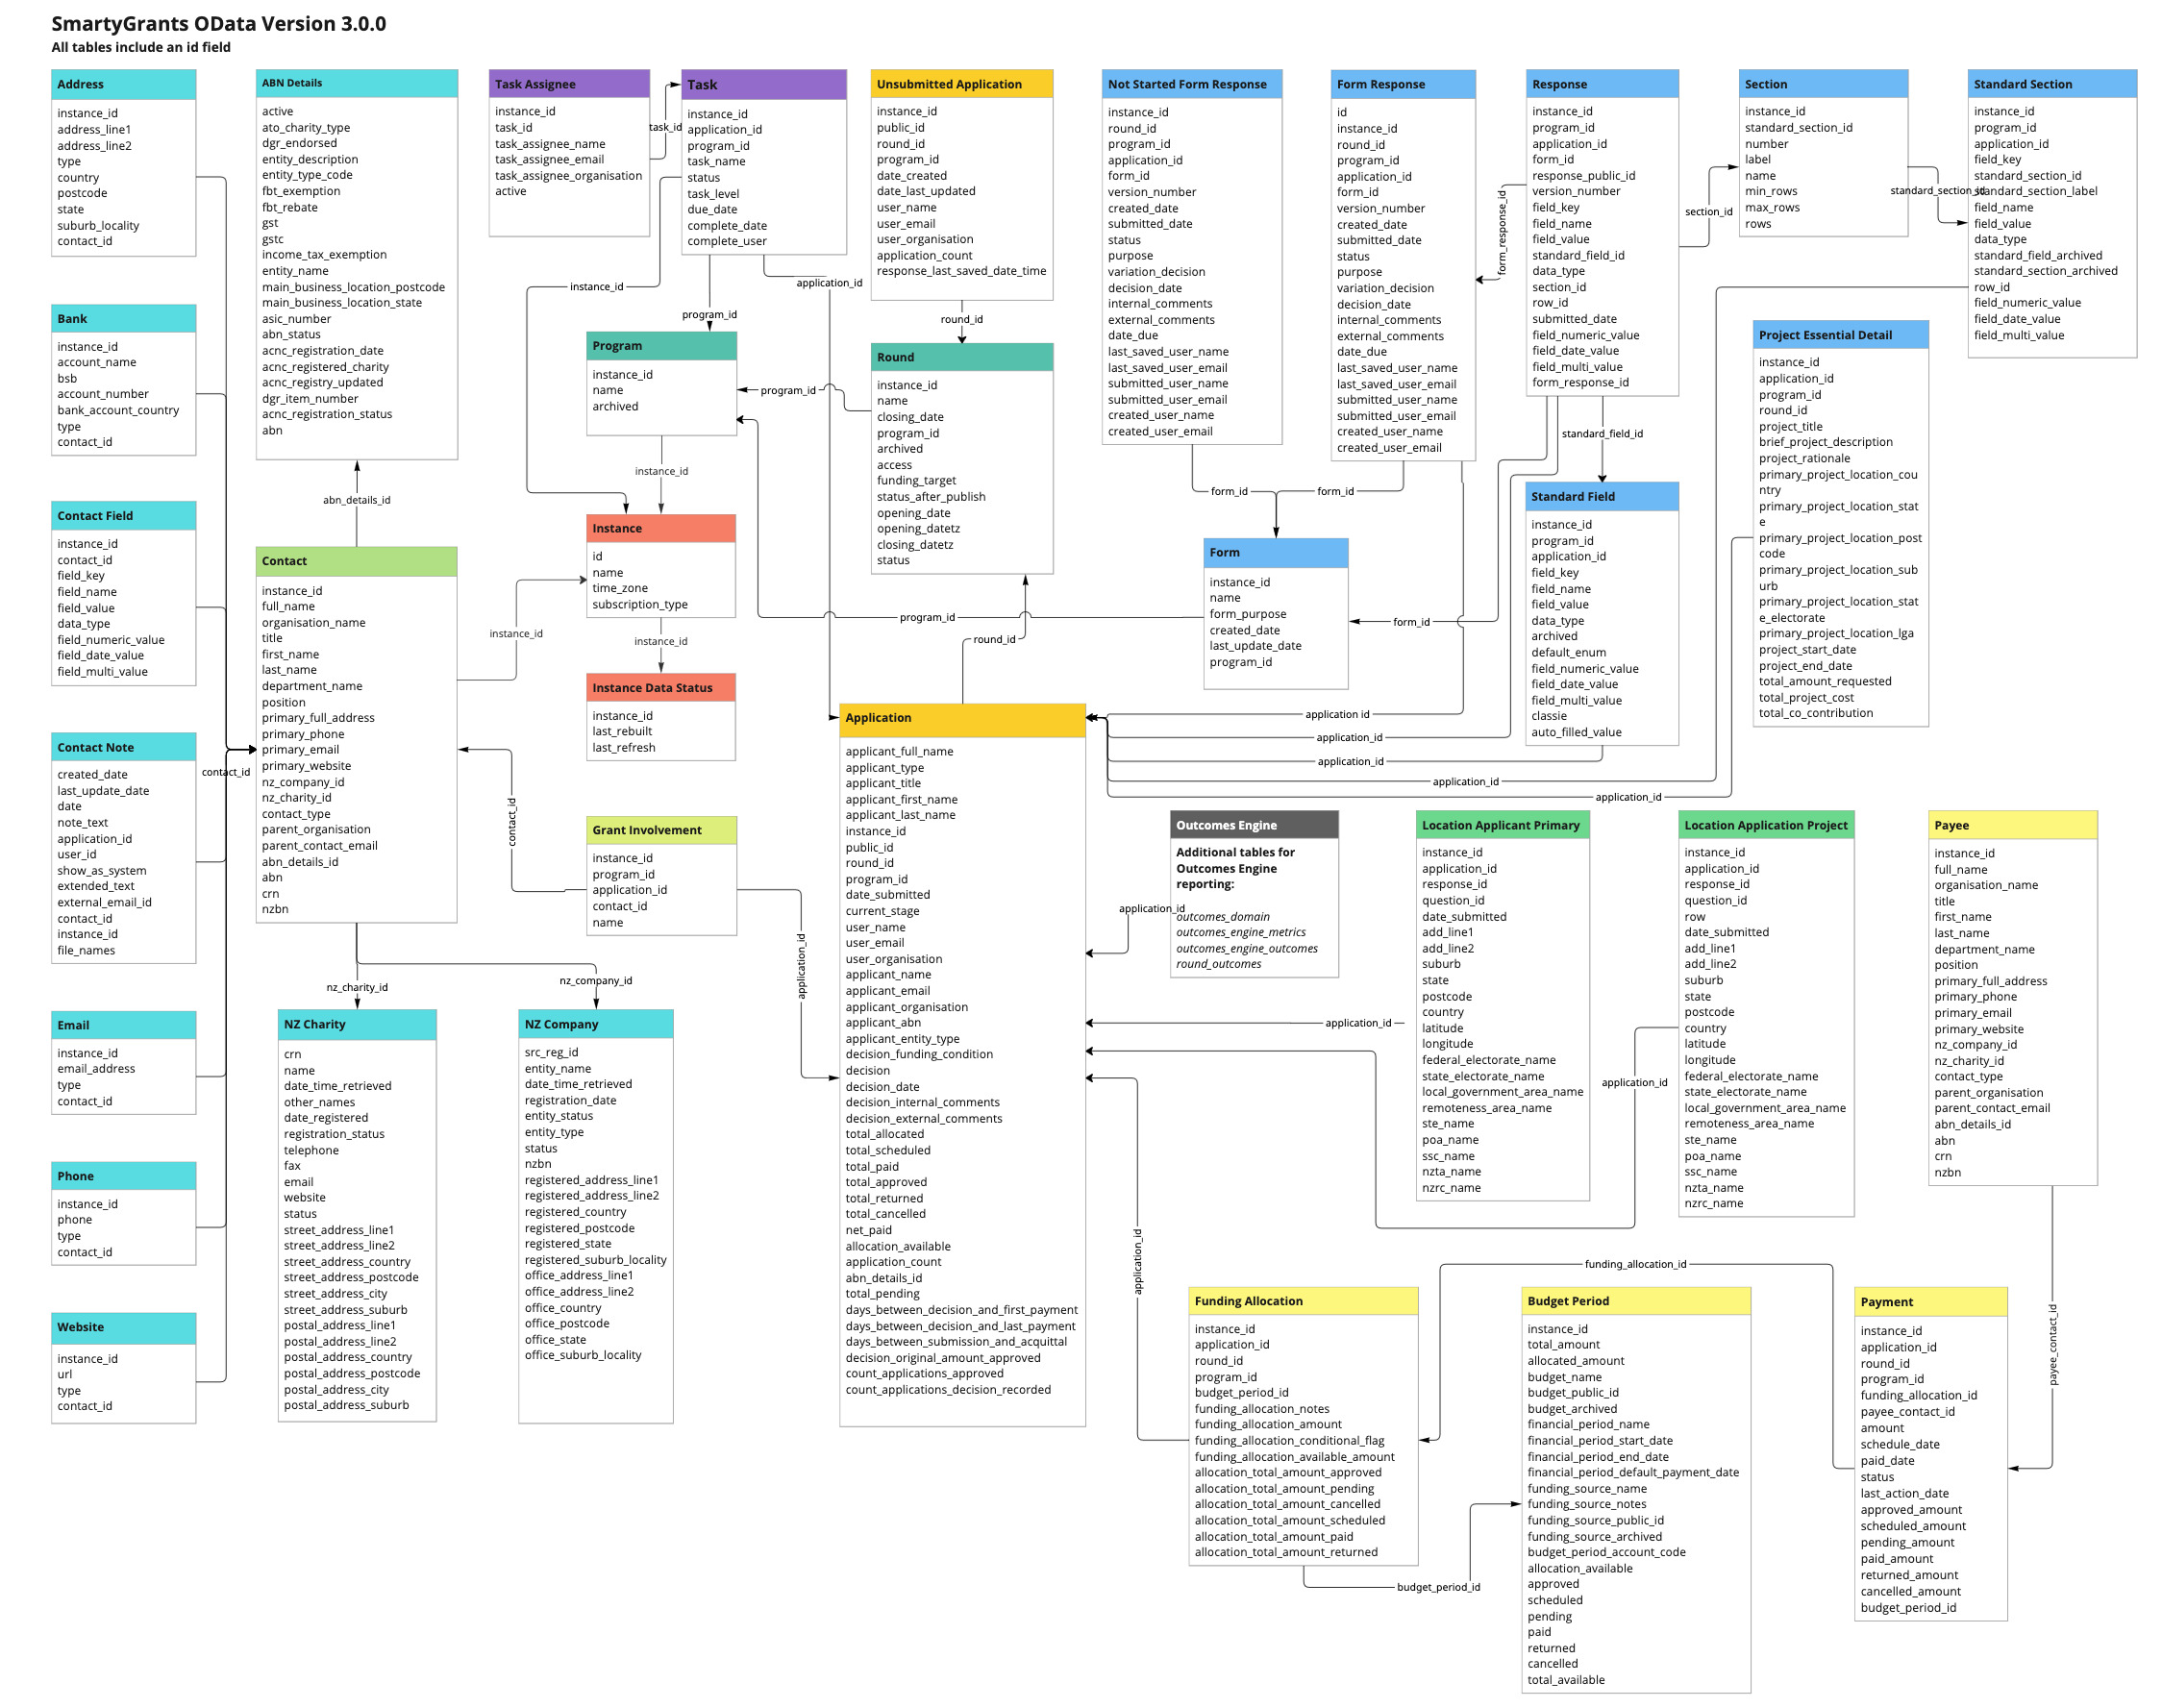
For further information on each table, take a look at the data dictionary for the OData API here:
Table Summary
The SmartyGrants OData service provides the below tables:
Table | Description | Parent Table(s) | Foreign Key(s) |
ABN Details | Australian Business Name lookup. | Contact | abn_details_id |
Address | Address information associated with a contact. | Contact | contact_id |
Application | Details of a grant application submitted to a round. | Round, Program | round_id, program_id |
Bank | Bank account details associated with a contact. | Contact | contact_id |
Budget Period | Budget and financial periods associated with an instance. | Instance | instance_id |
Contact | Contact information for individuals and organisations. | Instance | instance_id |
Contact Field | Custom fields associated with contacts. | Contact | contact_id |
Contact Note | File notes associated with a contact. | Contact | contact_id |
Email addresses associated with a contact. | Contact | contact_id | |
Form | Forms linked to a program. | Program | program_id |
Form Response | Forms which have been added to applications that are in progress or submitted. Contains data for only the most recently submitted version of a form response. | Form, Application | form_id, application_id |
Funding Allocation | Funding allocation associated with an application. | Application, Round | application_id, round_id |
Grant Involvement | Grant involvement of a contact in an application. | Application, Contact | application_id, contact_id |
Instance | SmartyGrants instance details. | None | |
Instance Data Status | SmartyGrants instance data status information. | None | |
Location Applicant Primary | List of locations from the Applicant primary address | Application | application_id |
Location Application Project | List of locations from project location question(s) or standard fields | Application | application_id |
Not Started Form Response | Forms which have been added to applications but not yet started. Once a form response is started or submitted the data will update to the form_response table. | Application, Round | application_id, round_id |
NZ Charity | New Zealand charity details lookup. | Contact | nz_charity_id |
NZ Company | New Zealand company details lookup. | Contact | nz_company_id |
Outcomes Domain | Outcomes Engine Domains associated with an Outcome or Metric. | Application | application_id |
Outcomes Engine Outcomes | Responses to the Outcomes Engine Default Standard Section for Metrics. | Application | application_id |
Outcomes Engine Metrics | Responses to the Outcomes Engine Default Standard Section for Grantmaker Outcomes. | Application | application_id |
Payee | Payee details associated with a payment. | Payment | payee_contact_id |
Payment | Payment details. | Funding Allocation | funding_allocation_id |
Phone | Phone numbers associated with a contact. | Contact | contact_id |
Program | Programs associated with an instance. | Instance | instance_id |
Project Essential Detail | Reponses to default standard fields from the Project Essential Detail Cateogry | Application | application_id |
Response | Response values from submitted form responses. Contains values and data from the most recently submitted version of a response. | Application, Form | application_id, form_id |
Round | Rounds associated with a program. | Program | program_id |
Round Outcomes | Outcomes Engine Outcomes associated with a round. | Round | round_id |
Section | Form section associated with a response. | Response | section_id |
Standard Field | Standard field values of an application. | Response, Application | standard_field_id |
Standard Section | Responses to a standard section in a form. | Section, Application | standard_section_id |
Task | Tasks associated with an application, program or instance. | Application, Program, Instance | application_id, program_id, instance_id |
Task Assignee | Task assignees. | Task | task_id |
Task Application | Tasks filtered to application tasks only. | Application | application_id |
Task Application Assignee | Task assignees filtered to application tasks only. | Task Application | task_id |
Task Instance | Tasks in an instance not associated with a program or application. | Instance | instance_id |
Task Instance Assignee | Task assignees filtered to instance tasks only. | Task Instance | task_id |
Task Program | Tasks not associated with an application or instance. | Program | program_id |
Task Program Assignee | Task assignees filtered to program tasks only. | Task Program | task_id |
Unsubmitted Application | Unsubmitted grant application details. | Round, Program | round_id, program_id |
Website | Website information associated with a contact. | Contact | contact_id |
Using OData with SmartyGrants
The OData service can be used in SmartyGrants for both single and multi-instance reporting:
Single instance reporting: users can connect directly to their preferred application without developer knowledge (e.g. Excel, PowerBI). This enables self-service reporting and customisation for their own needs, and immediate access to the latest data.
Multi-instance reporting: OData can support multi-instance reporting by setting up the same OData API key across multiple instances for a centralised process supporting enterprise-level analytics and business intelligence. If the same OData API key is used across different instances, a user can use OData to get data from all those instances in the same feed. This can help facilitate complex data transformations and aggregations.
Note: The use of an OData API key alone does not grant access to any data in SmartyGrants. In order to access multi-instance reporting, you must be a user with “Administrator” access across each instance. This ensures that users are only able to access data they would otherwise access directly in SmartyGrants. For example, if an organisation has two accounts: Instance A and Instance B, and the same API key is used for both, a user with access to only Instance A will only see data for Instance A, even though the API key is also valid for Instance B. A user with access to both instances would be able to see the data from both instances using this authentication combination.
Accessing OData (Authentication)
To access OData, users must have both “Administrator” access to the account and an OData API key. Users access the data using their username and password and the OData API key. An OData API key on its own will not grant access to the data.
Info: OData is a paid feature in SmartyGrants. Please email service@smartygrants.com.au to learn about pricing and how to enable OData in your account.
OData API key
If OData has been enabled, your account settings will contain an API key. This is a 40-character string identifying your organisation’s account.
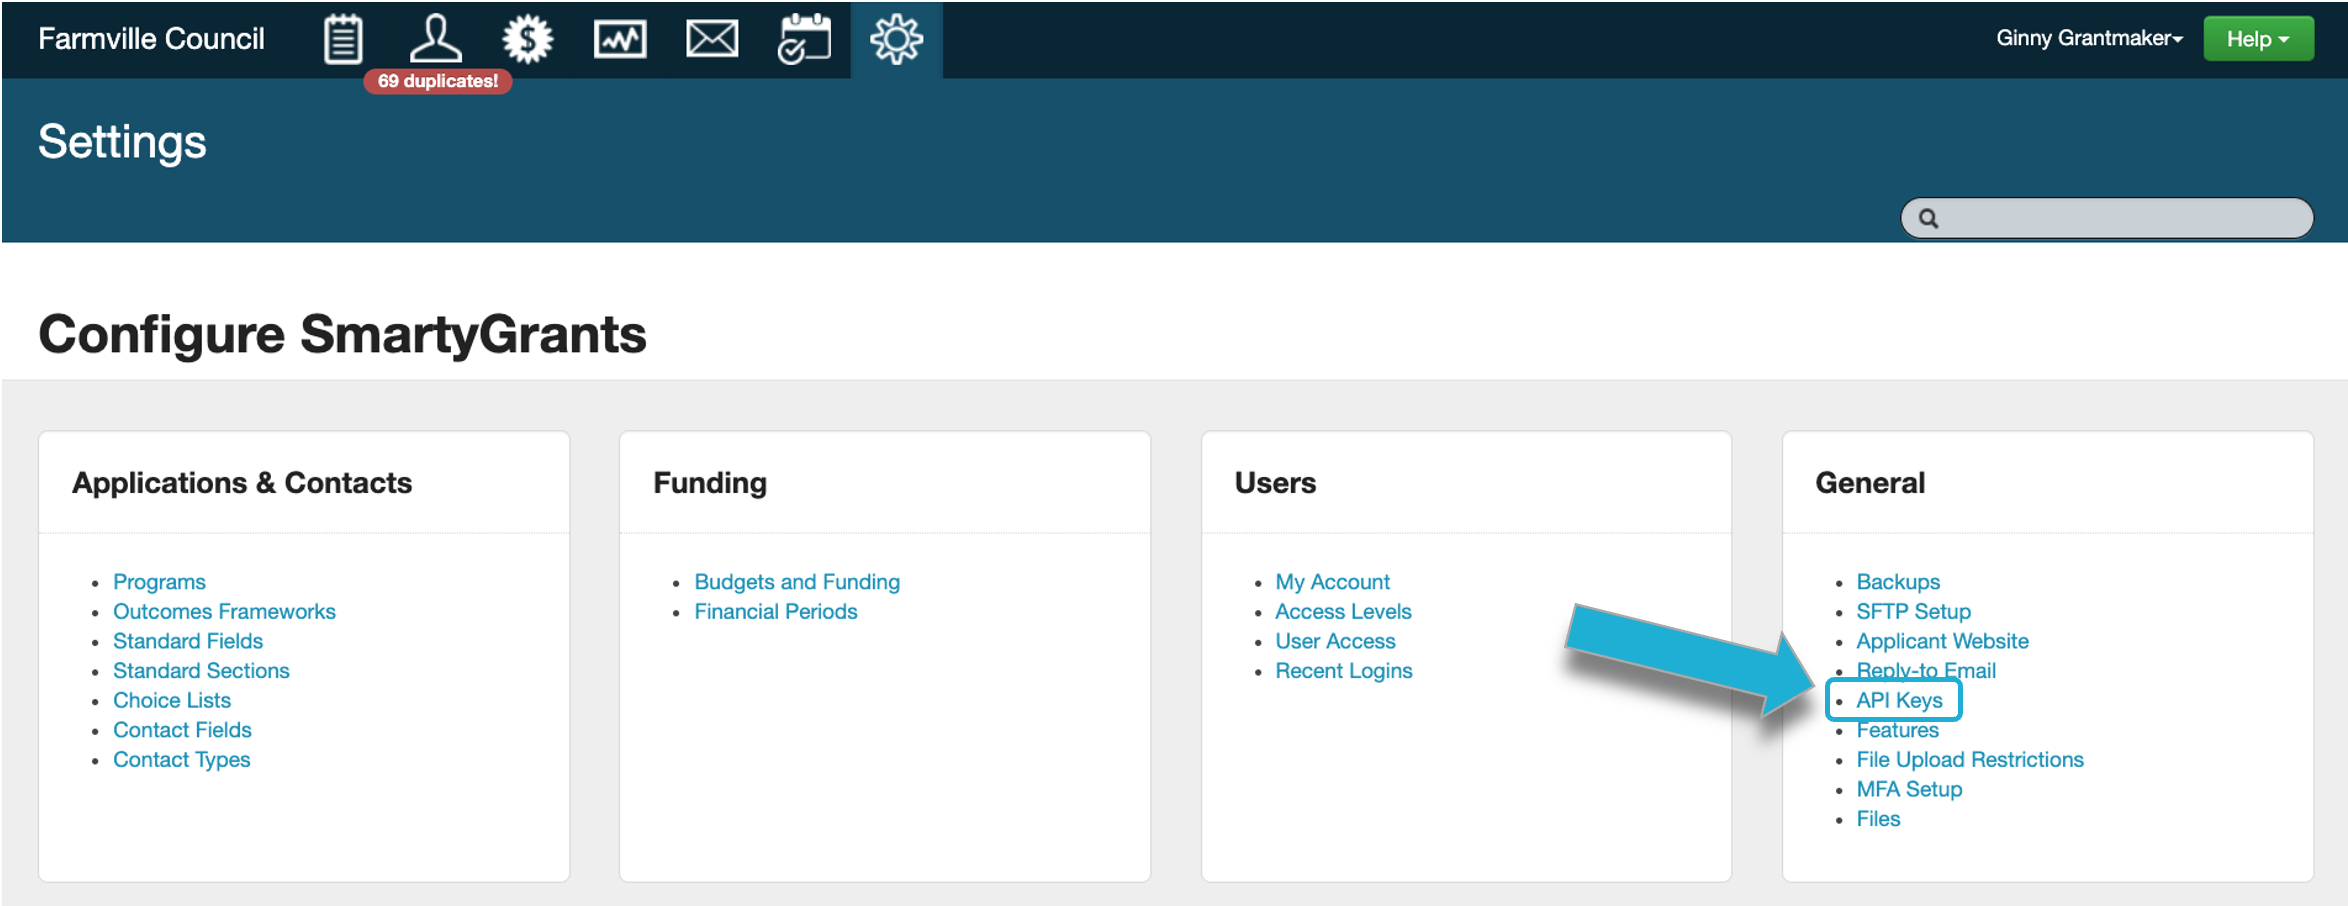
Find your OData API key by navigating to Settings > General > API Keys:
Info: If you do not already have an API key, request one via service@smartygrants.com.au.
The OData request URL and filtering
The OData Base URL needed for the connection is: https://bi.smartygrants.com.au/api/odata4/service/v1/.
To access metadata showing entity fields and relations, use the request URL: https://bi.smartygrants.com.au/api/odata4/service/v1/$metadata.
The request URL can be edited to filter the data down.
You can access data for a single entity by adding the entity’s name to the end of the request URL: https://bi.smartygrants.com.au/api/odata4/service/v1/{entity}.
For example, to access the entity “application”, you can use the following URL: https://bi.smartygrants.com.au/api/odata4/service/v1/application.
You can also view data for a single record by adding the “id” inside brackets.
For example, the URL below will only show application data for the record with “id” 70394: https://bi.smartygrants.com.au/api/odata4/service/v1/application(70394).
Since “payment” is an entity linked to “application” within the EntitySet, you can access payment data for application 70394 through the URL: https://bi.smartygrants.com.au/api/odata4/service/v1/application(70394)/payment.
API data limit per request
Calls to the OData API are currently limited to 200 requests per minute. This ensures that the service remains stable and responsive for all users by capping the number of requests any single client can make within a specified time frame.
In this case, the OData service is configured to allow a maximum of 200 requests from your application every 60 seconds. If your application exceeds this limit, subsequent requests within that minute will likely be rejected or delayed.
Tip: To reduce rate limit issues when accessing an OData API, try to send fewer requests by combining tasks into one request whenever possible. If you start reaching the limit, take a short break before making more requests. Also, if you get a message saying you've made too many requests, wait a bit before trying again.
Connecting OData feed with Microsoft Excel
Connecting Microsoft Excel with OData allows you to import and interact with data from an OData service directly within Excel.
Establishing the connection
Follow the steps below to connect your OData feed with Excel:
Open Microsoft Excel.
Create a new workbook or open an existing one where you want to import the OData feed.
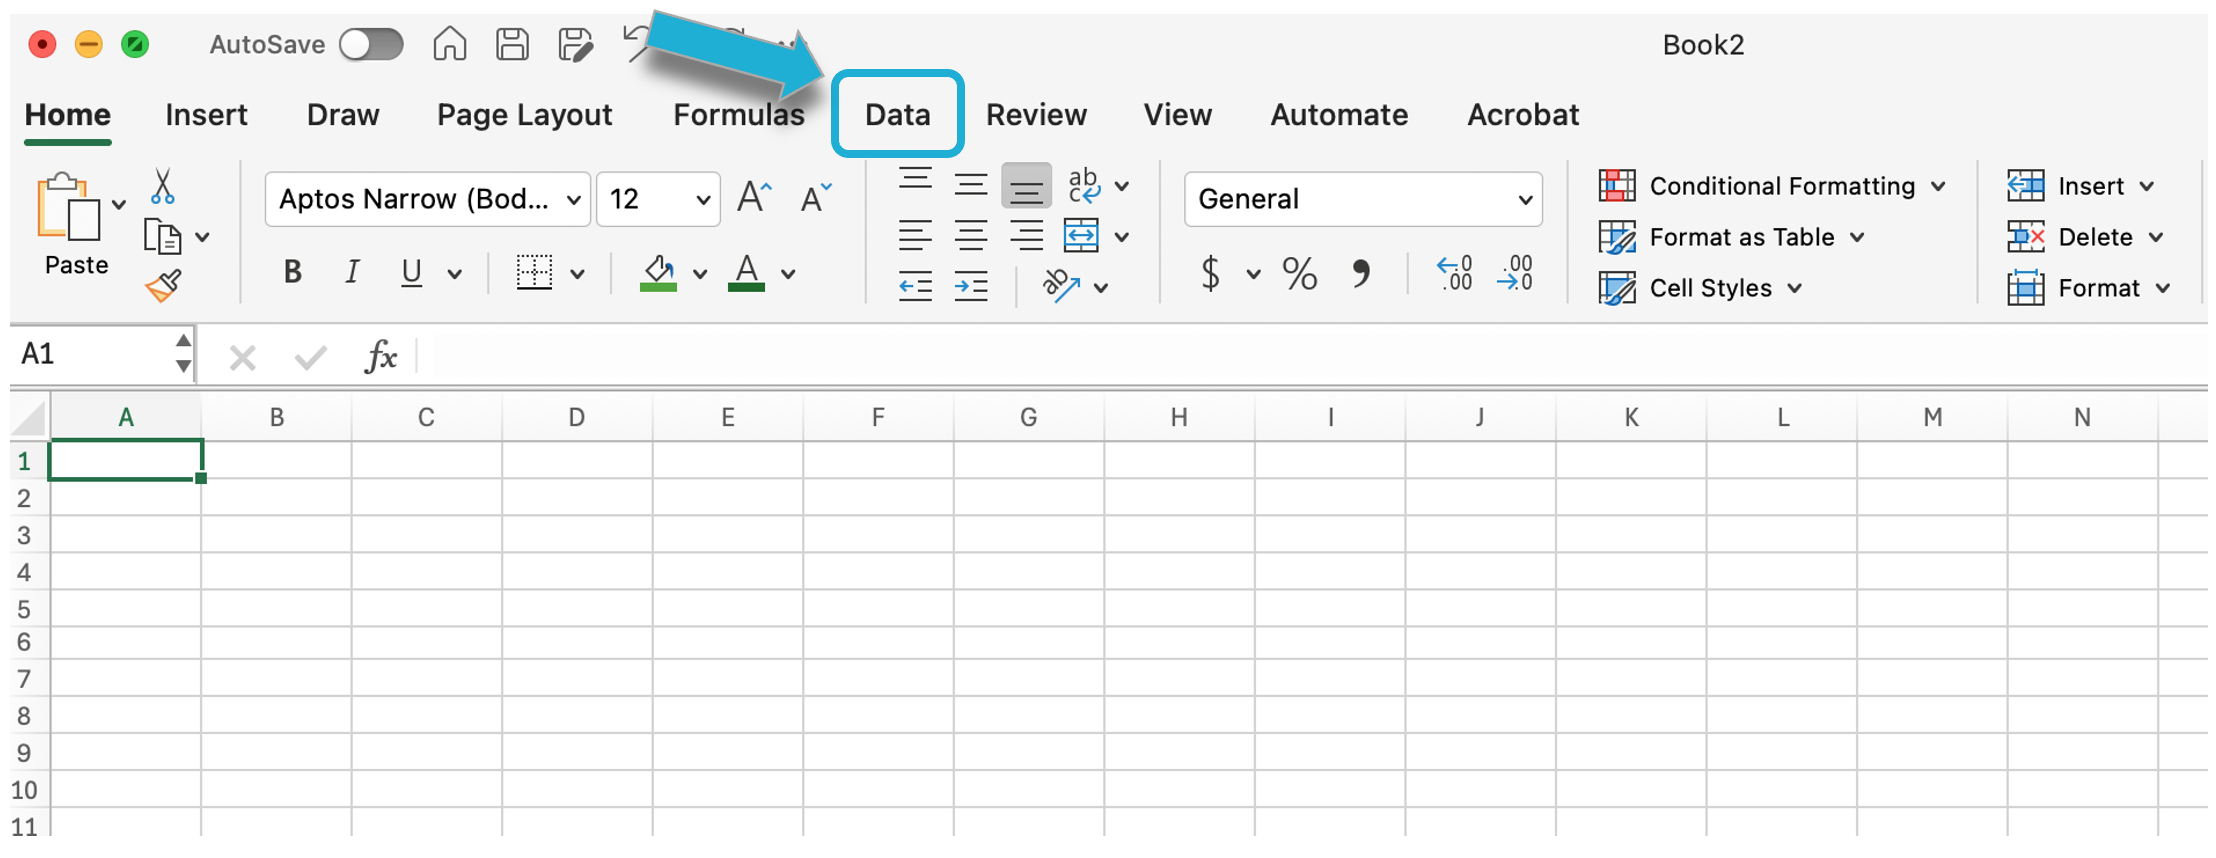
Select the Data tab in the Excel ribbon:
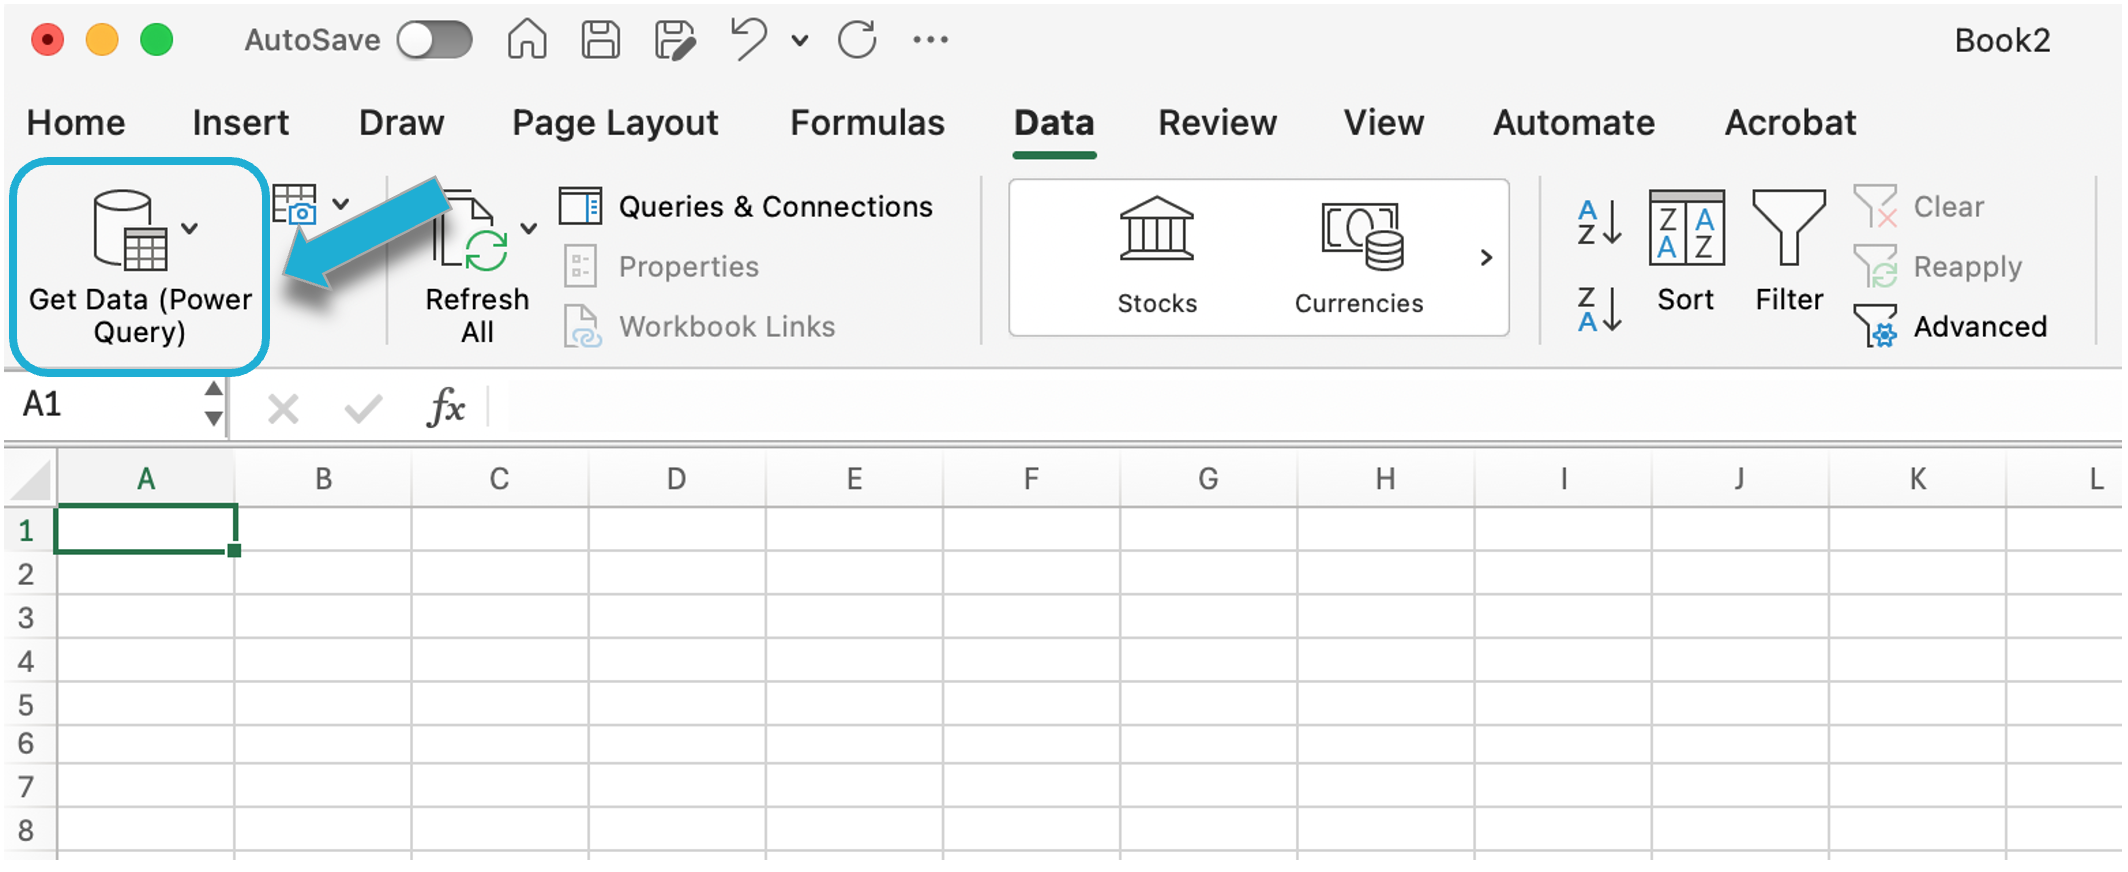
Select Get Data (in newer versions of Excel) or From Other Sources:
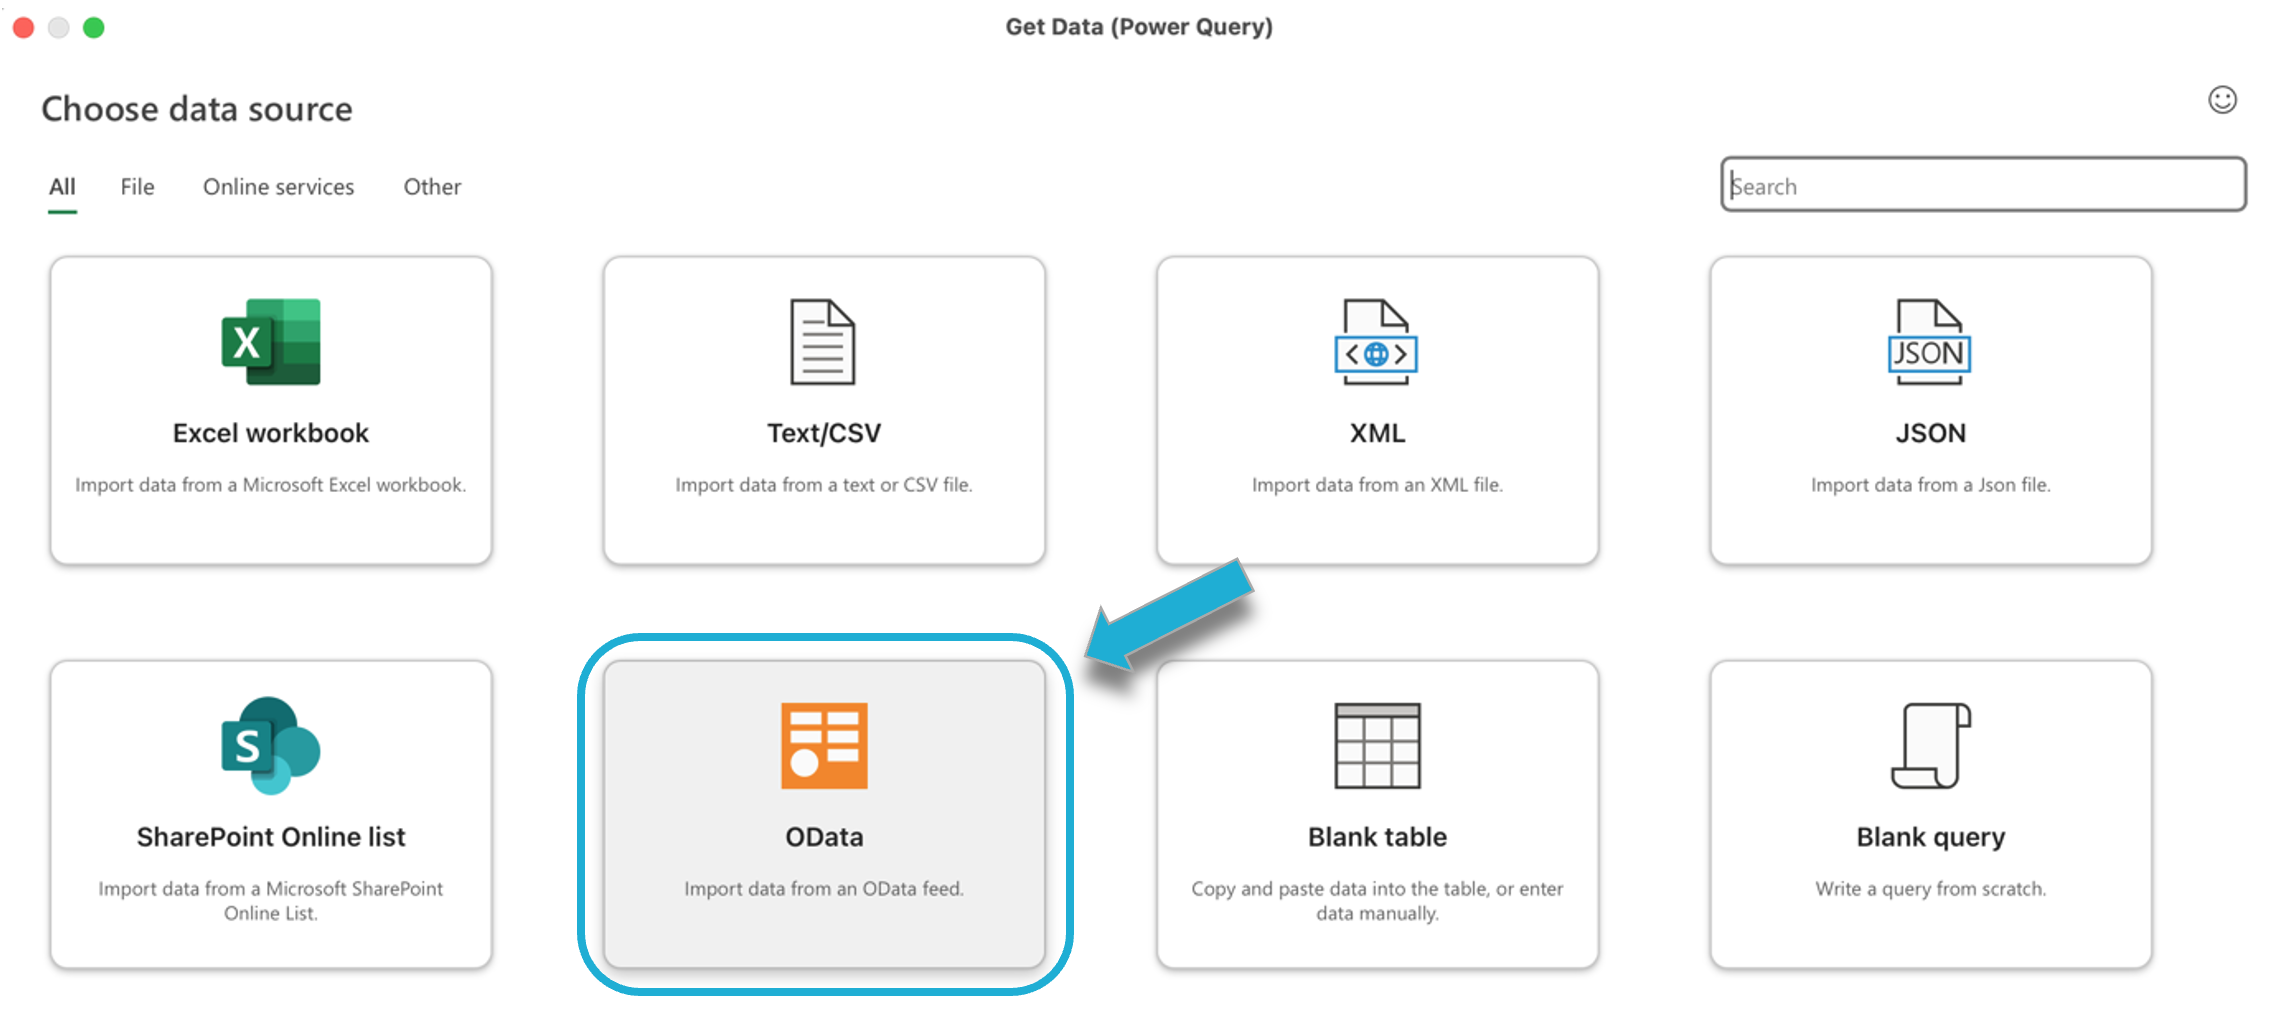
In the data source list, select From OData Feed. This option allows you to connect to an OData service:
You will be prompted to enter the OData feed URL needed for the OData connection. Paste the URL into the provided field:
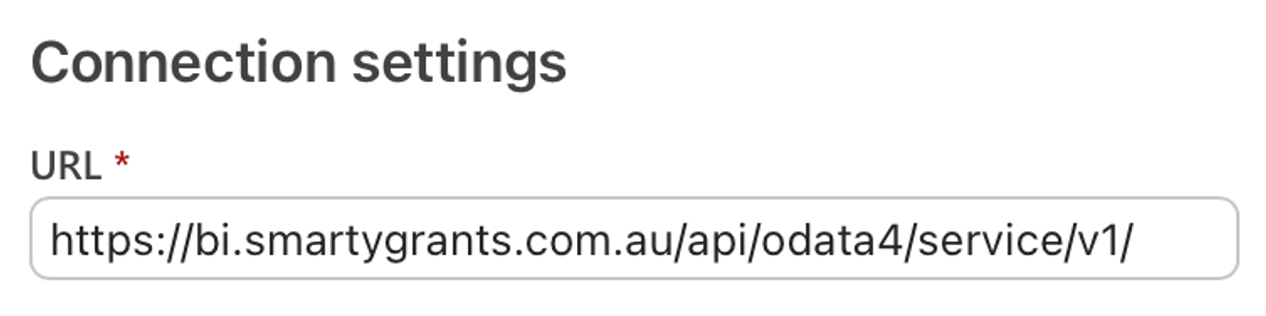
Info: This URL is provided by SmartyGrants: https://bi.smartygrants.com.au/api/odata4/service/v1/
Tip: This URL can be edited to filter the data loaded into Power BI, saving processing time. For example: https://bi.smartygrants.com.au/api/odata4/service/v1/instance loads just the instance data table. Tables can also be further filtered. For example: https://bi.smartygrants.com.au/api/odata4/service/v1/application(742) only loads application data with an “id” of 742.
You will need to authenticate the connection. Select Basic as the Authentication kind, then enter in your credentials specific to the API Key and select Save:
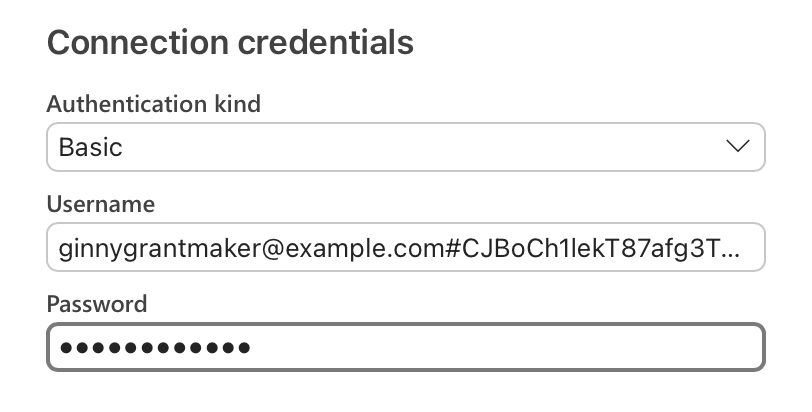
Info: The username is the same as the one used to log in to SmartyGrants, followed by # and your OData API key. For example, if your SmartyGrants username is ginnygrantmaker@example.com and your OData API key is 5555, the username you should enter is ginnygrantmaker@example.com#5555. The password is the same as the one used to log in SmartyGrants.
Preview and load in the data
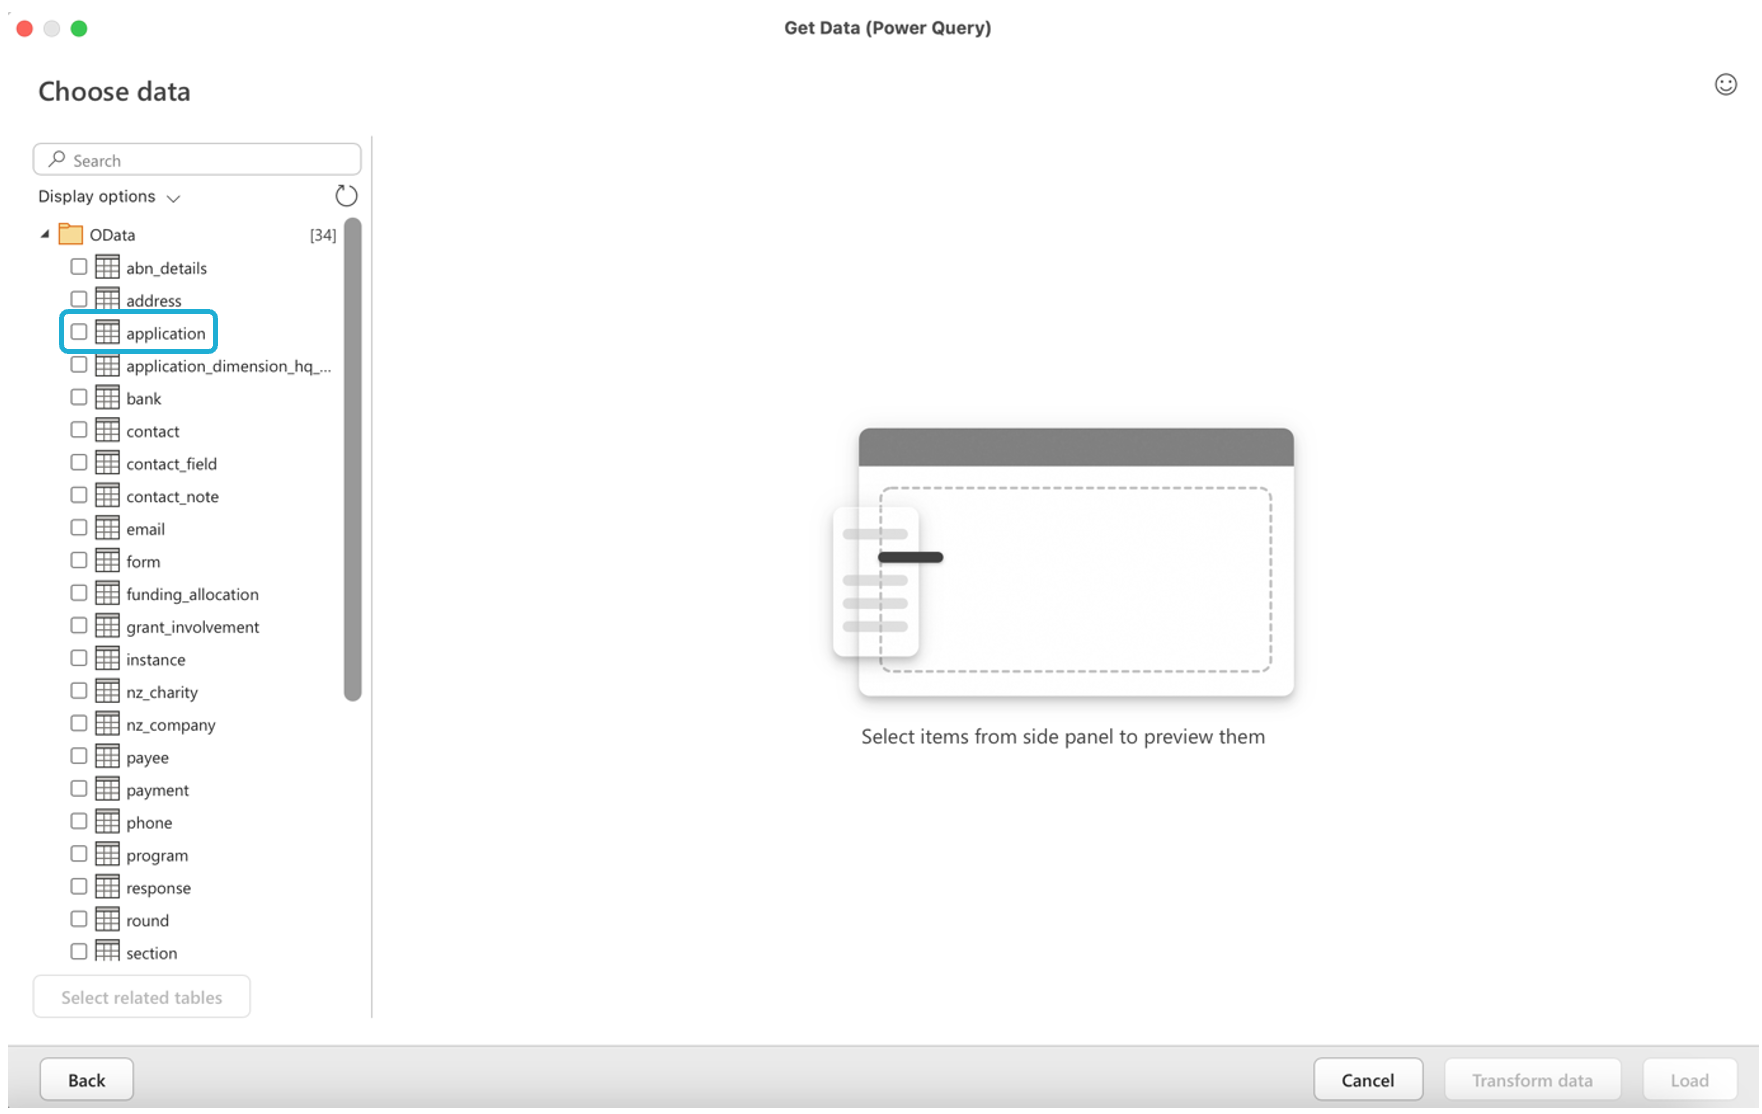
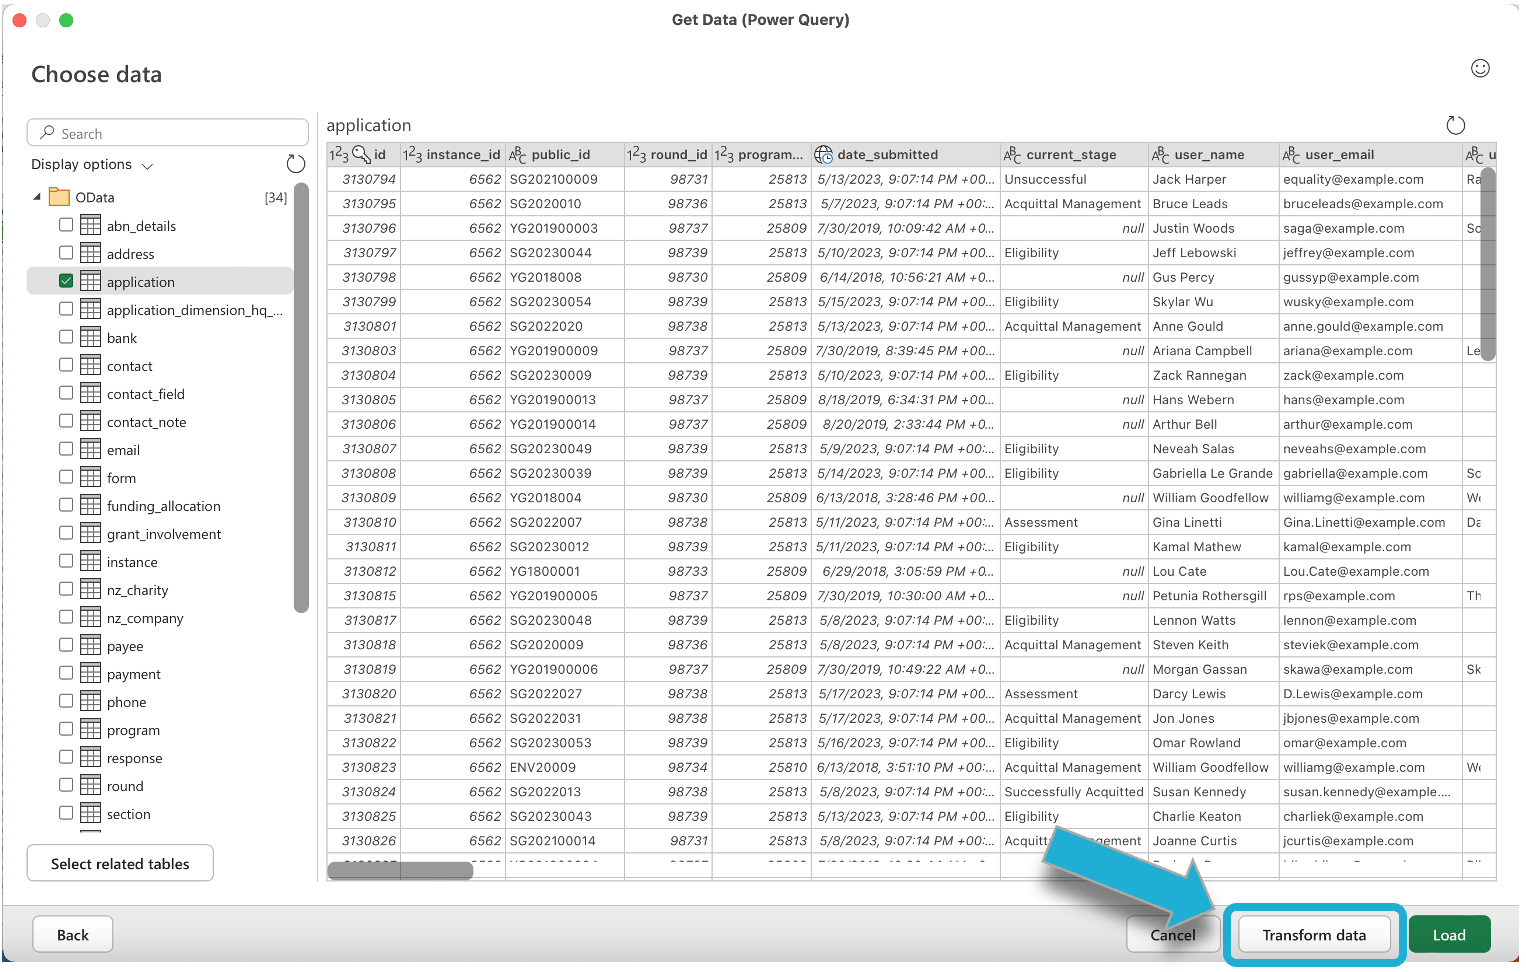
Once connected with the OData feed, Excel will fetch the metadata from the OData service and display a preview of the data. You can select the specific tables or views you want to import into Excel that are currently available in the OData feed.
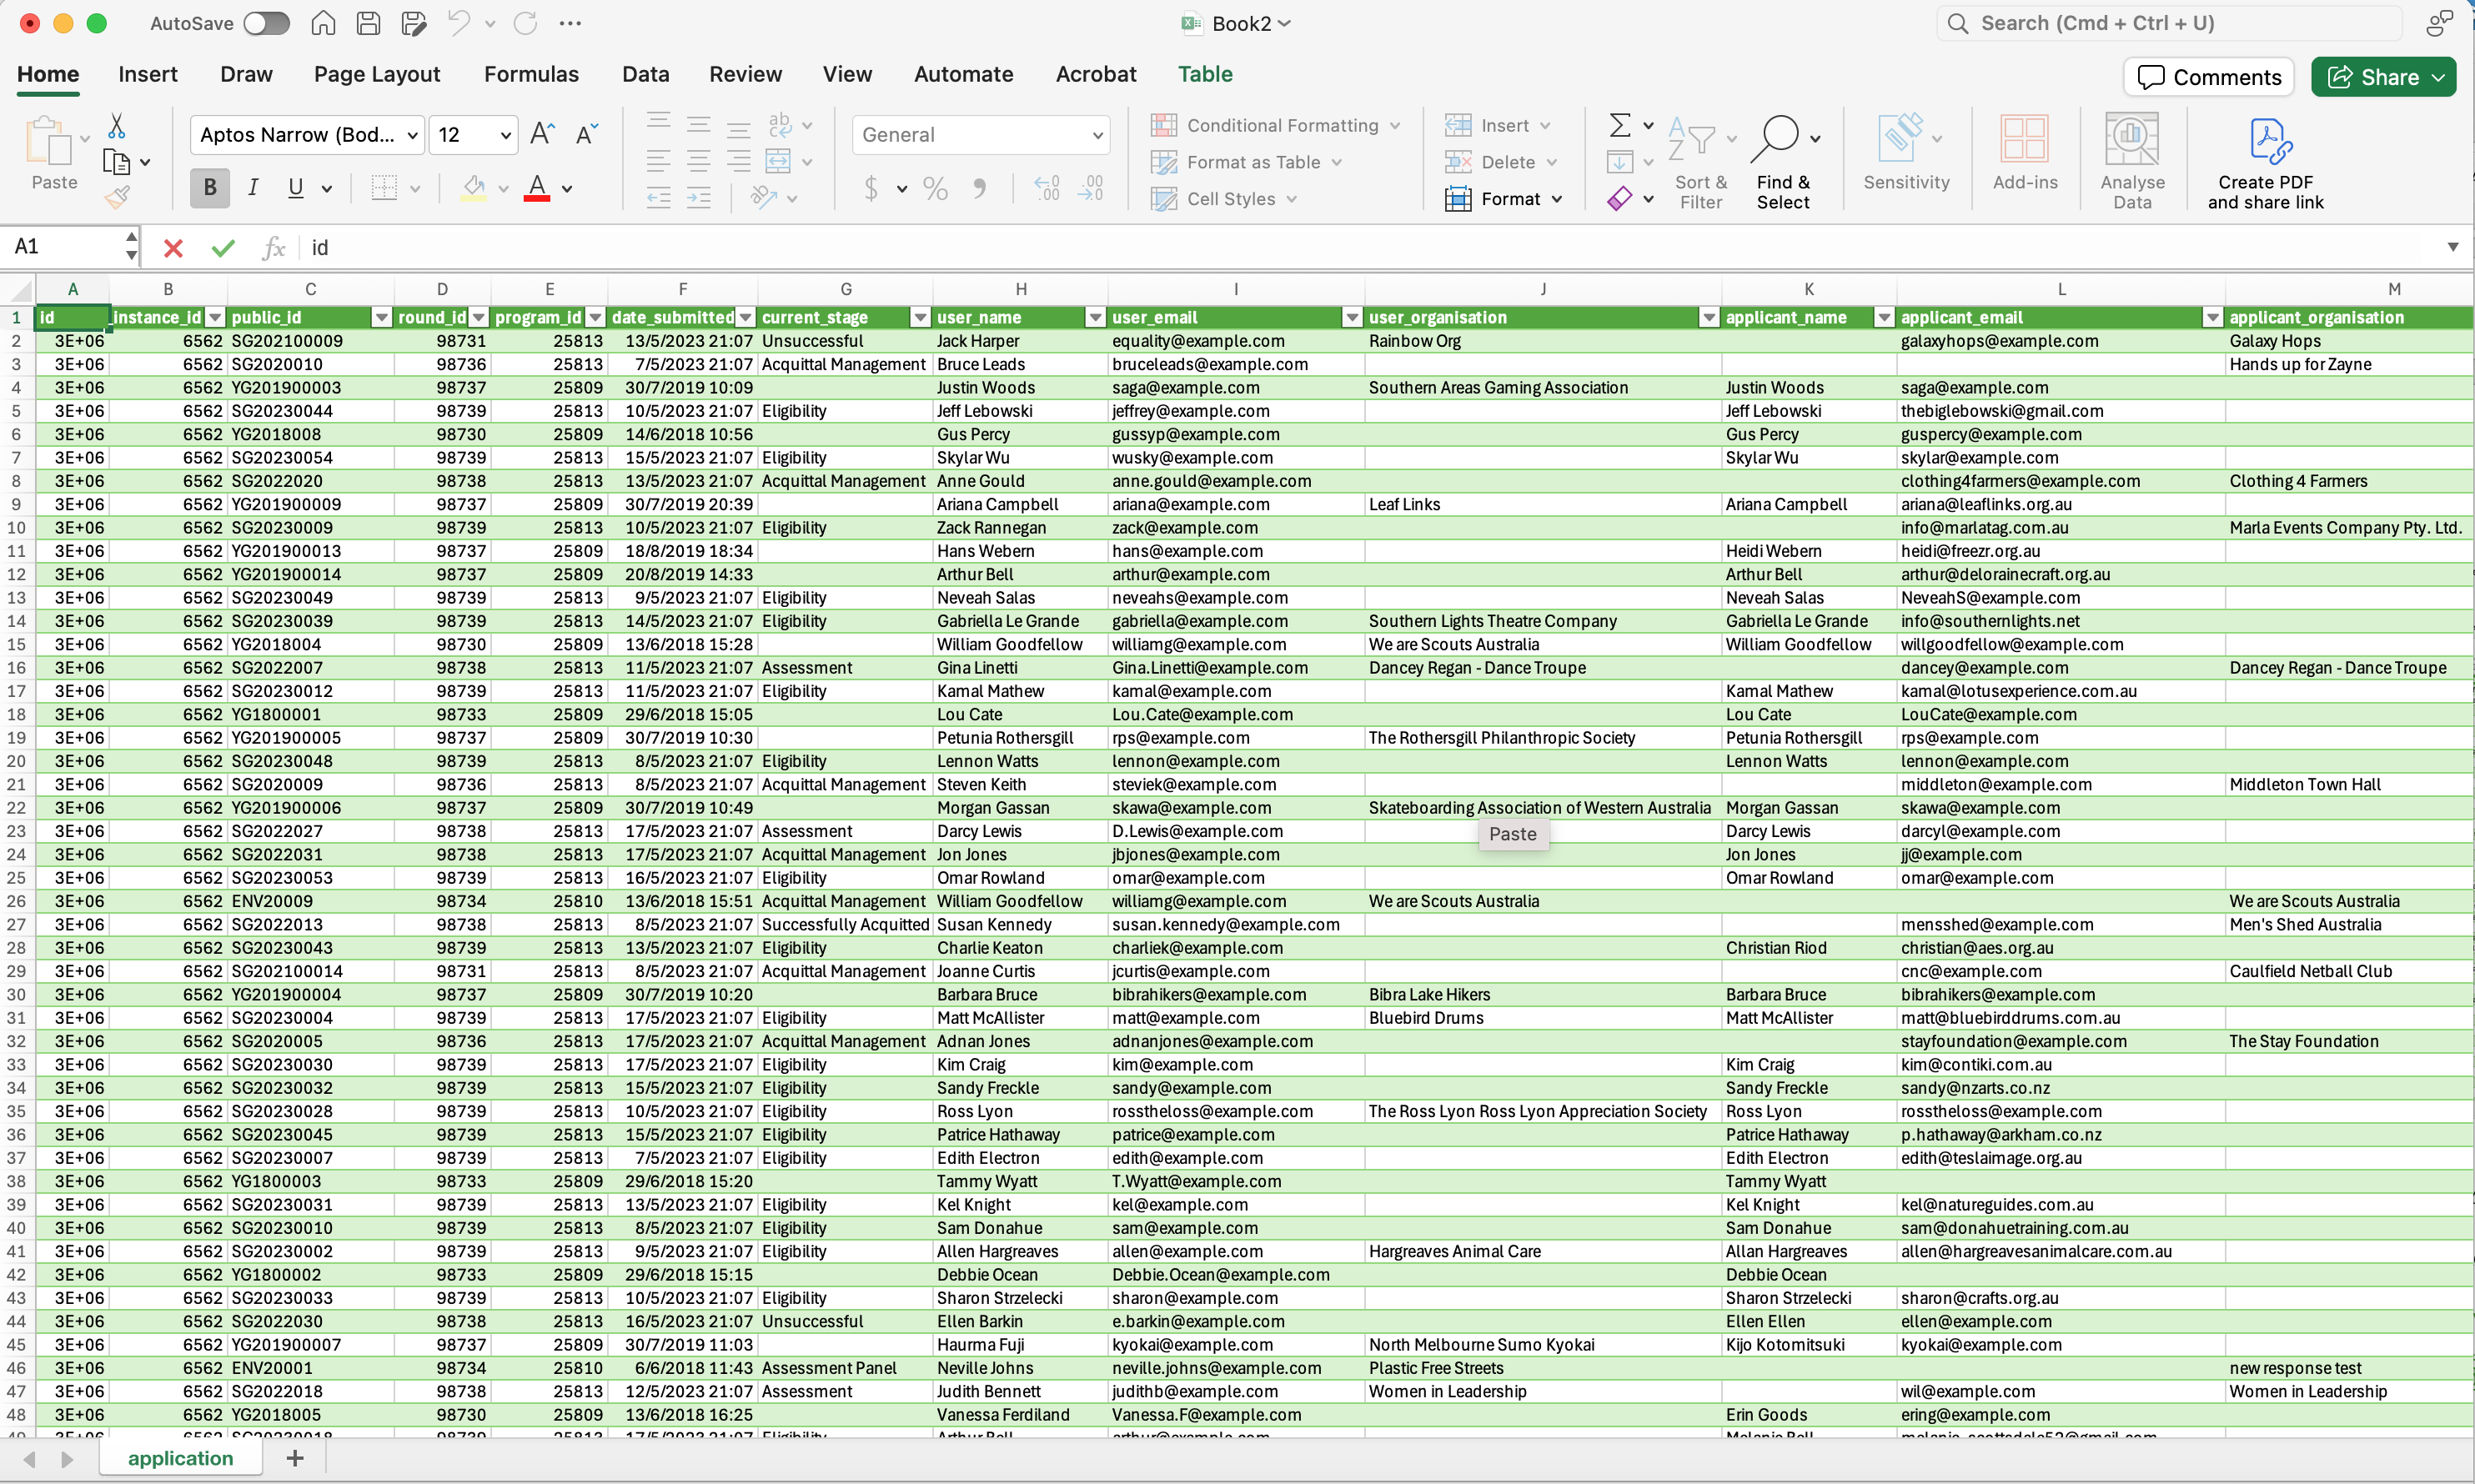
For example, selecting the Application table will load in all of the application details from the fields in the Application table:
Once you have loaded in the data, You can now use Excel to create charts and dashboards. You can use the data like any other data in Excel. You might want to create charts, tables, pivot tables, and apply filters or other Excel functionalities.
Tip: For more information on how to create Excel dashboards using an OData data feed, see here.
Additional tips
Refreshing data
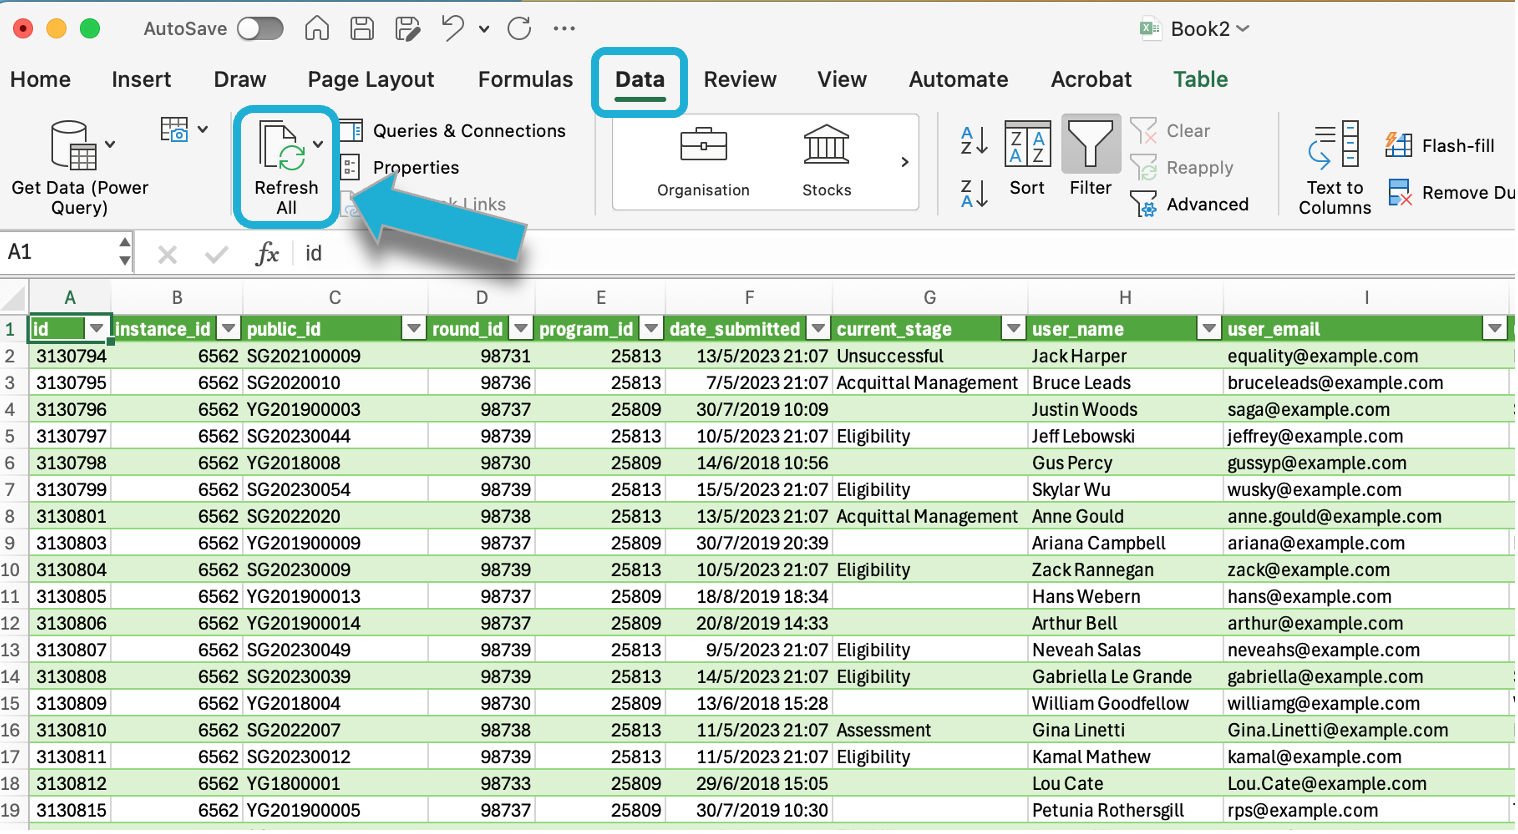
As the OData service provides live data, to automatically sync any new data from SmartyGrants, you can refresh the connection to get the latest data. Go to Data > Refresh All to update the data from the OData feed:
Editing queries
Using the Transform data feature in Excel gives you powerful tools to manipulate your data, making your analysis more robust and reliable.
You can edit the query to transform the data before loading it by using the Power Query editor. After connecting, select Transform Data to open the editor:
In the editor, you can apply various transformations using the options in the toolbar, the right-click menu, or directly by interacting with the data preview.
Key transformations include:
Remove Columns/Rows | You can remove unwanted columns or rows that aren't necessary for your analysis. Right-click on the column or row header and choose "Remove" or use the options in the toolbar. |
|---|---|
Filtering Data | Filter data based on specific criteria. For example, you can filter rows to include only those with certain values or dates. Select the drop-down arrow next to a column header and select the filter options. |
Sorting Data | Sort your data by one or more columns, either in ascending or descending order. Right-click on the column header and choose ‘Sort Ascending’ or ‘Sort Descending’. |
Merging Columns | Combine two or more columns into a single column. Use the "Merge Columns" option in the toolbar and specify the delimiter to separate the merged values. |
Replacing Values | Replace specific values in a column with different ones (e.g., replacing "N/A" with "0"). Use the "Replace Values" option under the Transform tab. |
Grouping Data | Group rows by one or more columns and apply aggregate functions like sum, average, count, etc., to other columns. Use the "Group By" option in the toolbar. |
Adding Custom Columns | Create new columns by applying custom formulas or calculations based on existing data. Use the "Add Custom Column" option and write a formula in the Power Query formula language. |
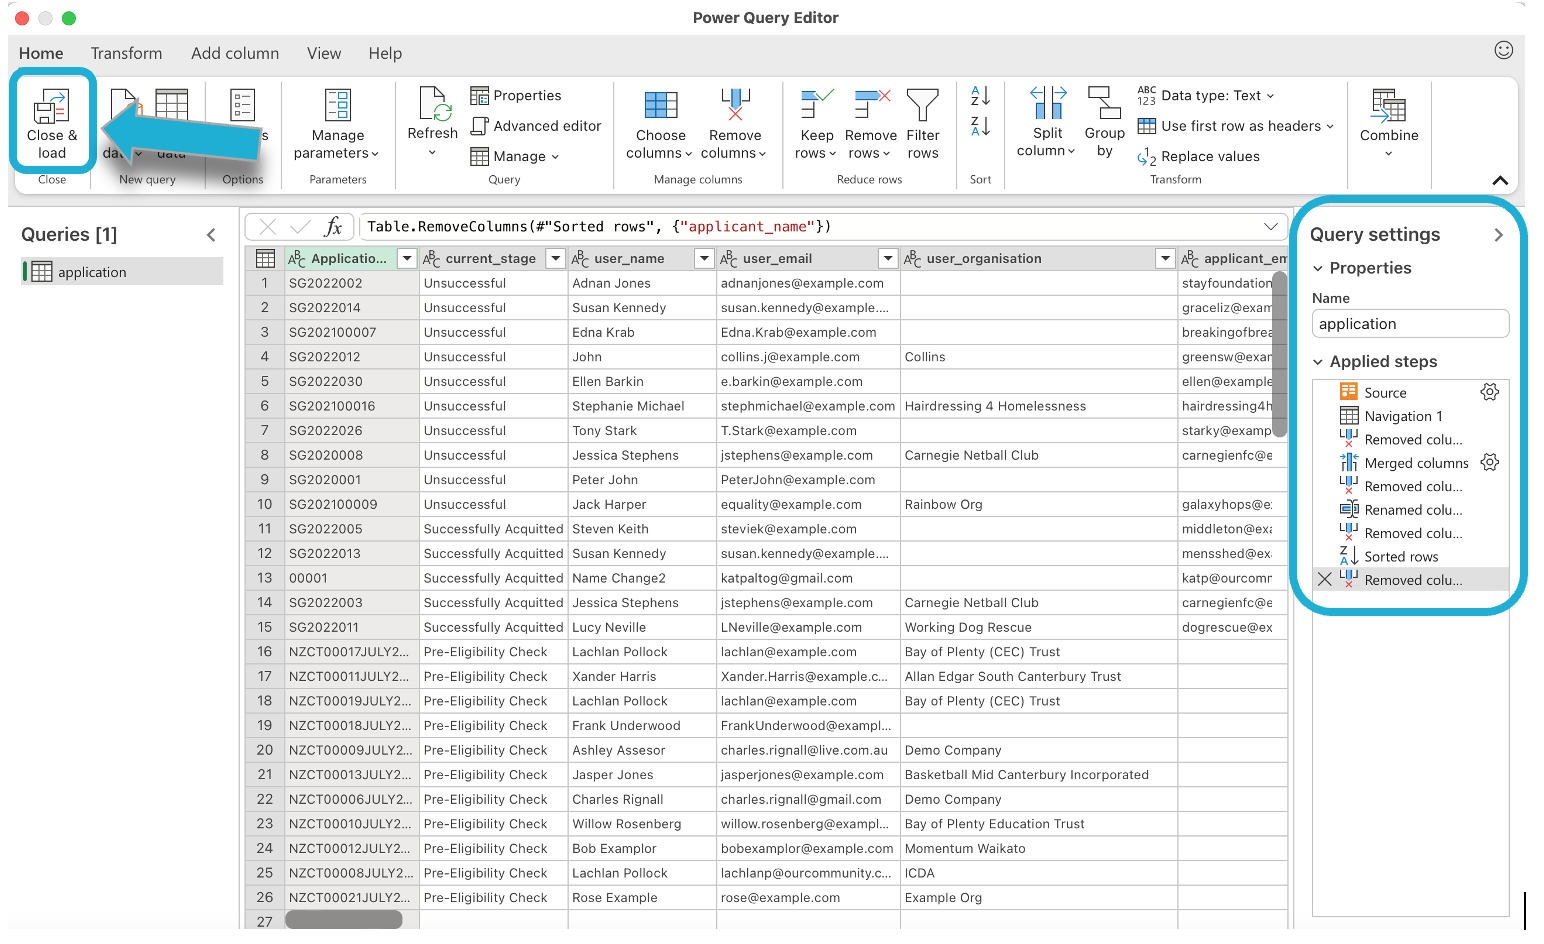
Each transformation you apply is recorded as a step in the Applied steps pane on the right. You can review, edit, or delete these steps.
Once you're done with the transformations, select Close & load to load the transformed data into Excel. You can choose to load it into a new worksheet, the existing one, or directly into a PivotTable or Data Model:
Connecting OData feed with Power BI
To connect your OData feed with Power BI, you will need:
A Microsoft 365 for Business account, which includes Microsoft Power BI.
Power BI Desktop, which is only available on Microsoft Windows.
Info: If you don’t have access to Windows, Power BI Online can be used on macOS and other operating systems to open the template workbook. However, Power BI Online has less functionality than Power BI Desktop (specifically, it is not possible to make use of the response, contact_field, standard_field and standard_section tables, and it cannot be used to set up a partial data model).
Establishing the connection
Follow the steps below to connect your OData feed with Power BI:
Open Power BI.
Select File → Blank Report to open a new workbook.
Select File → Options and settings → Options → Data Load and ensure ‘Update or delete relationships when refreshing data’ and ‘Autodetect new relationships after data is loaded’ are both unticked:
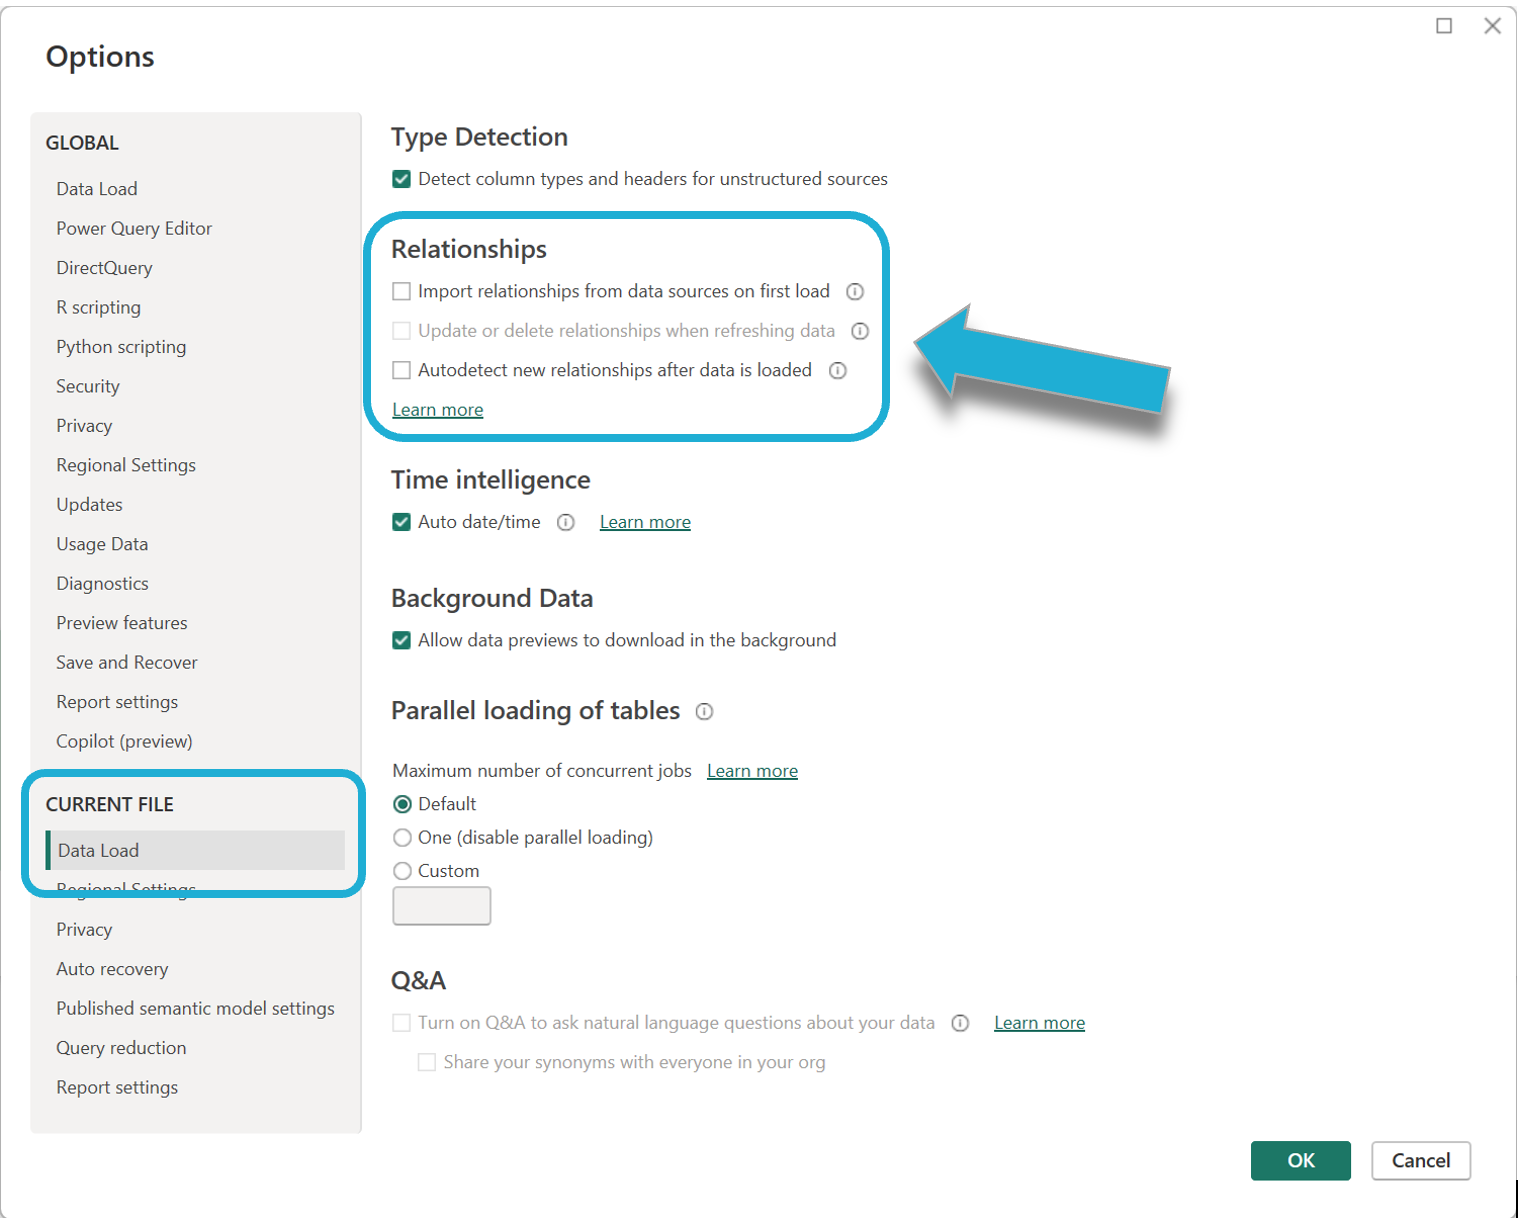
Warning: We recommend that you ensure Power BI does not auto-detect/auto-update relationships between tables. This is because it is not guaranteed that Power BI will do this correctly.
Select Get Data from the menu ribbon and then select OData feed:
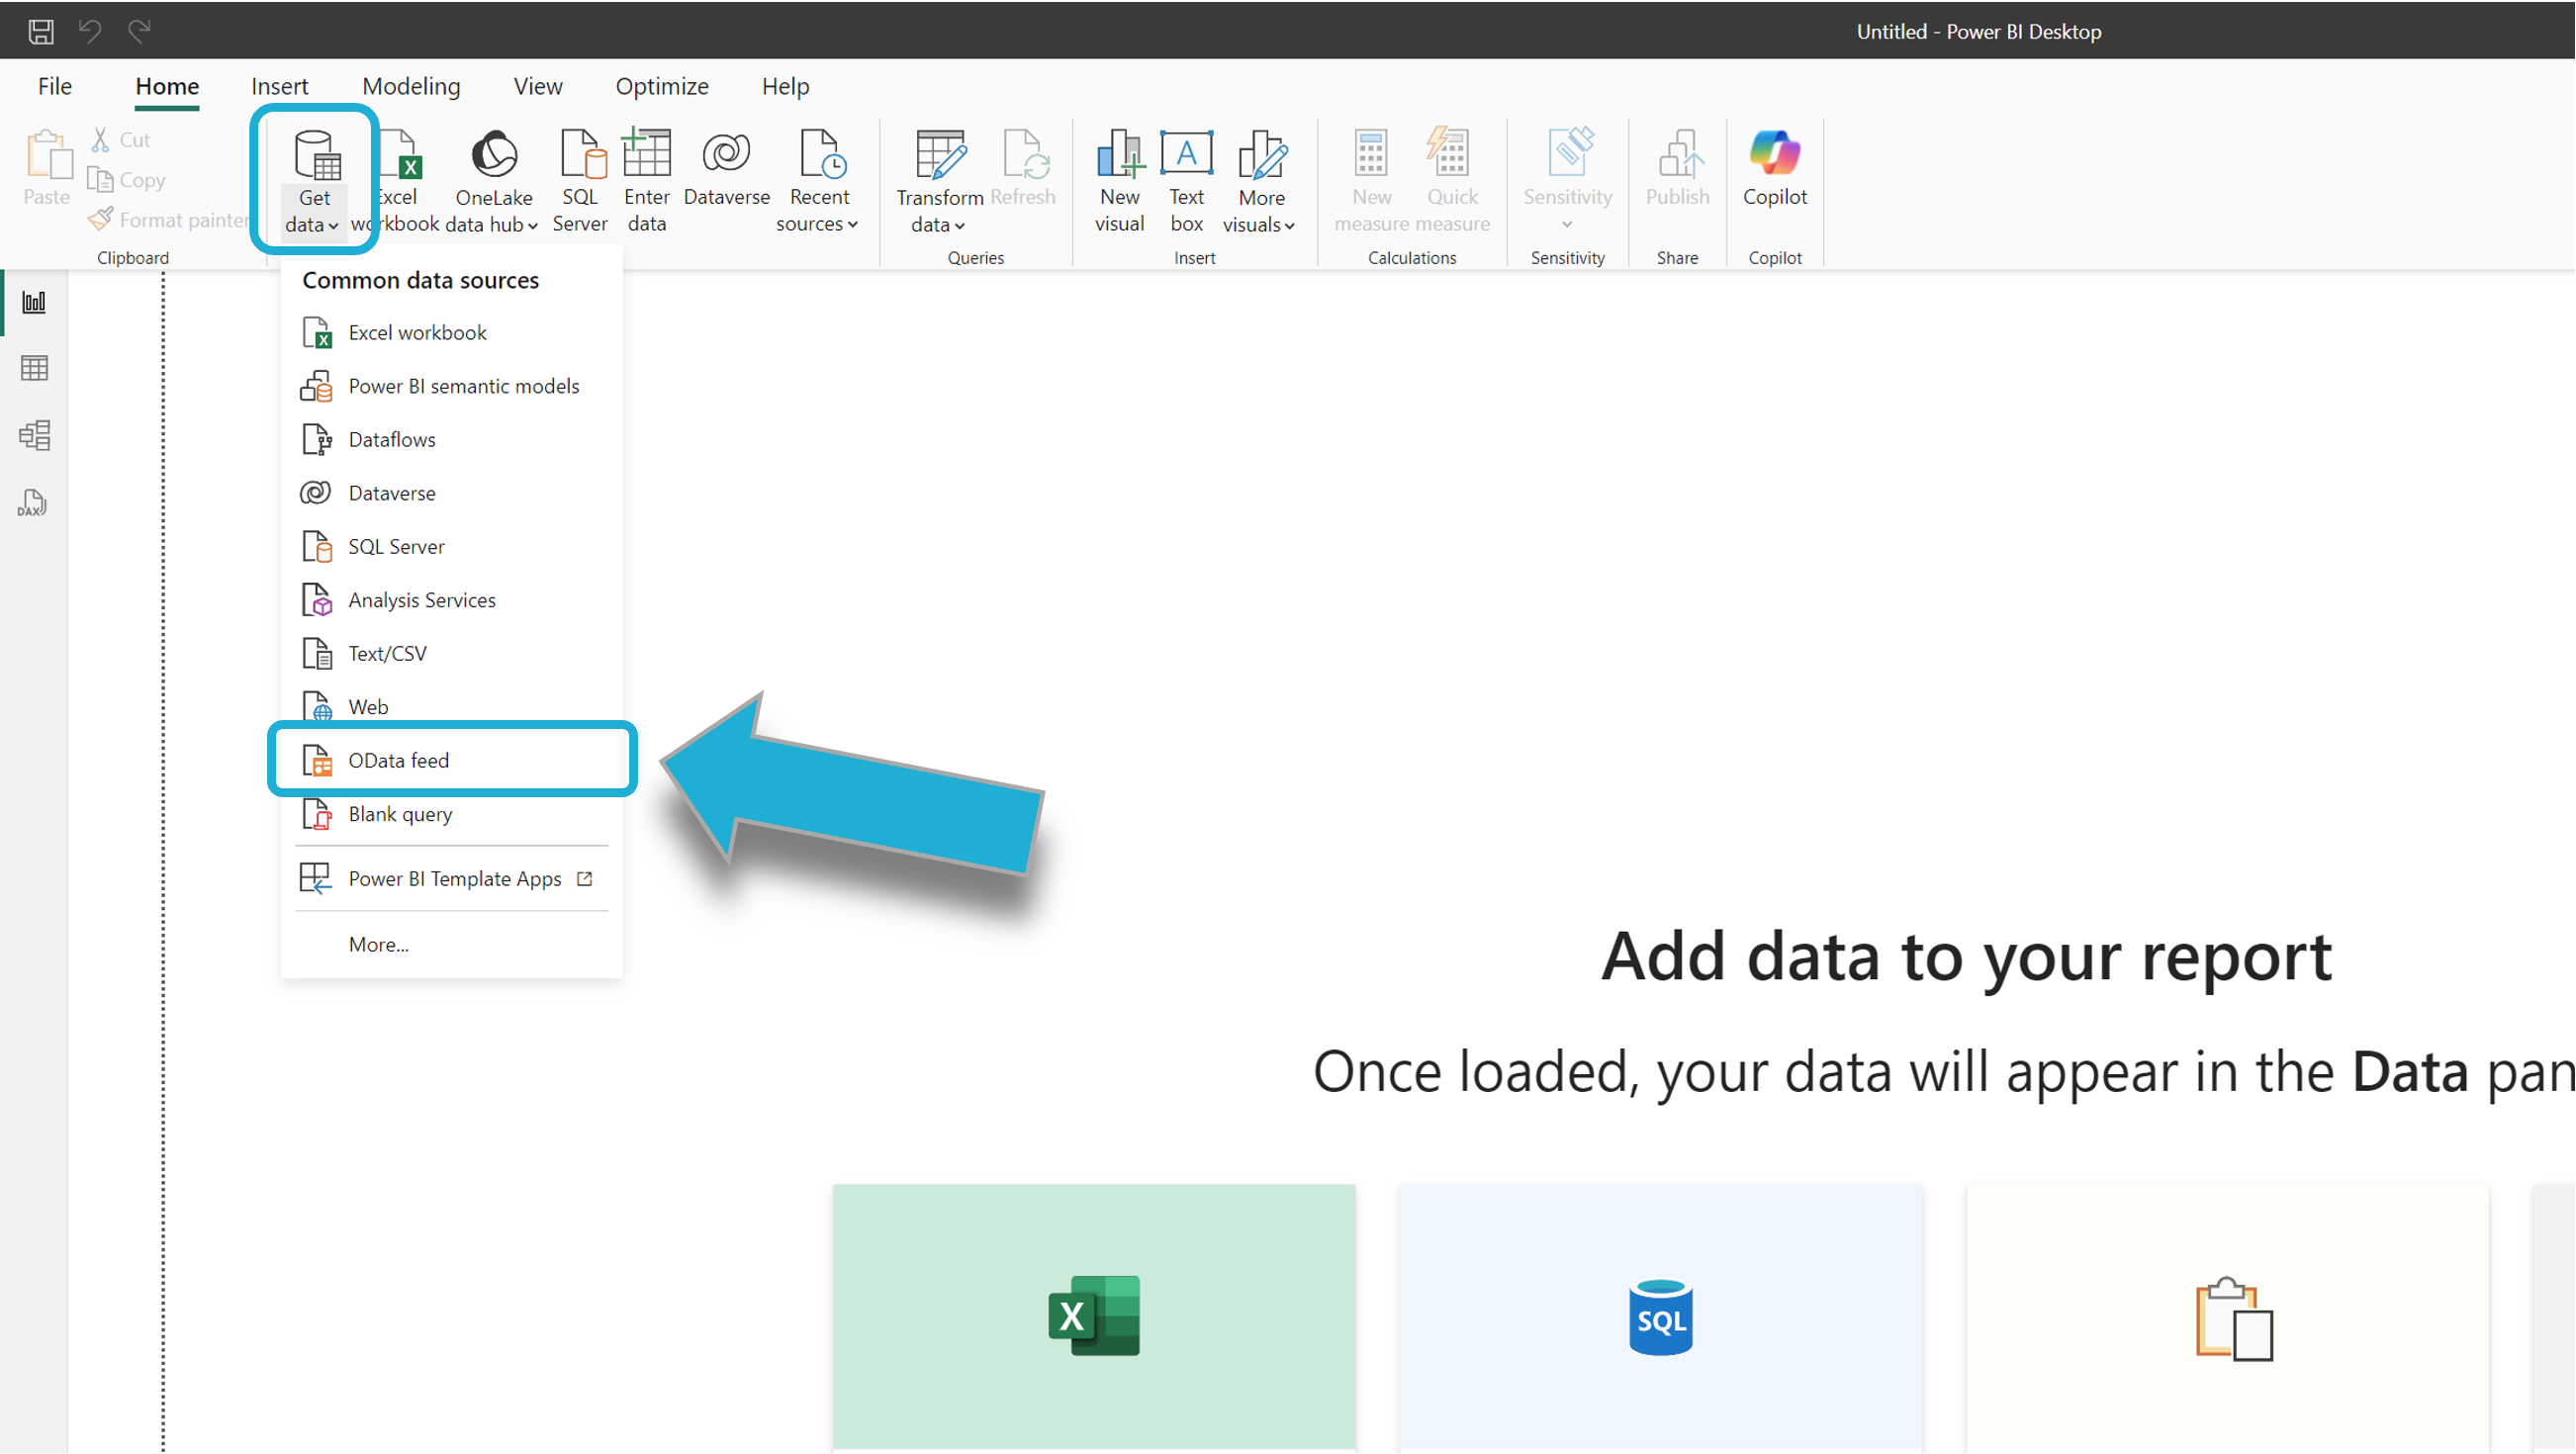
You will be prompted to enter the OData feed URL needed for the OData connection. Paste the URL into the provided field and ensure the Basic radio button on the left is selected:
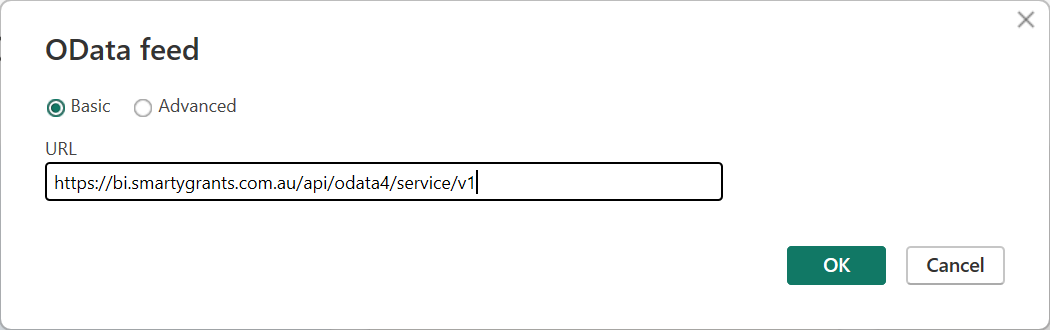
Info: This URL is provided by SmartyGrants: https://bi.smartygrants.com.au/api/odata4/service/v1/
Tip: This URL can be edited to filter the data loaded into Power BI, saving processing time. For example: https://bi.smartygrants.com.au/api/odata4/service/v1/instance loads just the instance data table. Tables can be also further filtered. For example: https://bi.smartygrants.com.au/api/odata4/service/v1/application(742) only loads application data with an “id” of 742.
You will need to authenticate the connection. Select Basic as the authentication kind, then enter in your credentials specific to the API Key and select Connect:
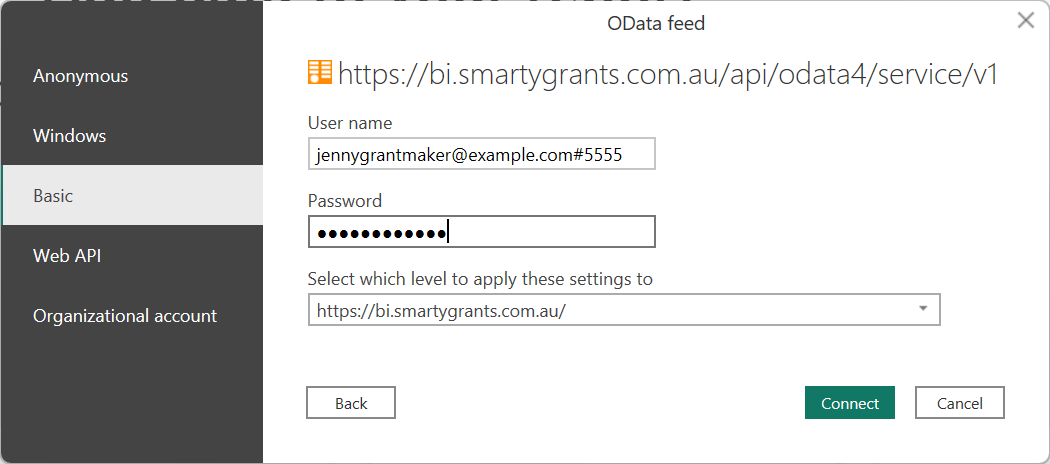
Info: The username is the same as the one used to log in to SmartyGrants, followed by # and your OData API key. For example, if your SmartyGrants username is ginnygrantmaker@example.com and your OData API key is 5555, the username you should enter is ginnygrantmaker@example.com#5555. The password is the same as the one used to log in SmartyGrants.
Preview and load in the data
Once connected with the OData feed, Power BI will fetch the metadata from the OData service and display a preview of the data. You can select the specific tables or views you want to import into Power BI that are currently available in the OData feed:
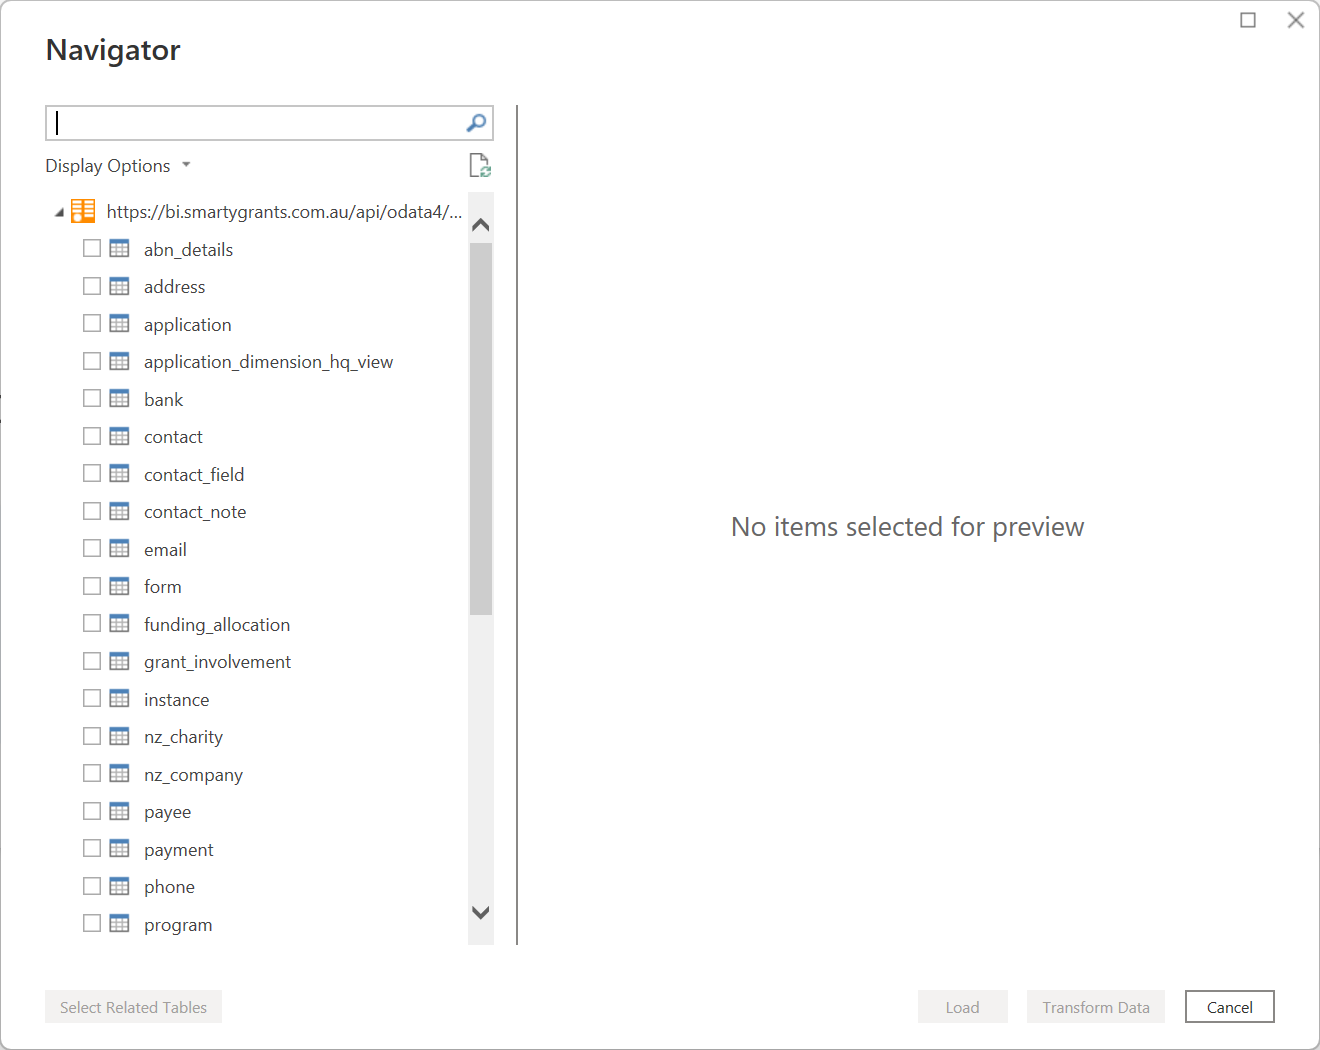
Important: Ignore the ‘Select Related Tables’ button at the bottom of the window. It will not have any effect as the underlying SmartyGrants data model has not been preserved.
Selecting a table will provide a preview of the data:
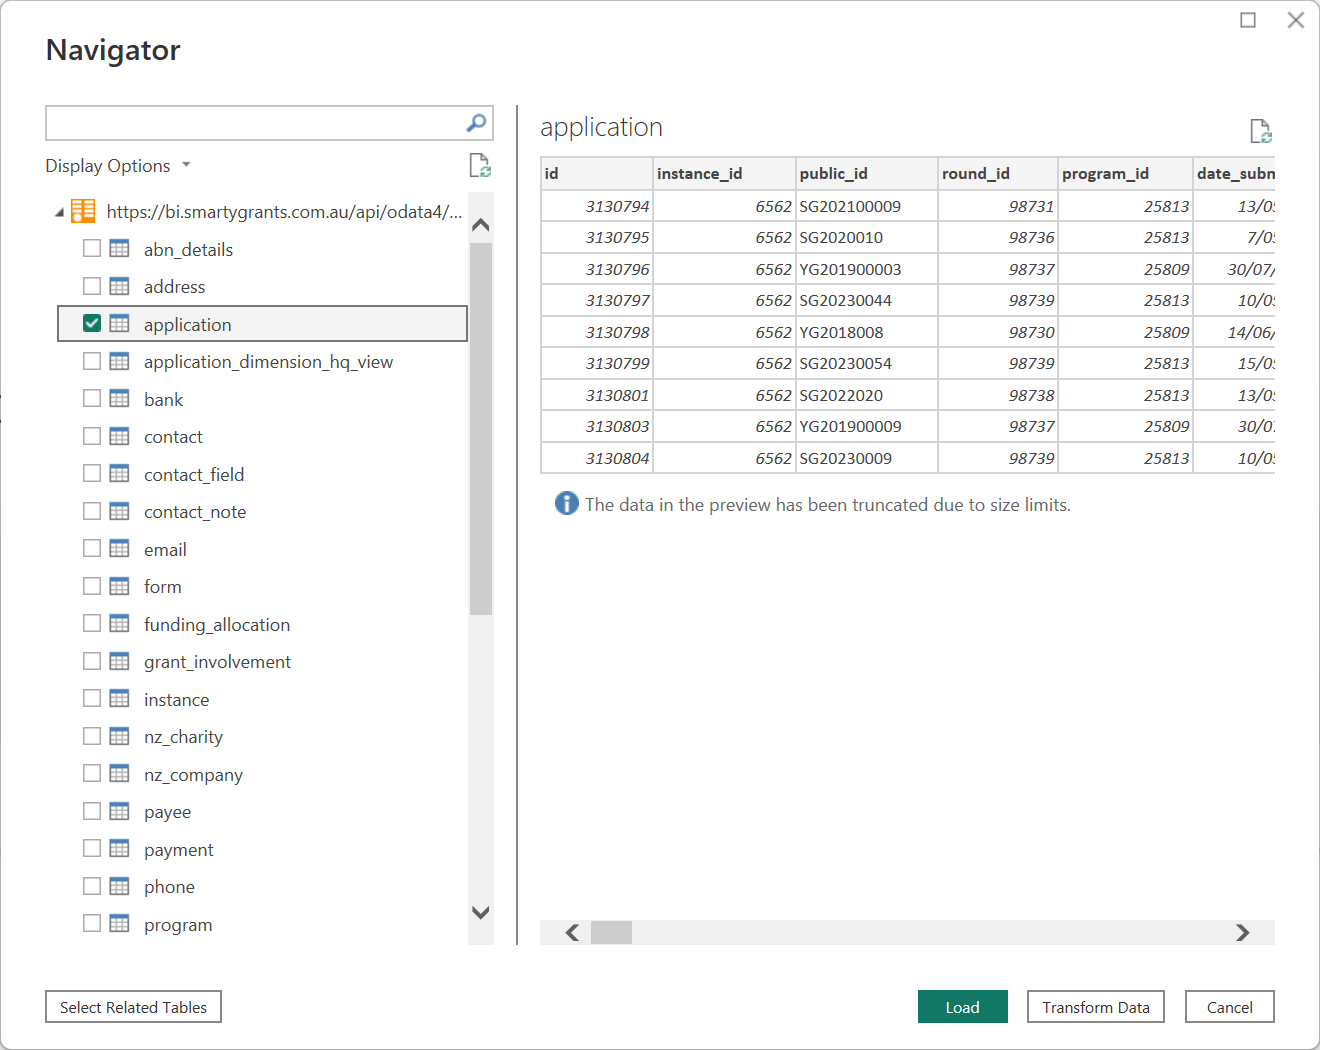
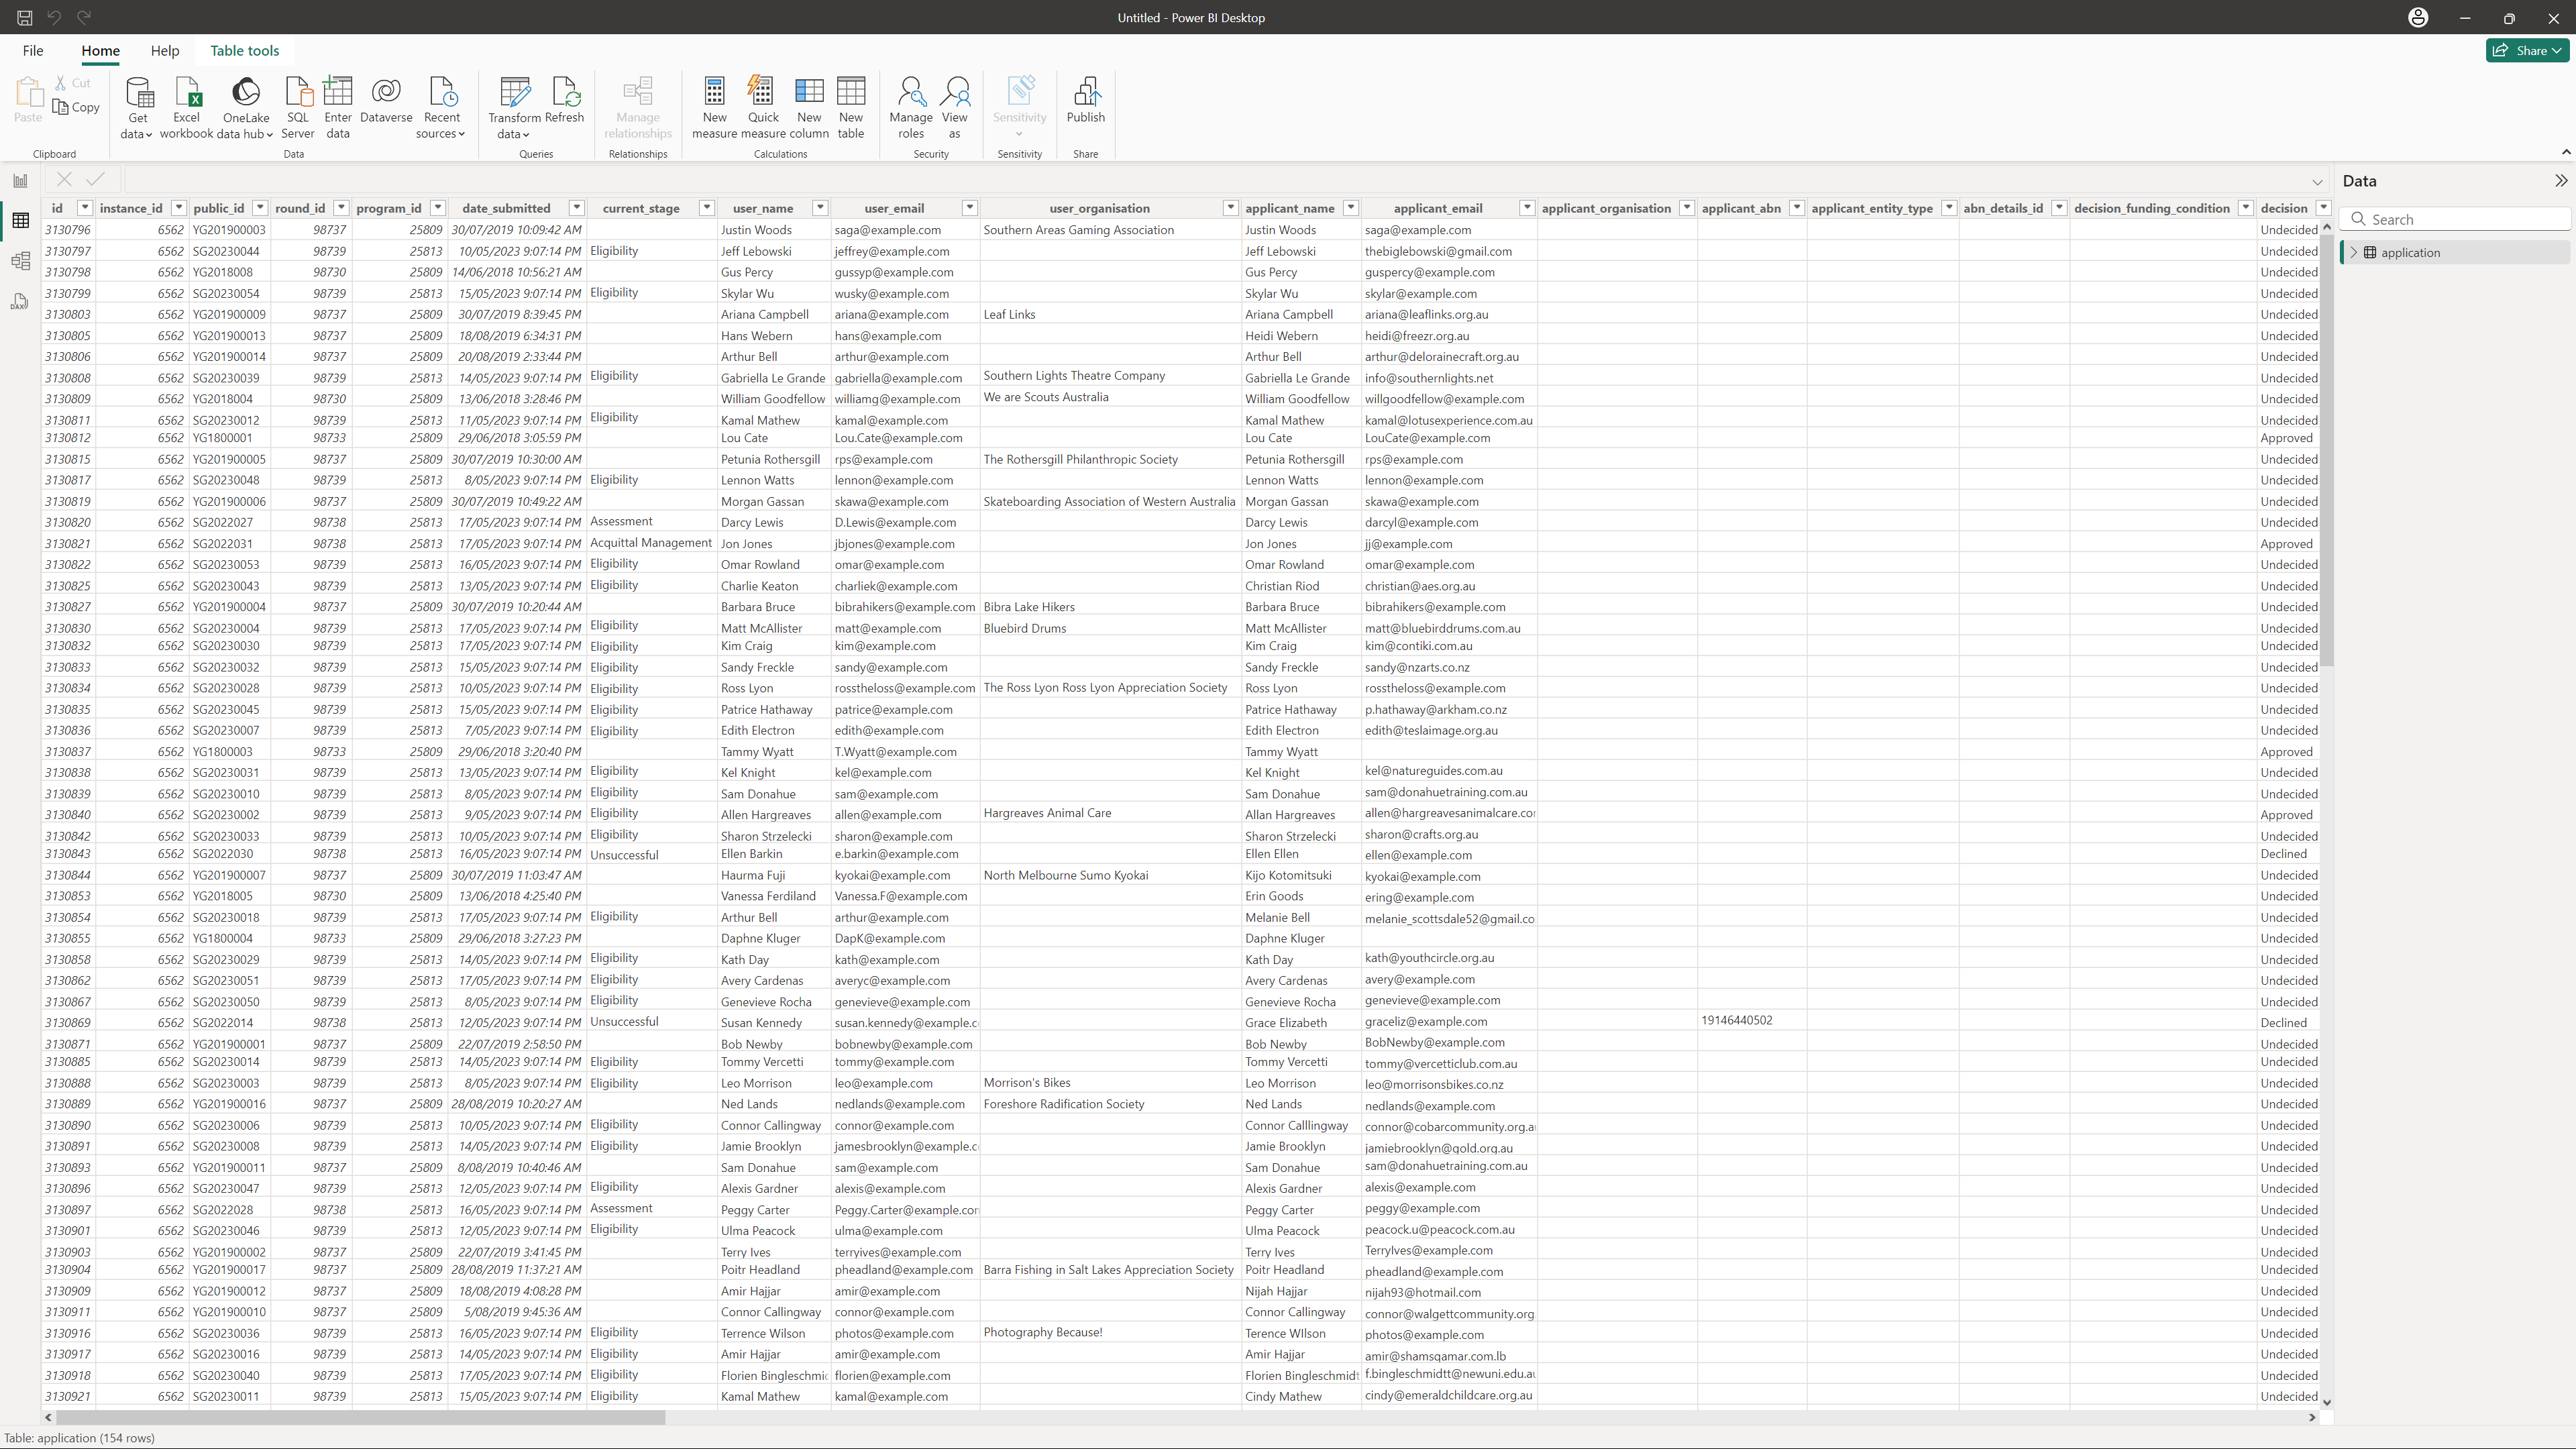
Once you have selected the tables that you need, select Load. You will see the tables you have loaded in the right-hand pane of the main window under Fields (or Data in newer versions of Power BI).
Info: If later you’d like to add a table to your partial model that you didn’t originally load, select Recent sources in the menu ribbon, then select OData and tick the additional table.
Tip: For more information on how to create Power BI dashboards using an OData data feed, see here.
Determining the tables that you need
Before loading your data, it’s essential to understand exactly what data you need and the specific purposes it will serve.
For example, you may wish to build a Power BI dashboard to analyse the funding allocated across various programs. This dashboard may include different charts segmented by funding rounds and responses to specific questions in forms.
By looking at the full data model, you can determine the required fields for inclusion in the Power BI dashboard. Specifically, you may need the ‘total_allocated’ field from the Application table, the ‘Name’ columns from the Program and Round tables, and the ‘field_name’ and ‘field_value’ columns from the Response table. Therefore, we should select the Application, Program, Round and Response tables.

Additional tips
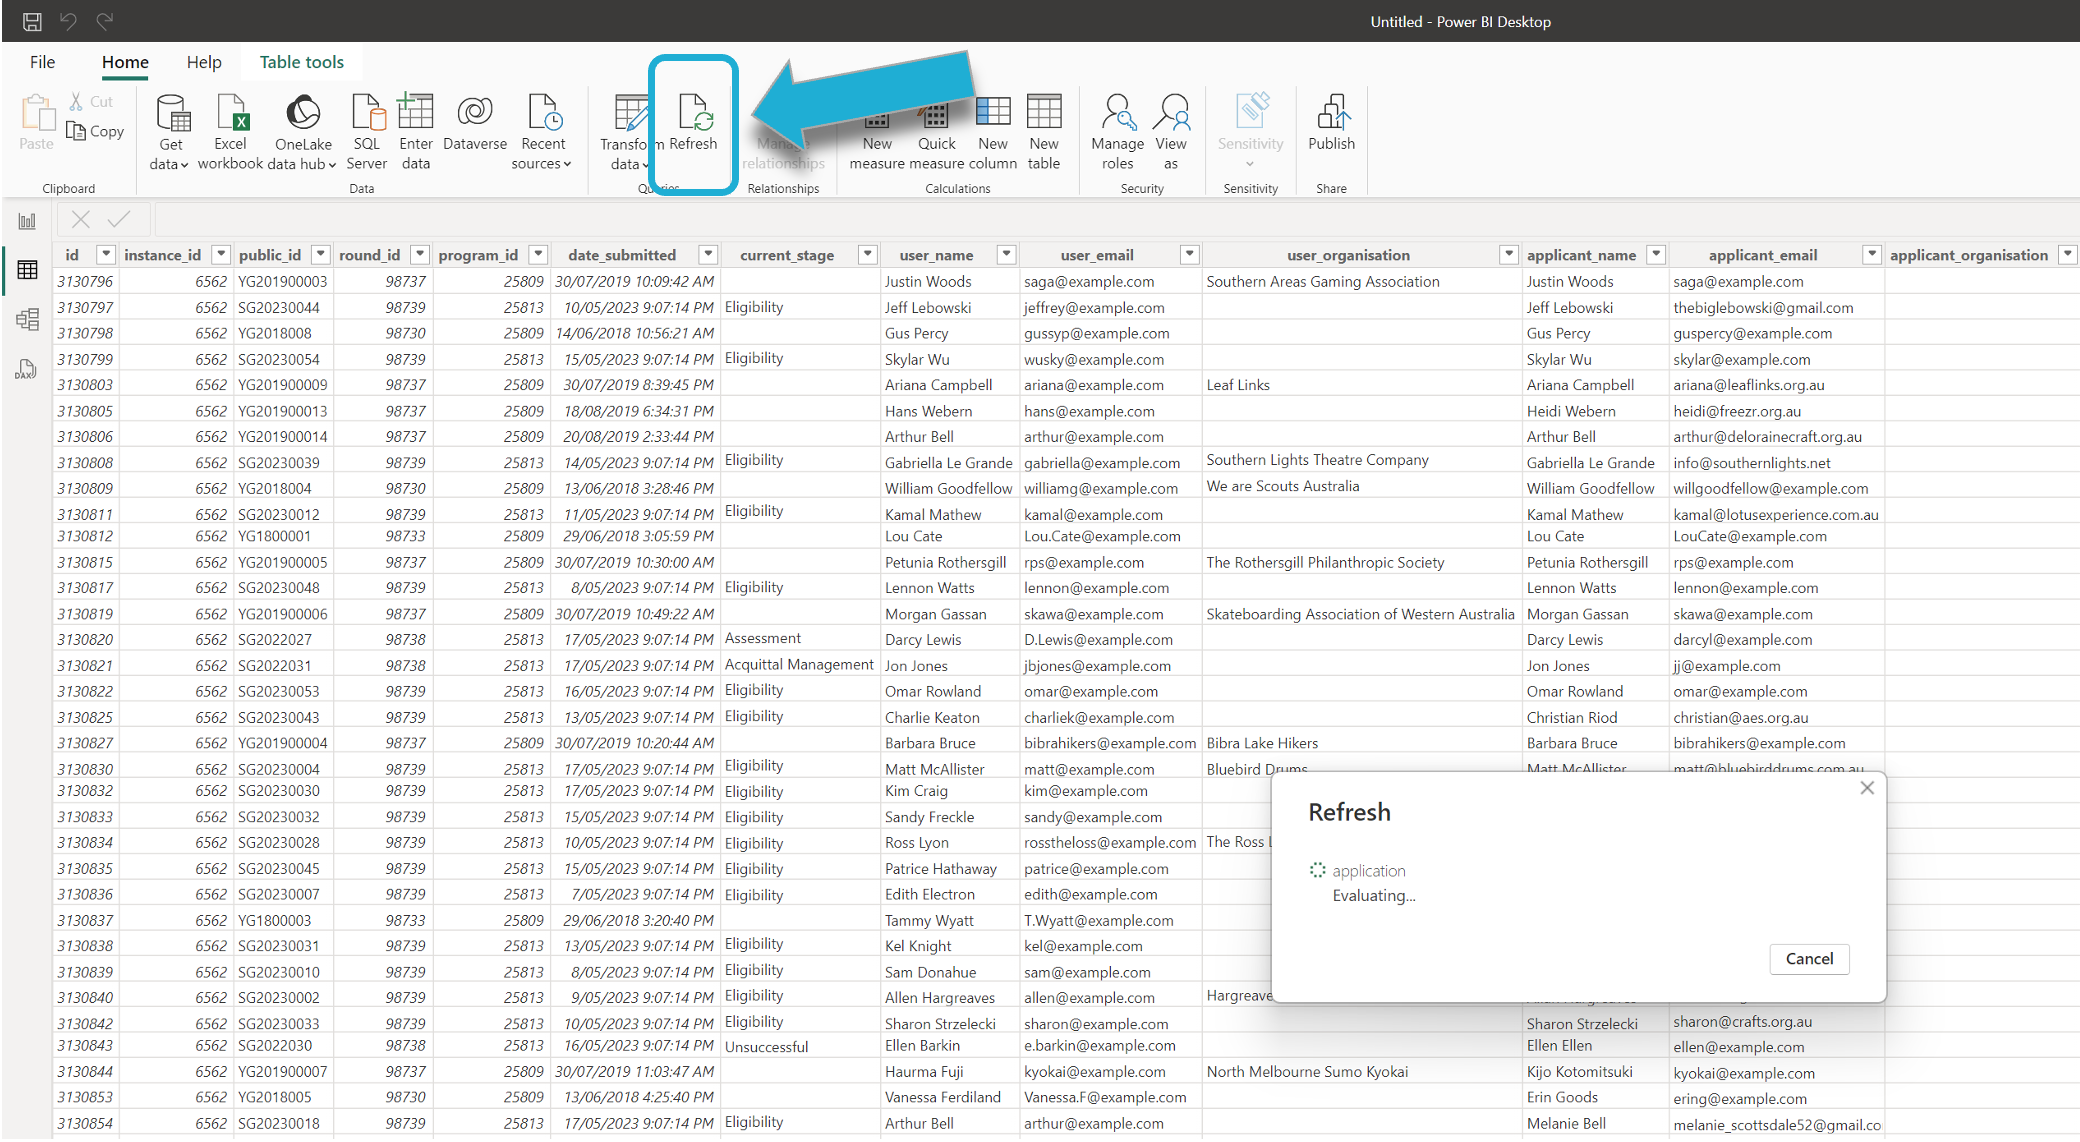
Refreshing data
As the OData service provides live data, to automatically sync any new data from SmartyGrants, you can refresh the connection to get the latest data. Go to Home > Refresh in the PowerBI ribbon to update the data from the OData feed:
Editing queries
Power Query Editor in Power BI is a tool that allows users to connect to your OData feed, and transform that data before loading it in for analysis and visualization.
Once you’ve connected to the OData feed, Power Query Editor opens allowing you to clean, reshape and transform your data.
Key transformations include:
Remove or Rename Columns/Rows: | Remove unnecessary columns or rename them for clarity. |
|---|---|
Filtering Data | Apply filters to include only the data you need. |
Split Columns | Split data into multiple columns if it contains multiple values in a single column. |
Change Data Types | Ensure that each column has the correct data type (e.g., text, number, date). |
Merge Queries: | Combine data from multiple OData entities or other data sources. |
Add Calculated Columns: | Create new columns based on calculations or conditions applied to existing columns. |
After performing the desired transformations, select Close & Apply. This will load the transformed data into Power BI.
Info: It is possible to remove tables that are not integral to your reporting goals. However, be sure not to remove tables that disrupt relationships between tables needed in your analysis. For example, though your analysis may only make use of the Application and Contact tables you will need the Grant Involvement table to connect these two tables.
Troubleshooting
When connecting to an OData feed, you might encounter various issues. Below are some common troubleshooting steps to help resolve OData connection problems:
Authentication and connection issues
Check the OData Service URL: Ensure the OData service URL is correct and properly formatted. It should be https://bi.smartygrants.com.au/api/odata4/service/v1/.
Check you are using the correct credentials: Verify that you are using the correct username and password. The username is the same you use for SmartyGrants followed by # and your OData API key. For example, if your SmartyGrants username is jennyp@example.com and your OData API key is 5555, the username you should enter is jennyp@example.com#5555. The password is the same one you use to log in to SmartyGrants.
Check you are selecting the correct Authentication Type. The connection should be Basic.
Read error messages: Carefully read any error messages provided. They often contain clues about what’s wrong, such as issues with authentication, the service URL, or data retrieval.
Common Errors:
400 Bad Request | Indicates an issue with the request format or query parameters. |
|---|---|
401 Unauthorized | Authentication issues, possibly due to incorrect credentials. |
403 Forbidden | The service is rejecting the request, possibly due to permissions. |
404 Not Found | The service or endpoint URL is incorrect. |
500 Internal Server Error | A problem on the server side that you may need to report to the service provider. |
Clearing cache
If you have previous connection credentials you may need to clear any cached data.
To clear the cache in Power BI:
Select File > Options and Settings > Options.
In the new window select the Data Load tab on the left-hand menu bar, then select Clear Cache under Data Cache Management Options.

Troubleshooting with Postman
If you're experiencing missing data when making requests to the OData API, you can use Postman, a popular tool for API testing, to troubleshoot the issue. You can download Postman here.
Accessing the API in Postman
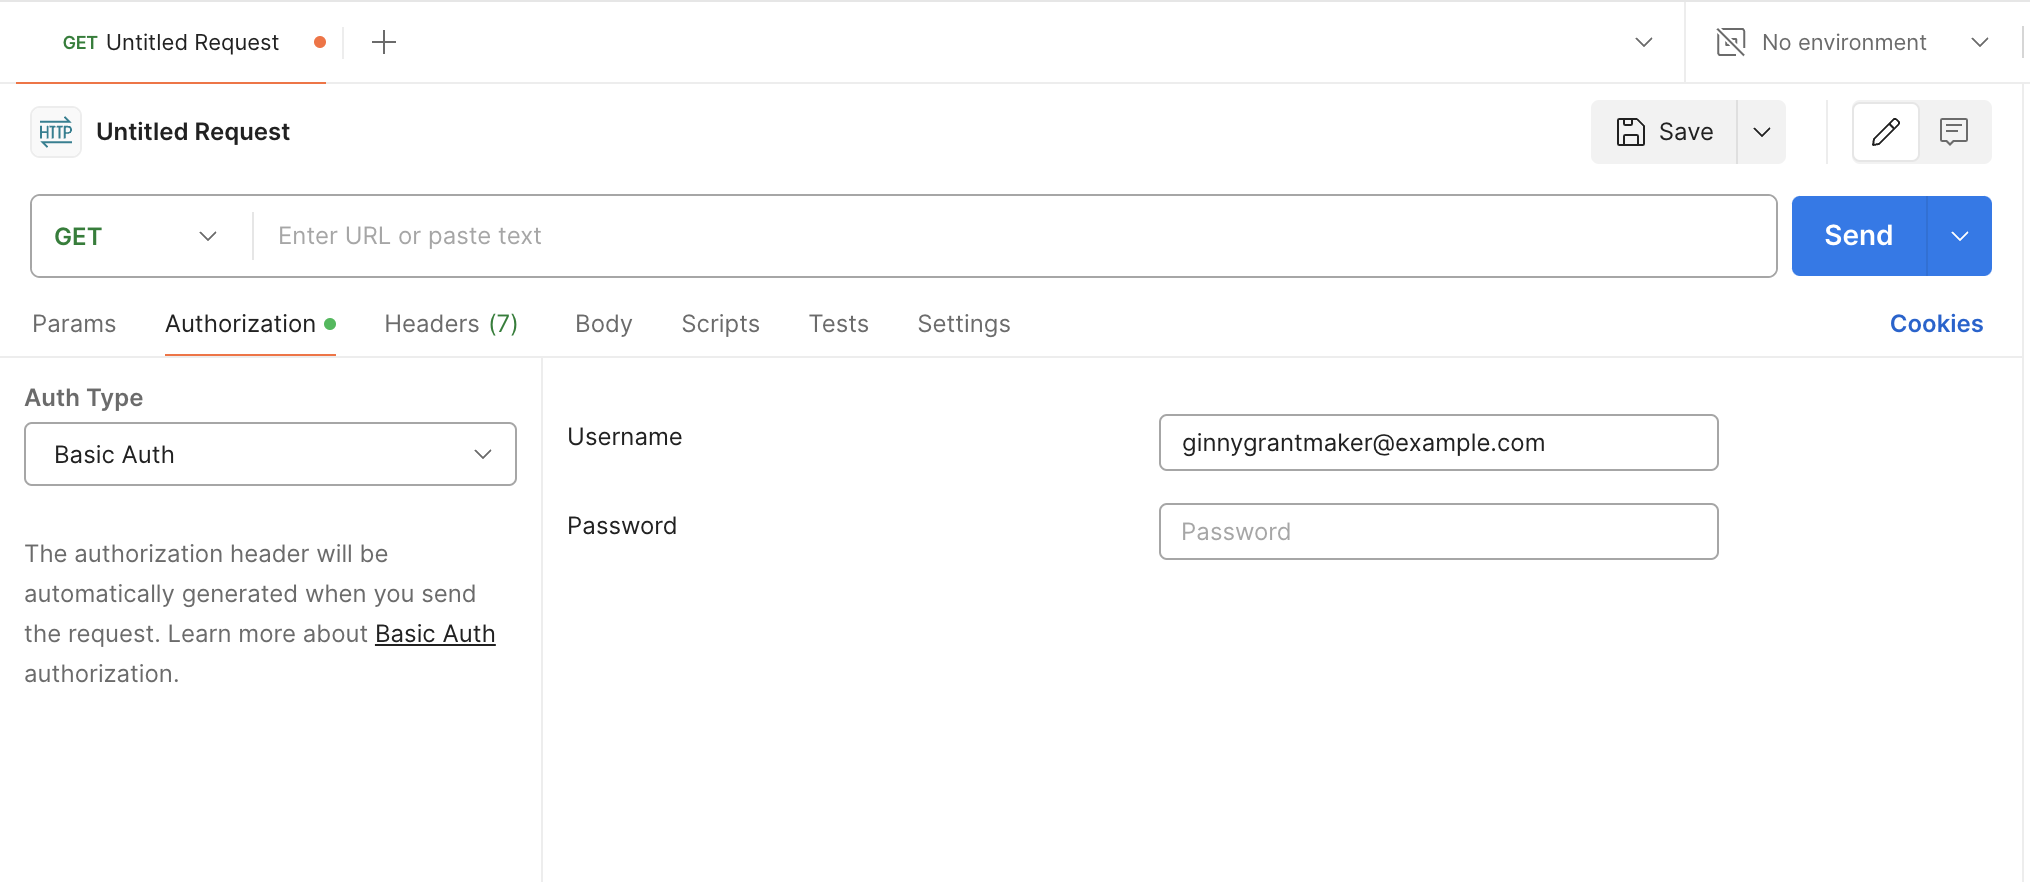
To access the OData API in Postman, enter in your SmartyGrants username and password in the Authorization section when creating a new API request:
In the Headers section, enter your API key:
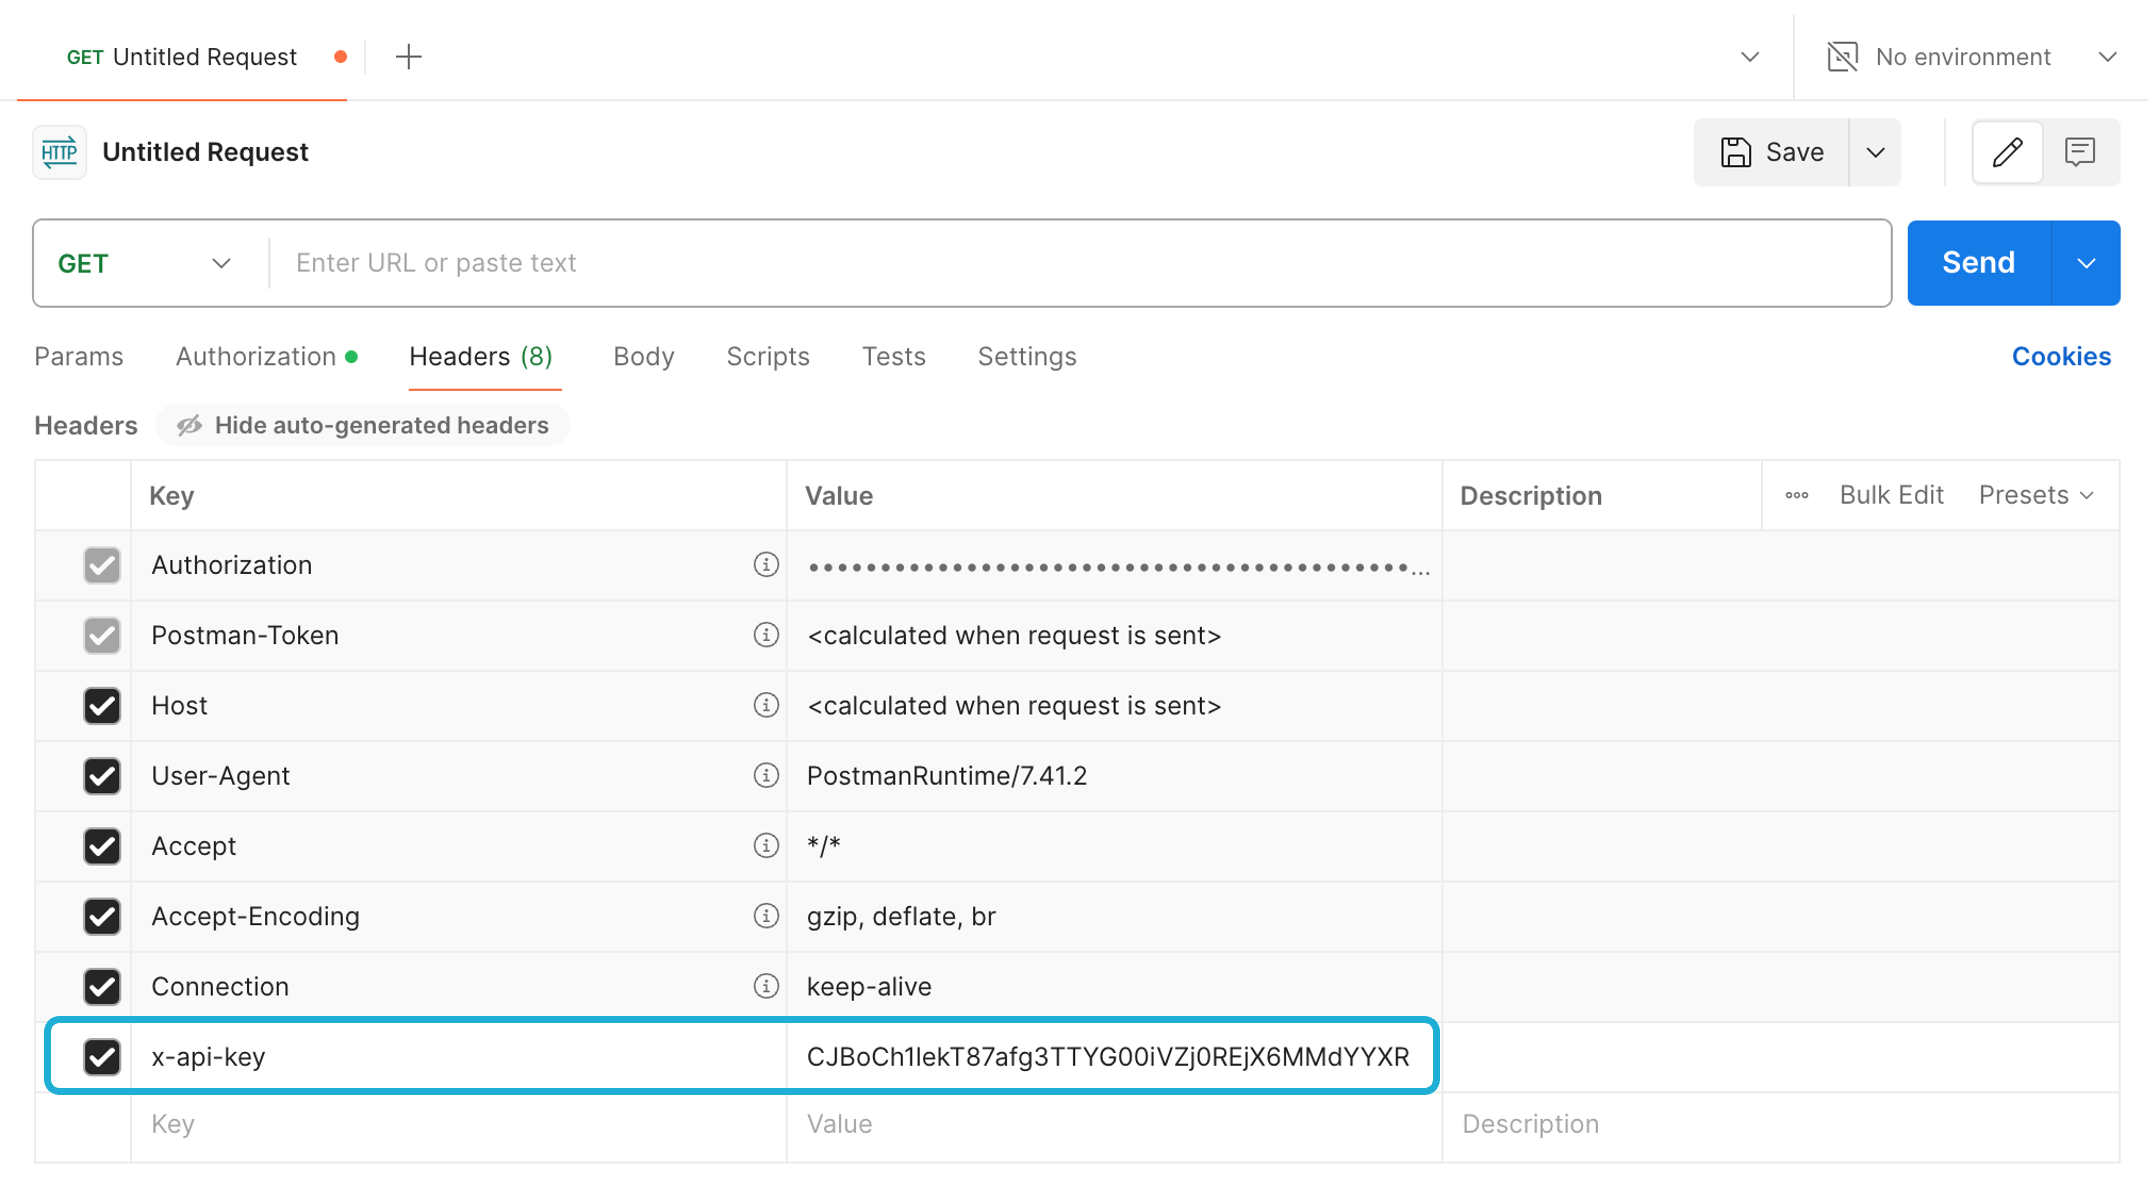
Info: If you do not already have an API key, request one via service@smartygrants.com.au.
Once you have authorised using your credentials, you can get your API Response.
Querying through Postman
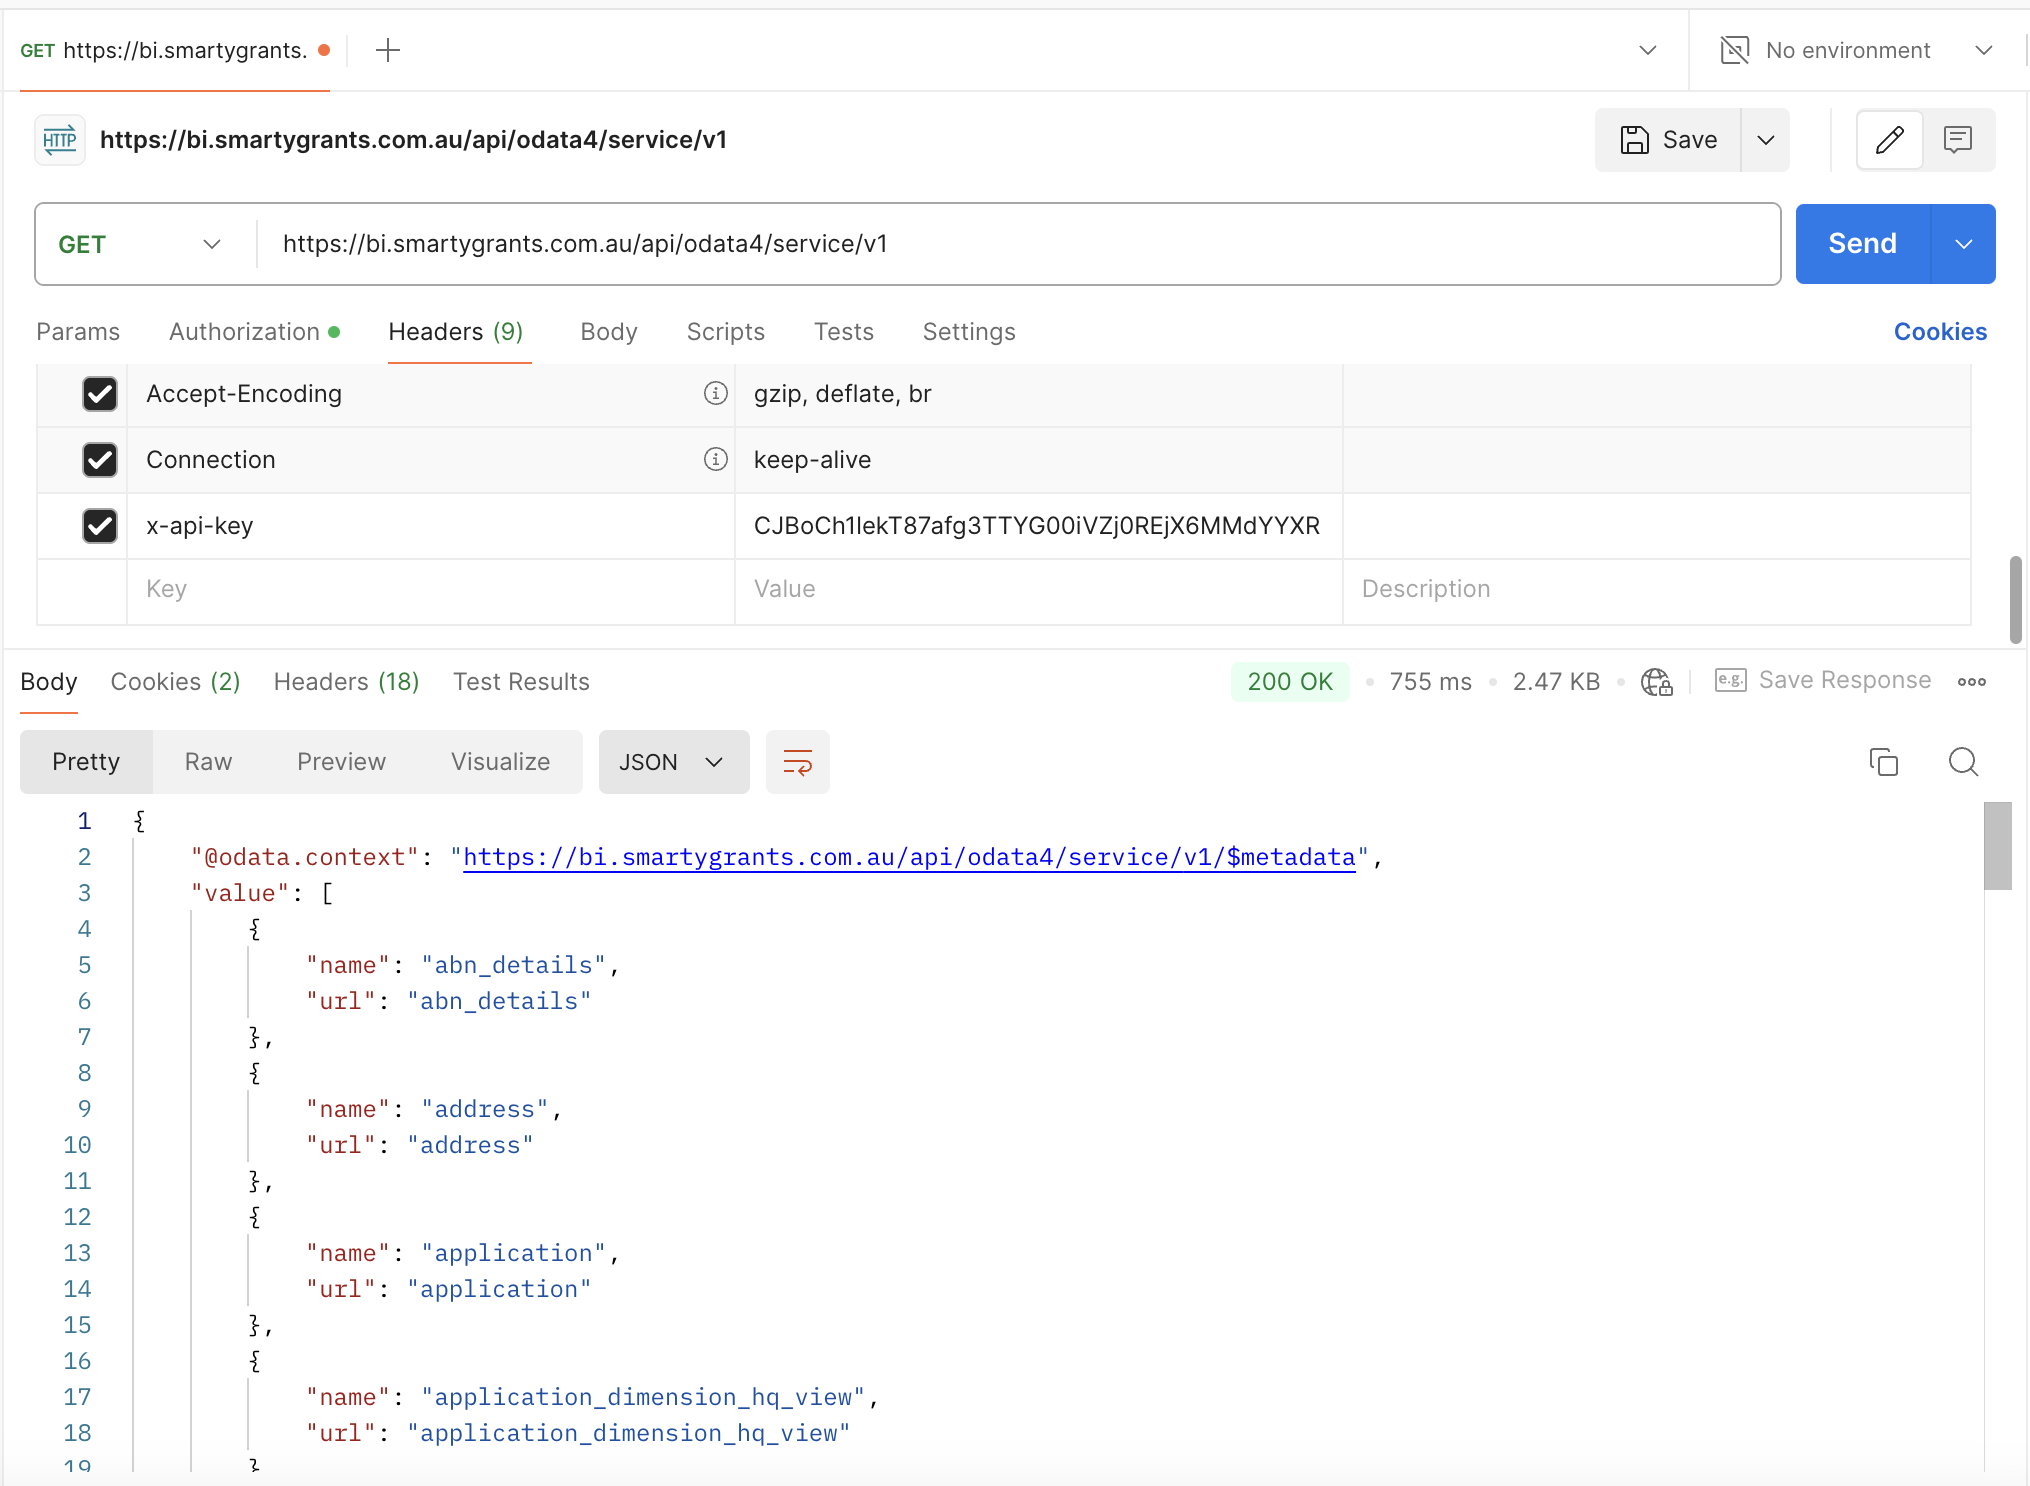
To see the list of entities that can currently be queried through OData, enter in the OData endpoint URL (https://bi.smartygrants.com.au/api/odata4/service/v1):
Data can be queried by editing the request URL. You can access data for a single entity by adding the entity’s name to the end of the request URL: https://bi.smartygrants.com.au/api/odata4/service/v1/{entity}
For example, to access the entity ‘application’: https://bi.smartygrants.com.au/api/odata4/service/v1/application
You can also view data for a single record by adding the ‘id’ inside brackets. For example, the URL below will only show application data for the record with ‘id’ 70394: https://bi.smartygrants.com.au/api/odata4/service/v1/application(70394)
Query options
Supported OData query options:
Query Option | Description |
|---|---|
$count | Used to retrieve the total number of entities in a collection. |
$top | Used to specify the maximum number of items you want the server to return. |
$skip | Used to skip a specified number of records in the result set. |
$orderby | Used to sort the results returned based on one or more fields. |
$filter | Used to retrieve only records that match the conditions specified in the filter. |
$deltatoken | Used to track changes in a specific data set. |
$select | Used to specify which fields to return from a collection. |
Query options are optional constraints on a query. They are added at the end of a request URL following the string form ?{query_options} = {value}:
https://bi.smartygrants.com.au/api/odata4/service/v1/{entity}?{query_options}.
An example of two query options $count and $top applied to the entity ‘application’: https://bi.smartygrants.com.au/api/odata4/service/v1/application?$count=true&$top=2.
Examine response data
When examining response data in Postman, it is important to start by checking the response status code. For instance, a status code of 200 OK indicates the requested infomrmation was returned successfully. See below for a list of common Response Status codes:
HTTP Status | Meaning |
|---|---|
| Information on the specified request has been returned successfully. |
| The username & password are missing or incorrect. |
| The request syntax or parameters are incorrect. |
| The URL is incorrect, or the resource does not exist. |
| An unexpected error occured on the server side. |
After assessing the status code, it’s crucial to review the response body in Postman. This allows you to see the actual data returned and compare it against expected results to identify any discrepancies or missing information.
Check for request limits
The SmartyGrants API has a limit on the maximum number of rows you can retrieve in a single query. Here’s how you can troubleshoot and manage this limit:
OData Pagination: If the data set of a table is larger than 1000 rows, the API will use pagination (e.g., returning a
@odata.nextLinkURL for the next set of data).Handle Pagination in Postman: If pagination is used, manually follow the
nextLinkin Postman to fetch subsequent pages of data.
Info: Visit the Postman Learning Center for more tips on how to use Postman with your API projects.