Getting Started Guide (UK)
SmartyGrants is a powerful online service that enables grantmakers and program managers to receive online applications and manage every stage of the grant lifecycle.
This introductory guide will help you:
Understand key SmartyGrants concepts.
Learn how to navigate the platform.
Get your first program up and running.
Start accepting applications.
Table of contents
Key concepts
Sites
Manage Site | The manage site is where you manage your grant programmes. You can access the manage site at https://manage.smartygrants.co.uk. Use your registered email address and password to log in. |
Applicant Site | The applicant site is where applicants will register and/or log into their personal account to manage their grant applications within your rounds. Your account will have it’s own unique applicant site link (https://accountname.smartygrants.co.uk) and a site theme that can be customised to look like your organisation’s website. |
Info: Applicants can use the same user account to apply to any grant hosted on SmartyGrants. This means that applicants do not need to register again for different funders, nor for any new round that you publish on your applicant site.
Managing programs
Programs | As a grantmaking organisation, you may run different types of grant programmes or funding streams. For example, your organisation may run two programmes at once - a Cultural Diversity Grants programme and a Community Grants programme. In the system, you can create a Program for each programme or funding stream. A Program acts like a folder containing all of the programme's applications, rounds, forms, tasks, and so on. |
Rounds | A round is a period during which your community can apply to a given programme. In the system, you can either define grant rounds with a start and finish date and time, or you can leave them open-ended. For example, you may accept Cultural Diversity Grants applications all year round, but only accept Community Grants applications between April 1st and May 31st. Applicants can only lodge online applications during the specified open round period. Each round can only have one initial application form. Each round you create is hosted on your applicant site with a specific URL. To apply, applicants can go straight to that specific web address, or visit your applicant homepage, to browse all open and public rounds. Rounds can be set to Public (which show on your applicant site homepage), Private or Test (which do not appear on the homepage). Typically, there are multiple rounds in a program. |
Forms | You can create your own online forms. Forms are the key to collecting information from your applicants, and can also be used to record internal data (such as assessment or administrative information). You can build forms from scratch or adapt the template forms created by the SmartyGrants team. If there is specific information you need to collect or report on, you’ll need to ask for it. Adding or creating a field within a form enables you to collect that information. |
Applications | An application is the record that contain all the information relevant to a specific grant application. An application is created when an initial application form is submitted, and application records will contain all added forms, whether externally submitted (Application, Acquittal or Variation forms), or filled out by internal staff or assessors (Assessment or Admin forms). While applications can have multiple contacts, each application record can only have one associated user. |
Workflows | Workflows provide management tools to help you follow established grantmaking processes employed by your organisation. These tools include stages, rules, and tasks. |
Managing data
Funding & payments | You can record funding and payment information in the system. You can set up financial periods, and create budget allocation and funding sources within these periods. Whenever you record an approved decision against an application, you can allocate a funding amount and define which budget and which financial period the amount is being drawn from. The funding section provides a quick snapshot view of your budgets and financial periods. It also shows you payments you have allocated, scheduled, approved and/or paid, returned or cancelled. All of this information can also be compiled into reports using the reporting feature. |
Standard fields & choice lists | A standard field is a key field/question for which you want to capture an answer on all (or most) of your applications across all programmes. They allow you to report on common information across programmes. Standard field responses can also be pulled through into other forms. Choice lists are predefined lists of choices that you want your applicants to choose from when answering a question. These lists can be used in choice questions across different programmes and forms. |
Reports | Reports allow you to turn your data into meaningful and practical information, formatted however you wish. For example, you can use reports to run summaries of grant rounds, produce notification letters to applicants, or analyse your grant giving over a period of time. There are various ways to report in SmartyGrants. |
Outcomes Engine | The Outcomes Engine is designed to help you collect, report, and learn about the outcomes and impacts of your grants in partnership with your grantees. You can also see which grantees and which funded projects are having the most success at helping you ‘shift the needle’ towards your overall outcome goals. |
Communications
Contacts | The system helps you to keep track of application contact details by filing them into a dedicated contacts directory. Contacts are automatically populated in the contact directory area when a form containing contact fields is submitted. The contact directory provides a summary of an individual or organisation's grant involvement history alongside their contact details. Contacts can be edited or added manually, and you can also keep a file note history of any correspondence on a contact record. |
Mailouts | The mailout functionality allows you to send email communications to your contacts. You can filter across programmes and applications to ensure the right audience is selected for your correspondence. |
System navigation
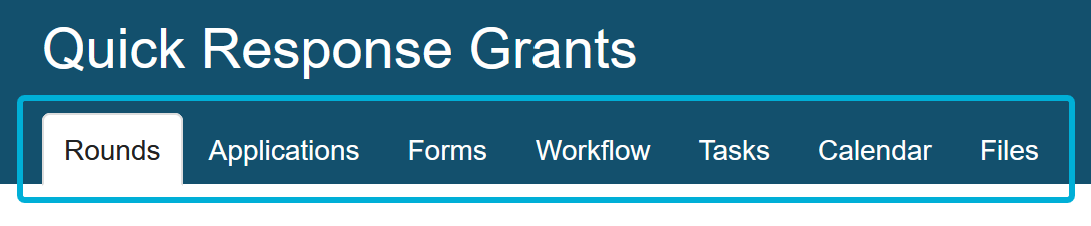
When logged in, at the very top of all pages, you will see the navigation panel.
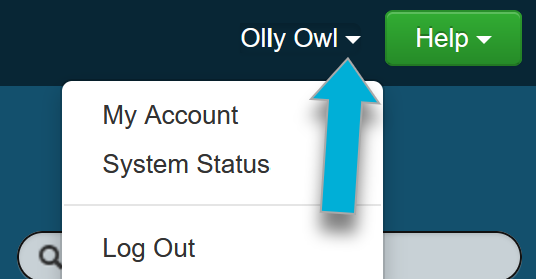
The name of your Account will appear on the left-hand side in white.

The icons at the top of the screen act like a filing cabinet for your account. Selecting an icon will take you to the relevant page.
Your Account Settings, Log Out, and Help menu are all found at the top right-hand side of the screen.
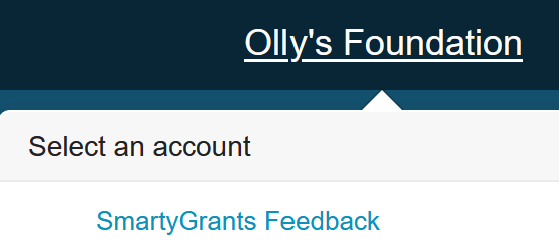
If you have access to several accounts, you can access these by hovering over the account name.
Programs
Below is the Programs icon.

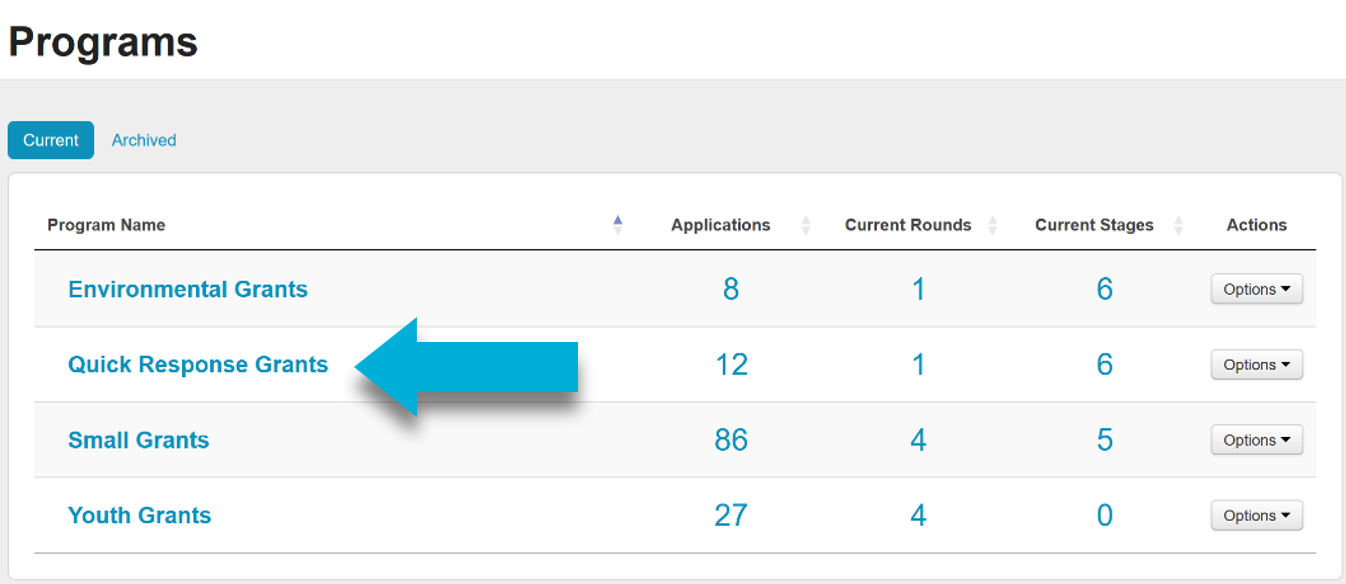
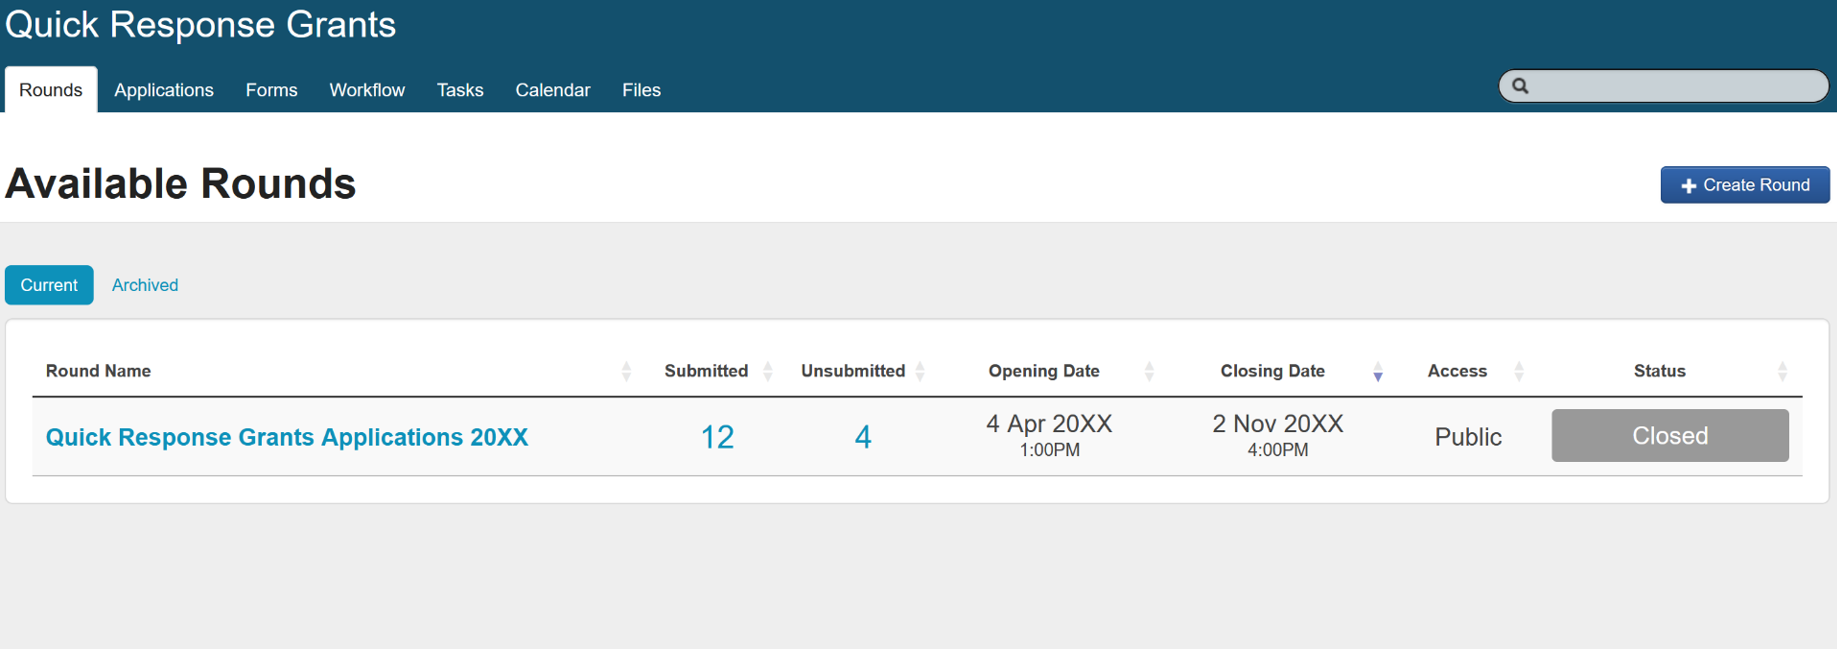
The Programs page is the first page you see when you log in. It displays a list of programmes that have been created within your account alongside a summary of each program's applications, current rounds, and stages.
Selecting the name of that programme will take you to that specific programmes' page.
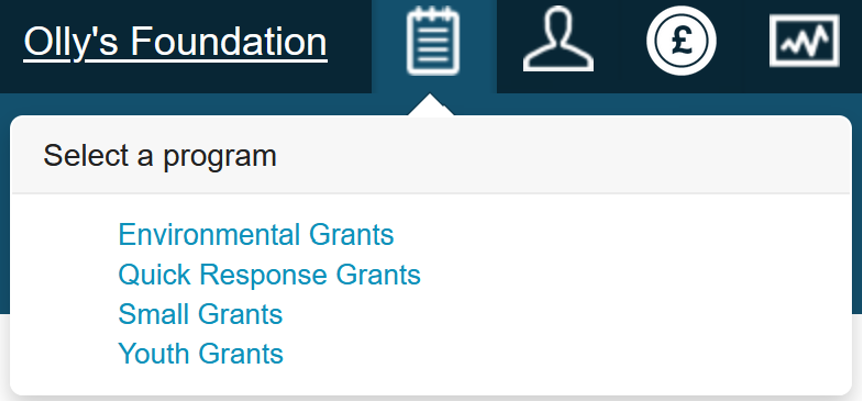
You can also quickly switch over to another programme at any time by hovering over the Program icon.
When you select one of your programmes, an additional navigational panel will appear. This panel is for features/settings relevant to the specific programme only. By default, the Rounds tab is selected.
If you have any current rounds, they will appear under Available Rounds on this page.
Contacts
Below is the icon that takes to you to the Contacts section. The default tab is the List of Contacts screen.

In Contacts, you can edit contact cards within your contacts directory, review and merge any duplicate contacts, add custom tags & flags to contacts, and see a history of recently sent emails to contacts.
Funding overview
Below is the icon that takes to you to the Funding Overview section.

In Funding Overview, you can see an overview of your account’s payments and funding history, and manage any financial periods that have been set up.
Reports
Below is the icon that takes to you to the Reports section. The default tab is the Dashboard page.

By default, in Reports, you can run a report, see your report history, and view, edit, or create a report template.
Mailouts
Below is the icon that takes to you to the Mailouts section. The default tab is the Drafts page.

In Mailouts, you can view, create, or send mailouts, see a history of sent emails, or view, edit, or create a mailout template.
Tasks
Below is the icon that takes to you to the Tasks section. The default tab is the List of Tasks page.

In Tasks, you can filter and view your assigned tasks, or create a new task.
Settings
Below is the icon that takes to you to the Settings section.

In Settings, you can configure and manage your account’s settings, user access, your data schema, and more.
Info: The settings page is where you’ll need to configure a lot of your account ‘defaults’. Once you’ve gone through the Getting Started guide in full, we recommend reviewing our training resources to get familiar with what, and how, to finish configuring your account.
‘First Week at SmartyGrants’ checklist
This checklist is designed to get you up and running in the fewest steps possible. Using this checklist, you’ll be able to:
Set up users
While following each step, if you are not familiar with any of the terms mentioned, please review the Key concepts first.
Before you start, ensure the relevant team members in your organisation are added with the appropriate access levels. A user account is required for each team member to be able to access the manage site or SmartySkills.
Select the Settings icon at the top of screen.
Under Users, select User Access.
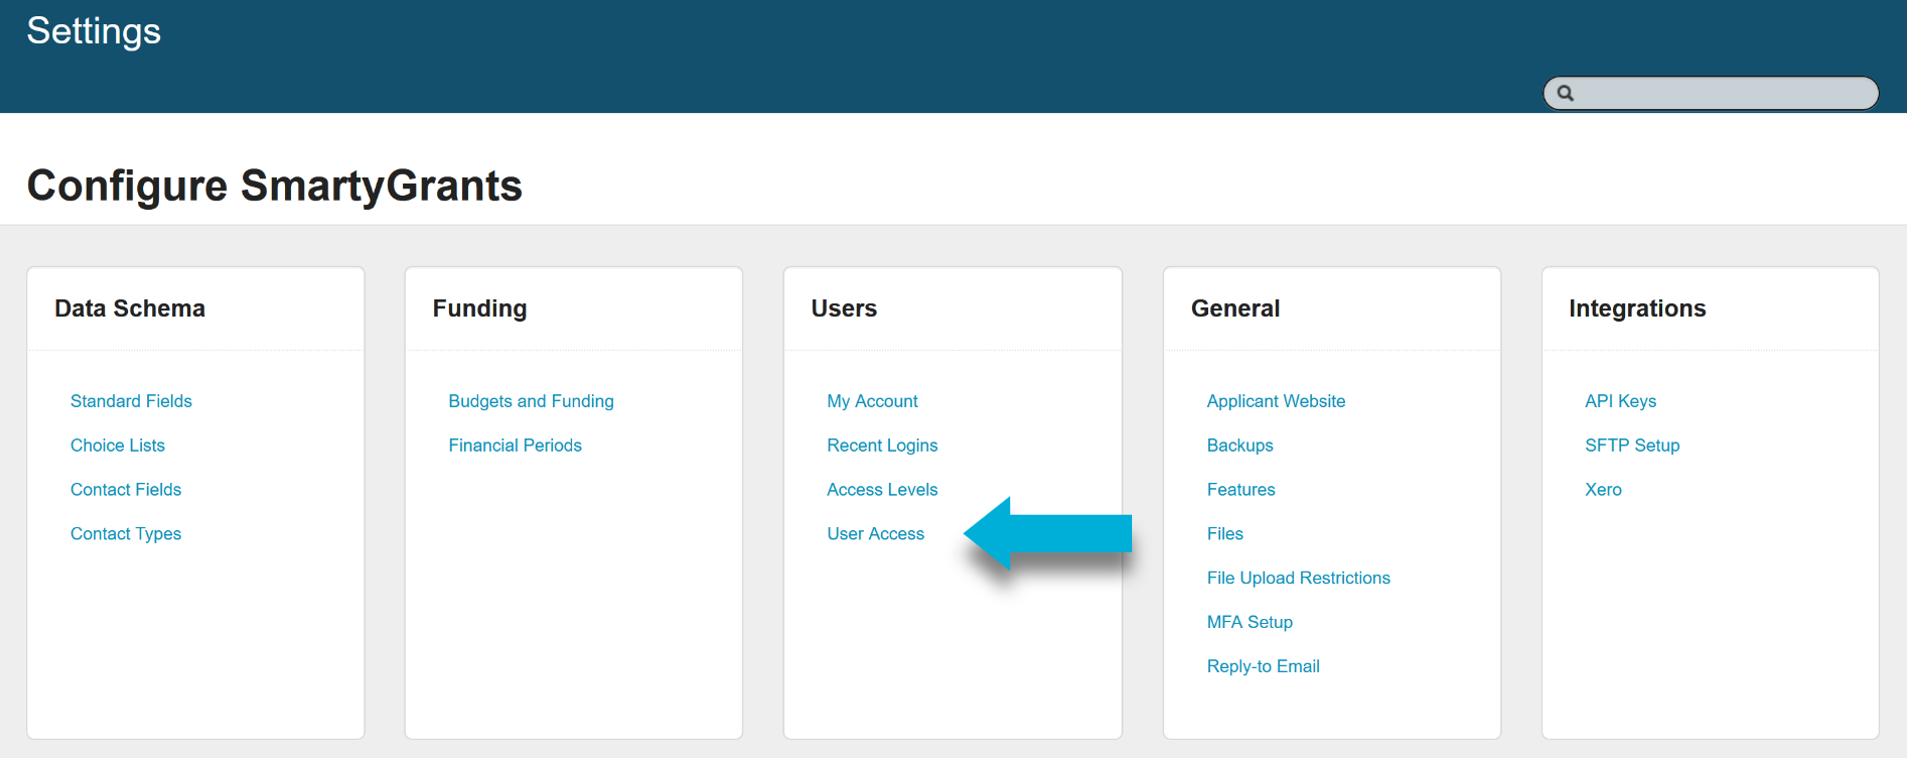
In the User Access screen, select the blue Add User button.

Enter in the user's name, email address, and organisation.
Select Add User.
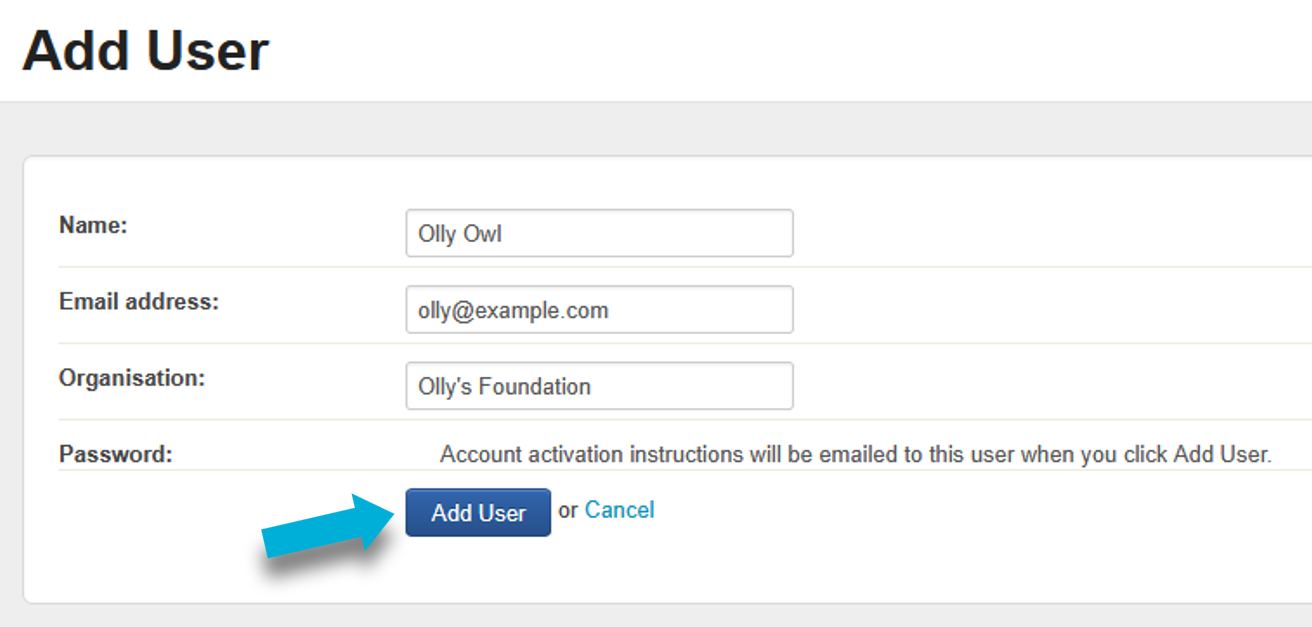
Note: Once you add a user, an automatic email will be sent from service@smartygrants.co.uk to that user’s email address. The email will contain a link for them to create their password. If the user is having trouble finding that email, double-check that their email address was input correctly. You can also ask them to check their junk/spam inbox folder. If they still cannot locate the email, contact our support team for assistance.
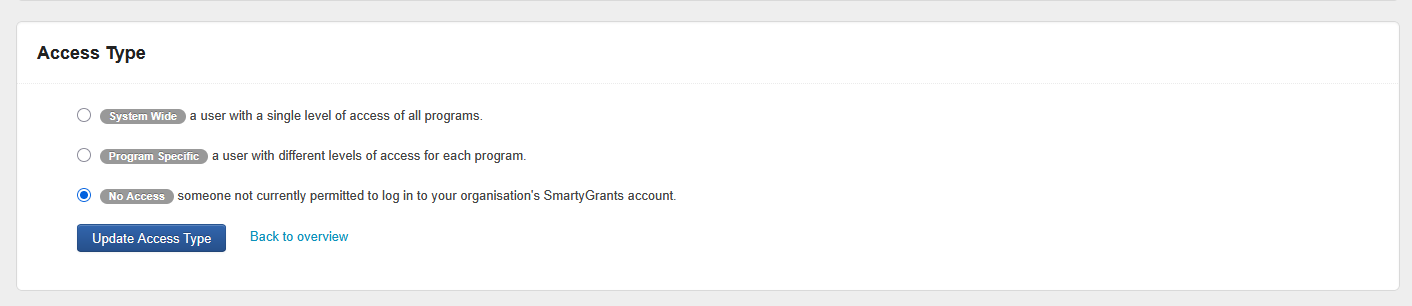
Next, you’ll need to assign a user access level for that user. Scroll down to Access Type.
Select the access type you wish to assign your user, and then select Update Access Type.
System-Wide: A single, consistent level of access across all programs.
Program-Specific: A customised level of access for each individual program.
No Access: No visibility or access to the account.
Depending on what access type you choose, another window will appear to confirm the User Type. The options presented differ for each access type.
Tip: When assigning access types and user types, consider the minimum access and permissions needed for a user to perform their role. E.g:
An assessor that is only performing assessments for a specific programme would need Program Specific access type, Assessor user type.
A programme manager who is publishing and maintaining a specific programme would need Program Specific access type, Program Manager user type.
A data analyst that only needs to run reports across all programmes would need System Wide access type, Reporting Only user type.
This is not an exhaustive list, and the examples are only for your consideration. To understand more about user access, see User Types & Access Levels.
Select the relevant choices for your user, and then select Update Access Levels.
Set up contact types
Before you start accepting applications, you’ll want to set up your contact directory so that it makes sense for your organisation. Get started by creating the types of contacts you’re expecting to collect.
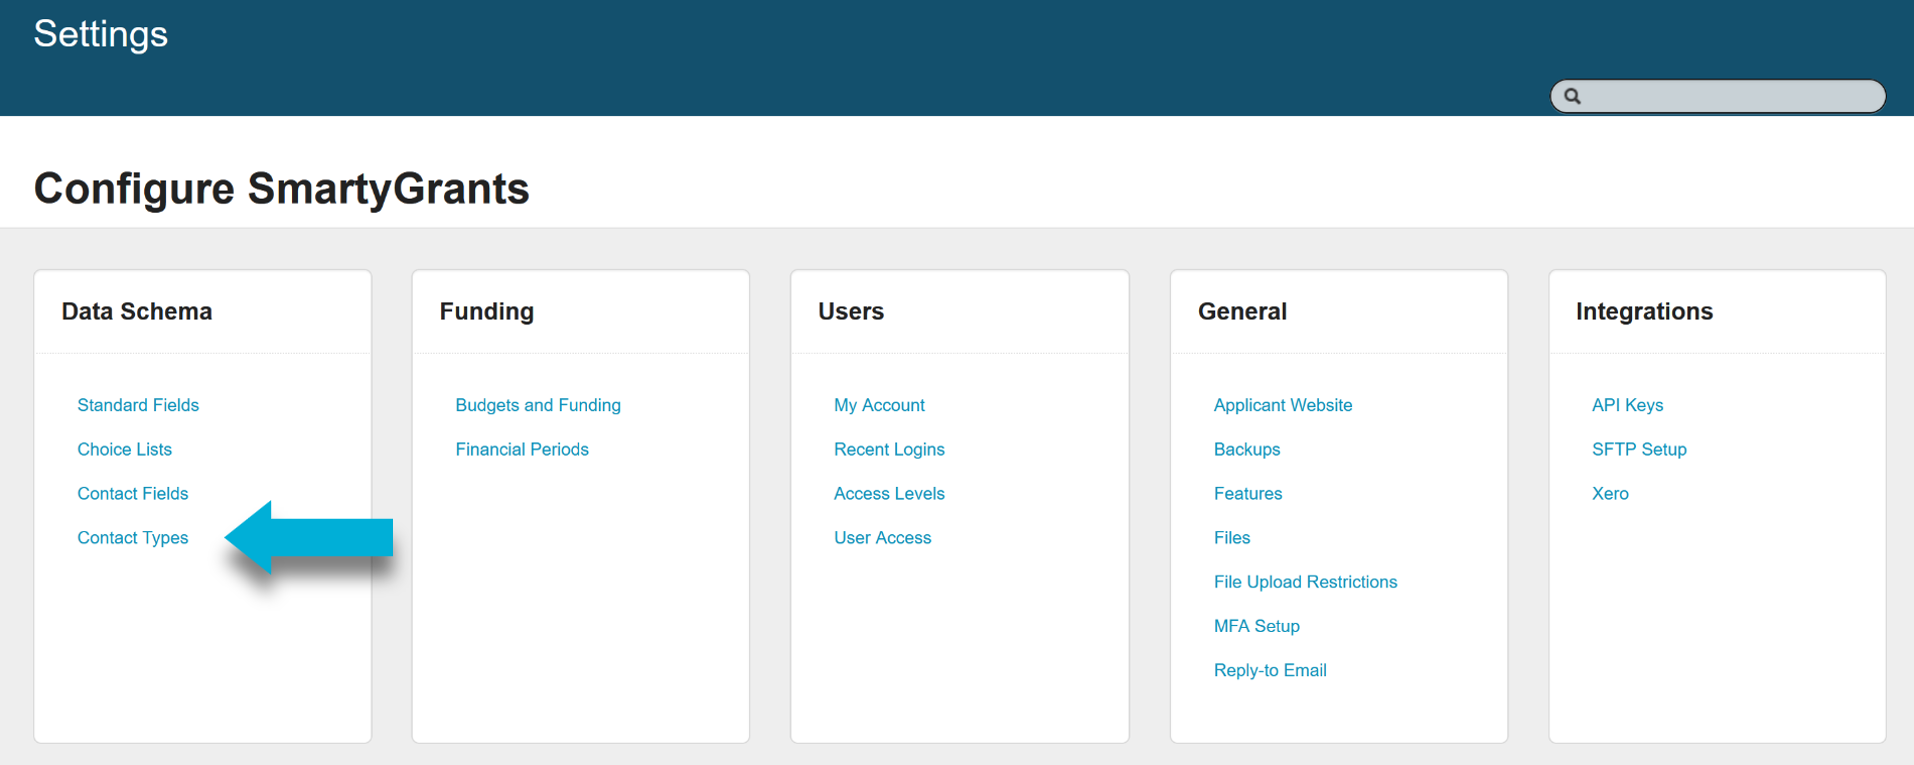
Select the Account Settings icon.
Select Contact Types.
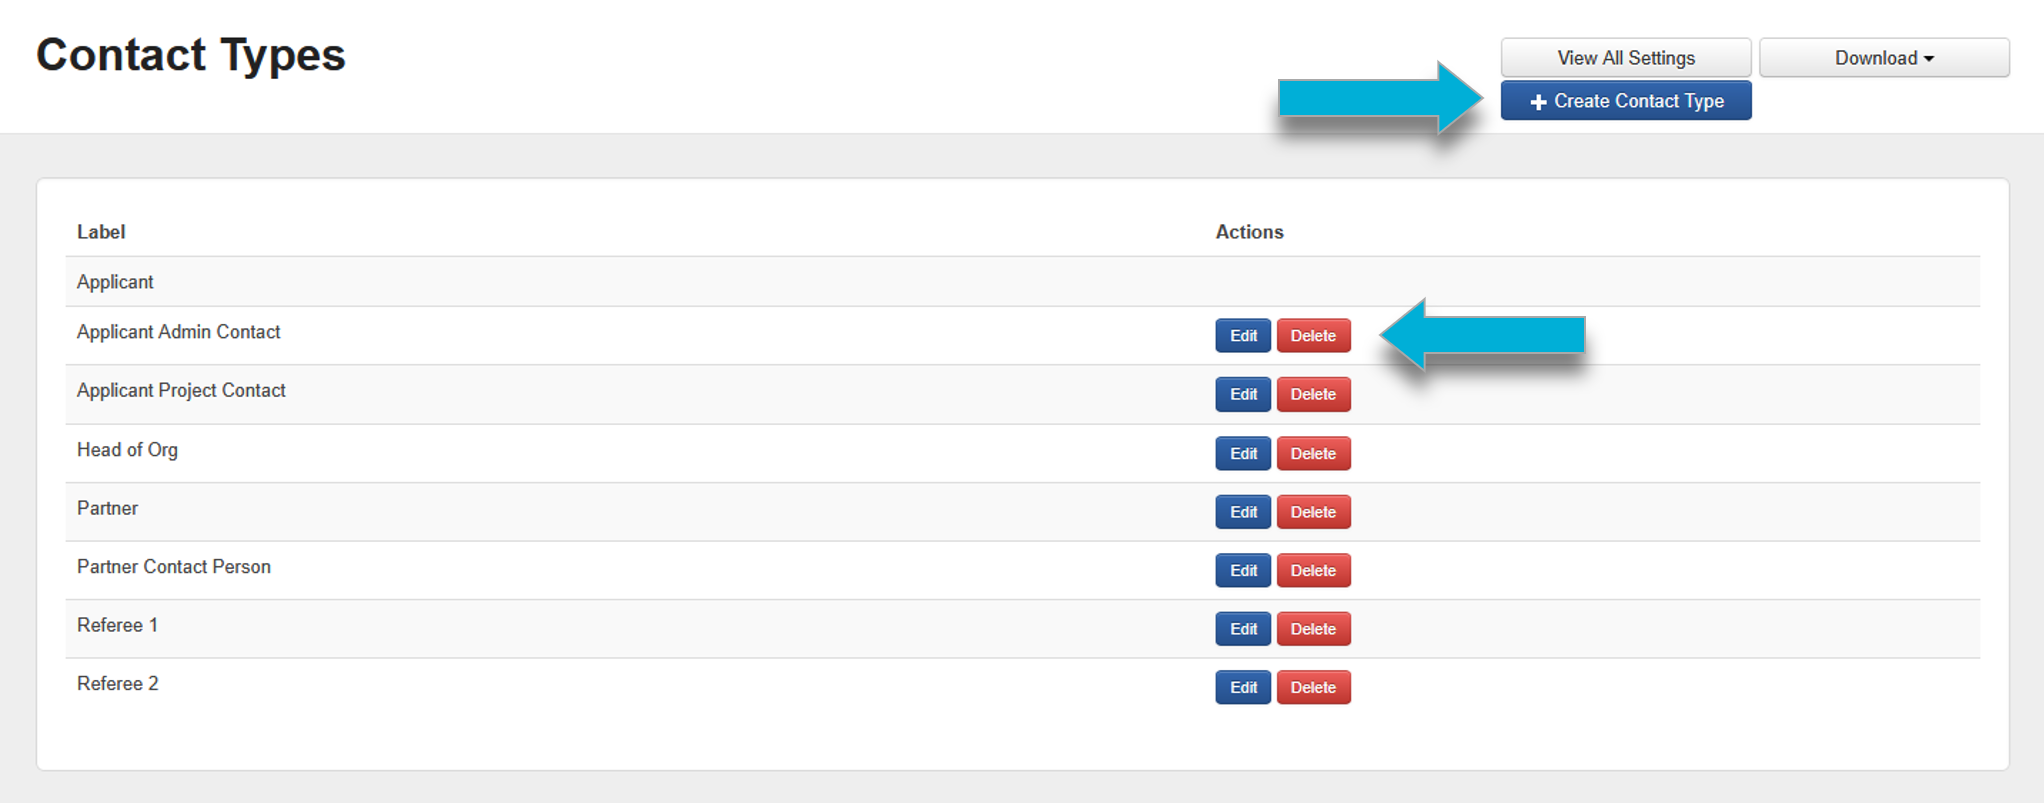
Note: Contact types are used to identify the role or relationship a particular contact fulfils within an application. The more that your contact types represent your grantees, the easier you will find it to maintain your contact directory.
The only default contact type is Applicant, and this cannot be changed. This contact type is essential to allow some functionality in the system to work correctly.
Under Contact Types is a list of the current contact types for your account.
If you want to update an existing contact type, select the Edit button.
If you want to remove a contact type, select the Delete button.
If you want to add a contact type, select the + Create Contact Type button.
Set up contact fields
Now that you have your contact types set up, you should decide what details you’d like to collect about your contacts.
Select the Account Settings icon.
Select the Contacts Fields tab.
Review the available default contact fields and categories.
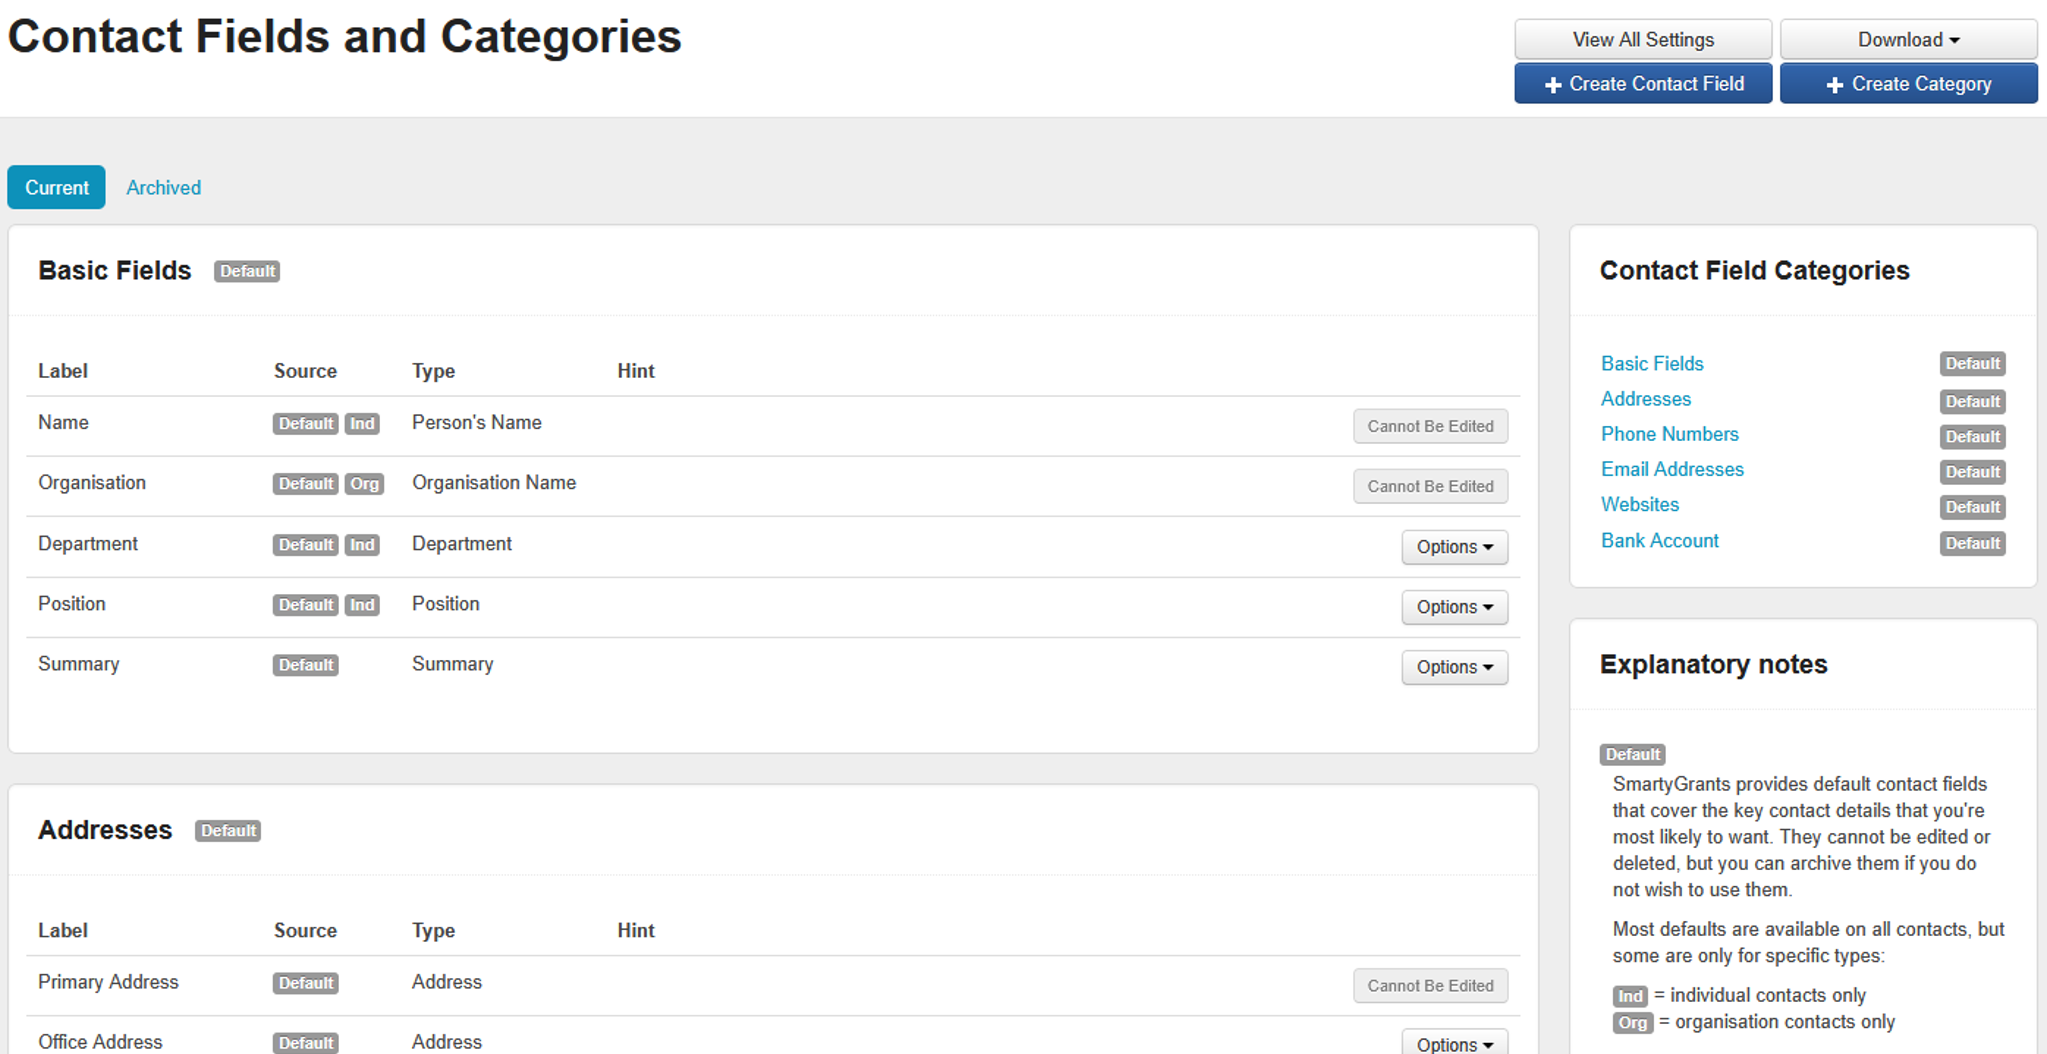
If you want to add a custom category, select the + Create Category button.
Give the category a label.
Select Save.
If you want to add a custom contact field, select the + Create Contact Field button.
Select the type of contact field you would like to create.
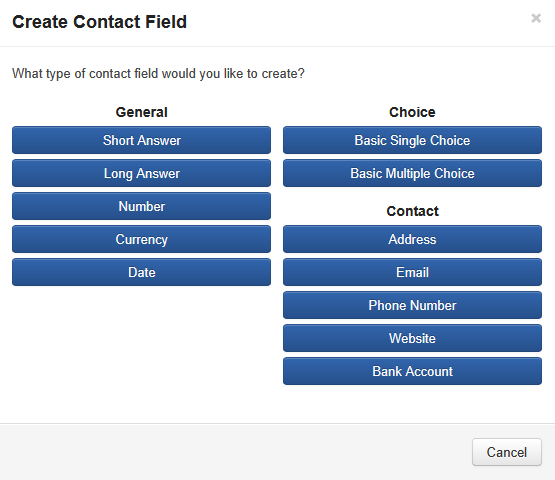
Select which category the field belongs to.
Enter a label for the contact field.
Note: The label is an internal reference that identifies the field and is used in reporting. The question text that applicants see will be created when the contact field is added to a form.
Complete all other settings for that specific question type.
Select Save.
Create a program
You’ll need to create a programme before setting up a round. A programme should reflect the type of funding being distributed, and account for the potential for multiple rounds; e.g ‘Cultural Diversity Grant’ or ‘Scholarships’.
Go to the Programs tab.
Select the + Create Program button.
Enter a programme name.
If you wish to specify a programme-level Applicant ID Numbering scheme, you can do so here. The numbering scheme determines the default prefix, suffix, length of digits, and starting number. Note that a numbering scheme can also be set at the round level later on if required.

Set a Reply-to email address. The default is set to service@smartygrants.co.uk, but we strongly encourage you to change this to be an email address that you and the grants team can access. Note that you can set a reply-to email at the round level later on if required.
Select the blue Add button at the bottom left of the screen. The system will display a message stating you’ve successfully created the program.
Create an application form
To collect applications, you’ll need to create a form with all the relevant fields.
Navigate to the relevant Program you made earlier.
Select the Forms tab.
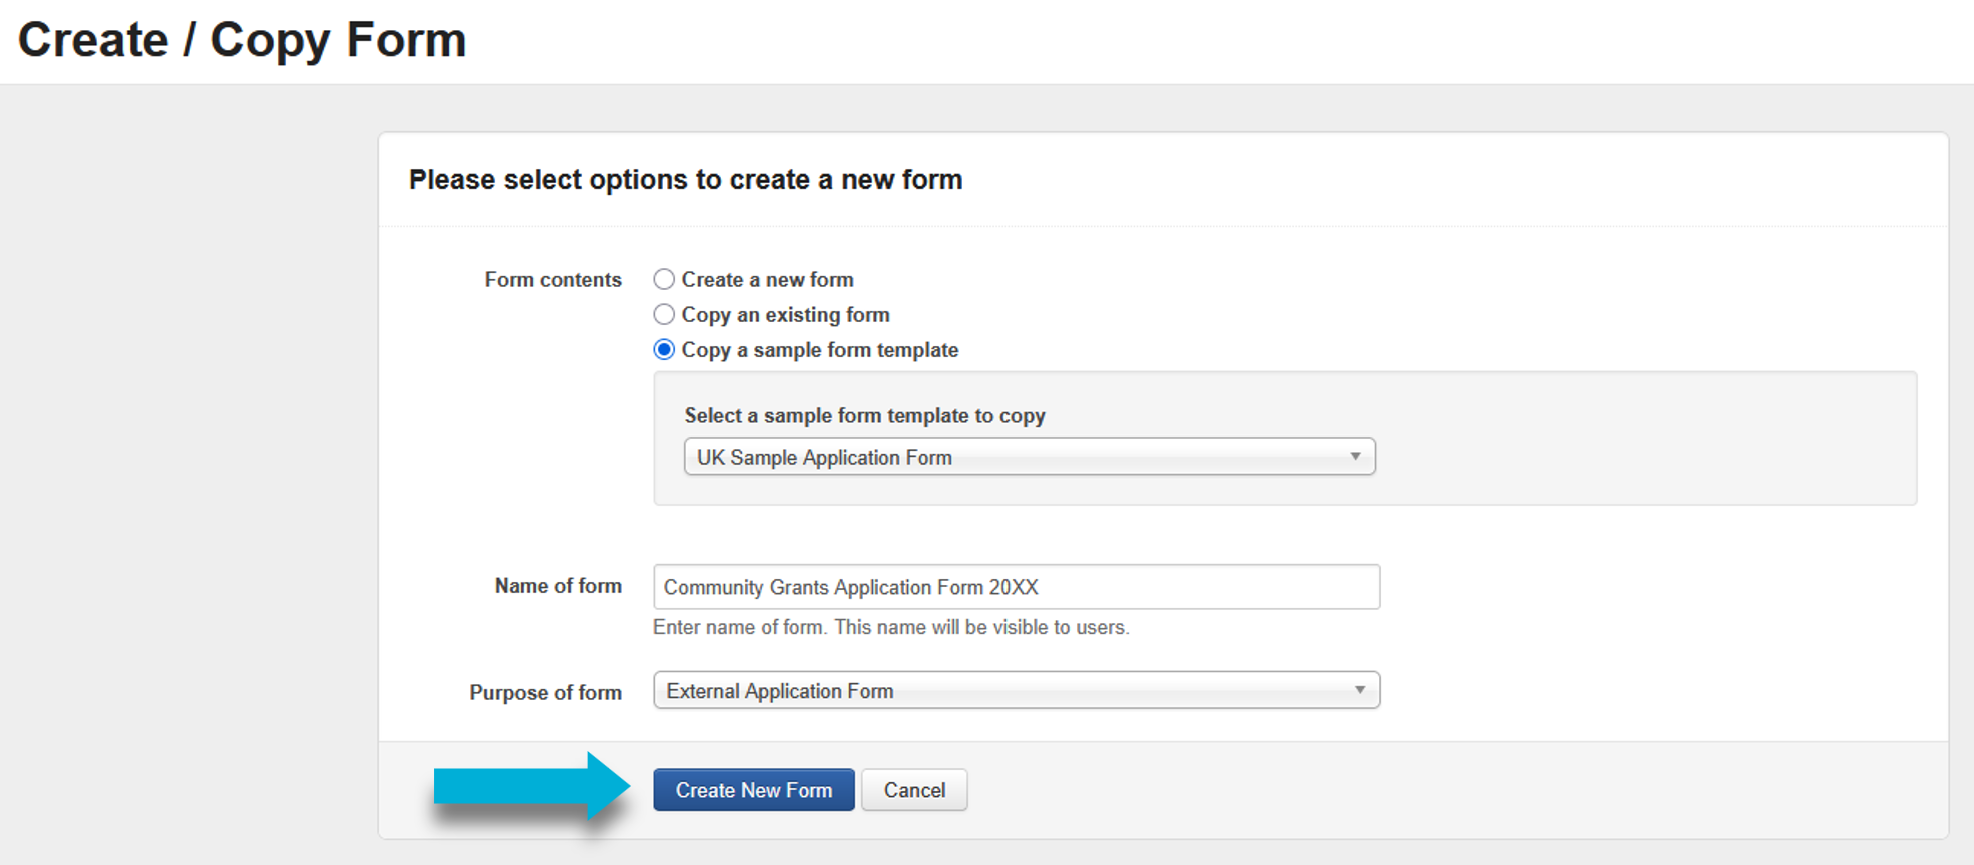
Select the blue + Create/Copy Form button.
To quickly get started, we strongly recommend selecting the Copy a sample form template option. This template will provide you with a form designed and built by the SmartyGrants team that can be easily customised.
Name your form.
Important: The form name you choose will be visible to applicants.
Select External Application Form from the Purpose of form drop-down box.
Select the Create New Form button.
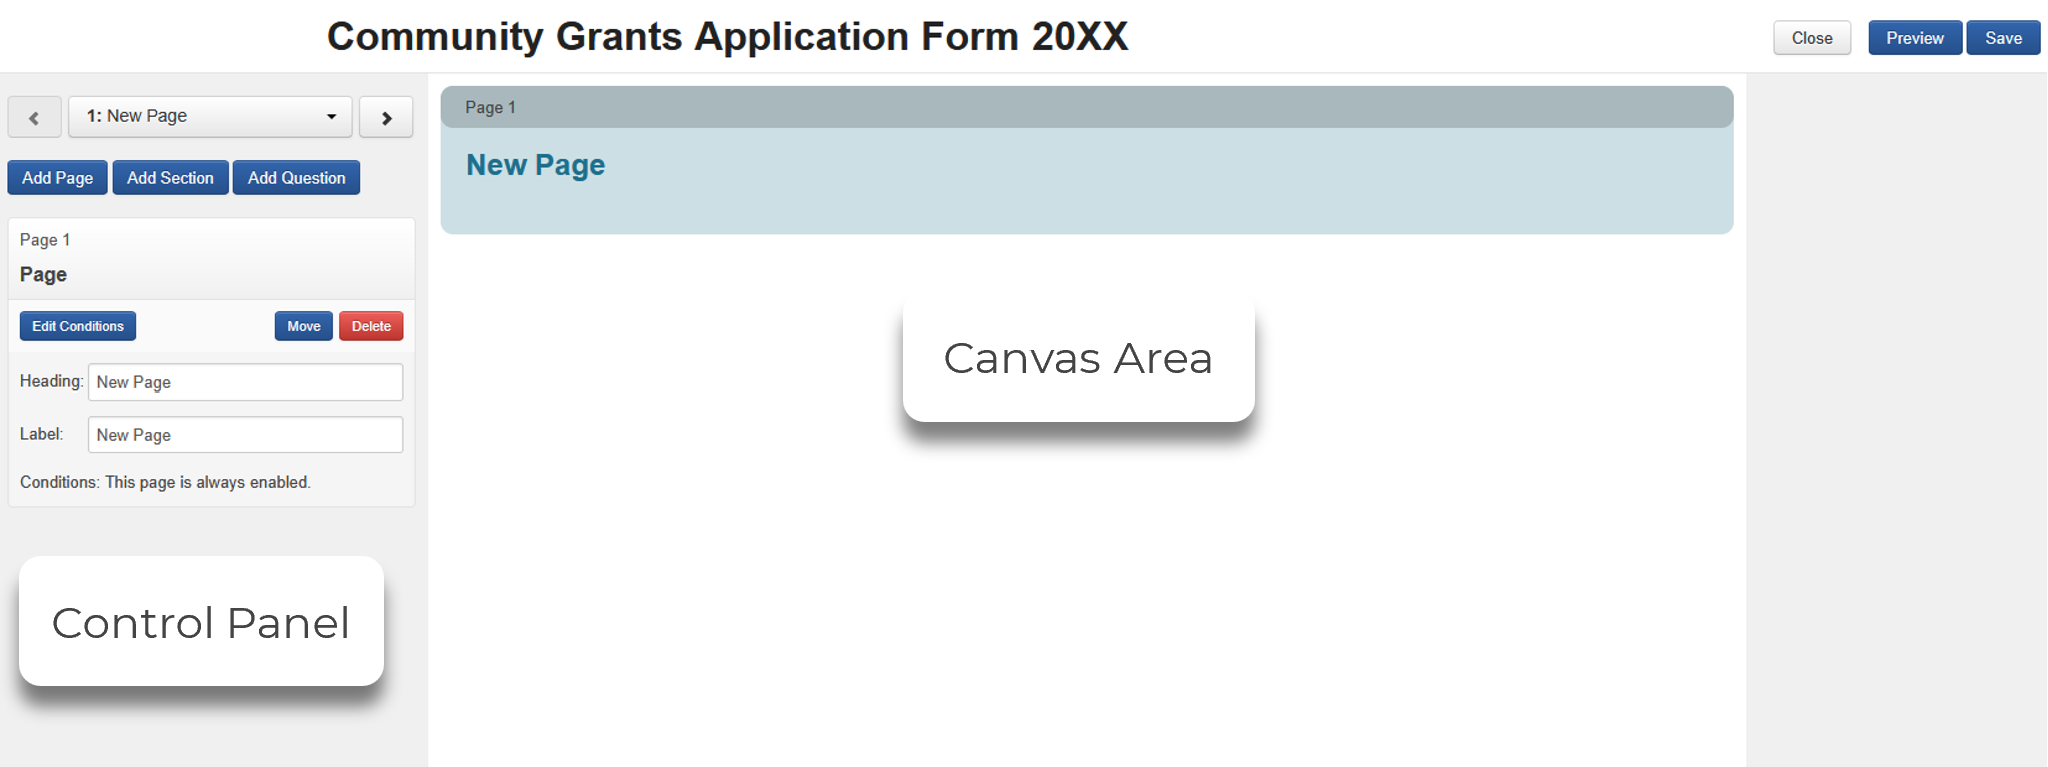
This will then open the form editor where you can begin to build or customise your form.
The area on the left-hand side of screen is the control panel, where you can control settings for your form, and edit the form’s elements (Pages, Sections, and Questions).
The area on the right of the screen is the canvas area, where the contents of the form can be seen.
To navigate the form:
Use the back and forward arrows at the top of the control panel to switch between form pages.
Use the scrollbar on the page window to scroll up and down the canvas area.
To change settings for a particular element of the form template, the element will first need to be selected within the canvas area. Once selected, the settings for that element will then appear in the control panel.
Warning: Ensure you periodically select the Save button when making edits to your form – at least once every 10 minutes – to ensure your progress is not lost.
To add new elements:
From the control panel,
To add a new page, select the Add Page.
To add a new section, select the Add Section.
To add a new question, select the Add Question.
To remove elements:
From the control panel,
To delete a page, make sure the page element is selected by selecting the Page (Number) bar at the top of the canvas area, then select the Delete button from within the control panel.
To delete a section, make sure the section element is selected by selecting the Section (Number) bar in the canvas area, then select the Delete button.
To delete a question, make sure the question element is selected by selecting the Question in the canvas area, then select the Delete button.
If you’re using a form template, review the information already contained within the form template, including the comments (indicated by curly brackets) for guidance or tips on form design.

If you wish to see how the form will appear to your applicants, you can select the Preview button.
When you have finished editing the form, select Save and then Close.
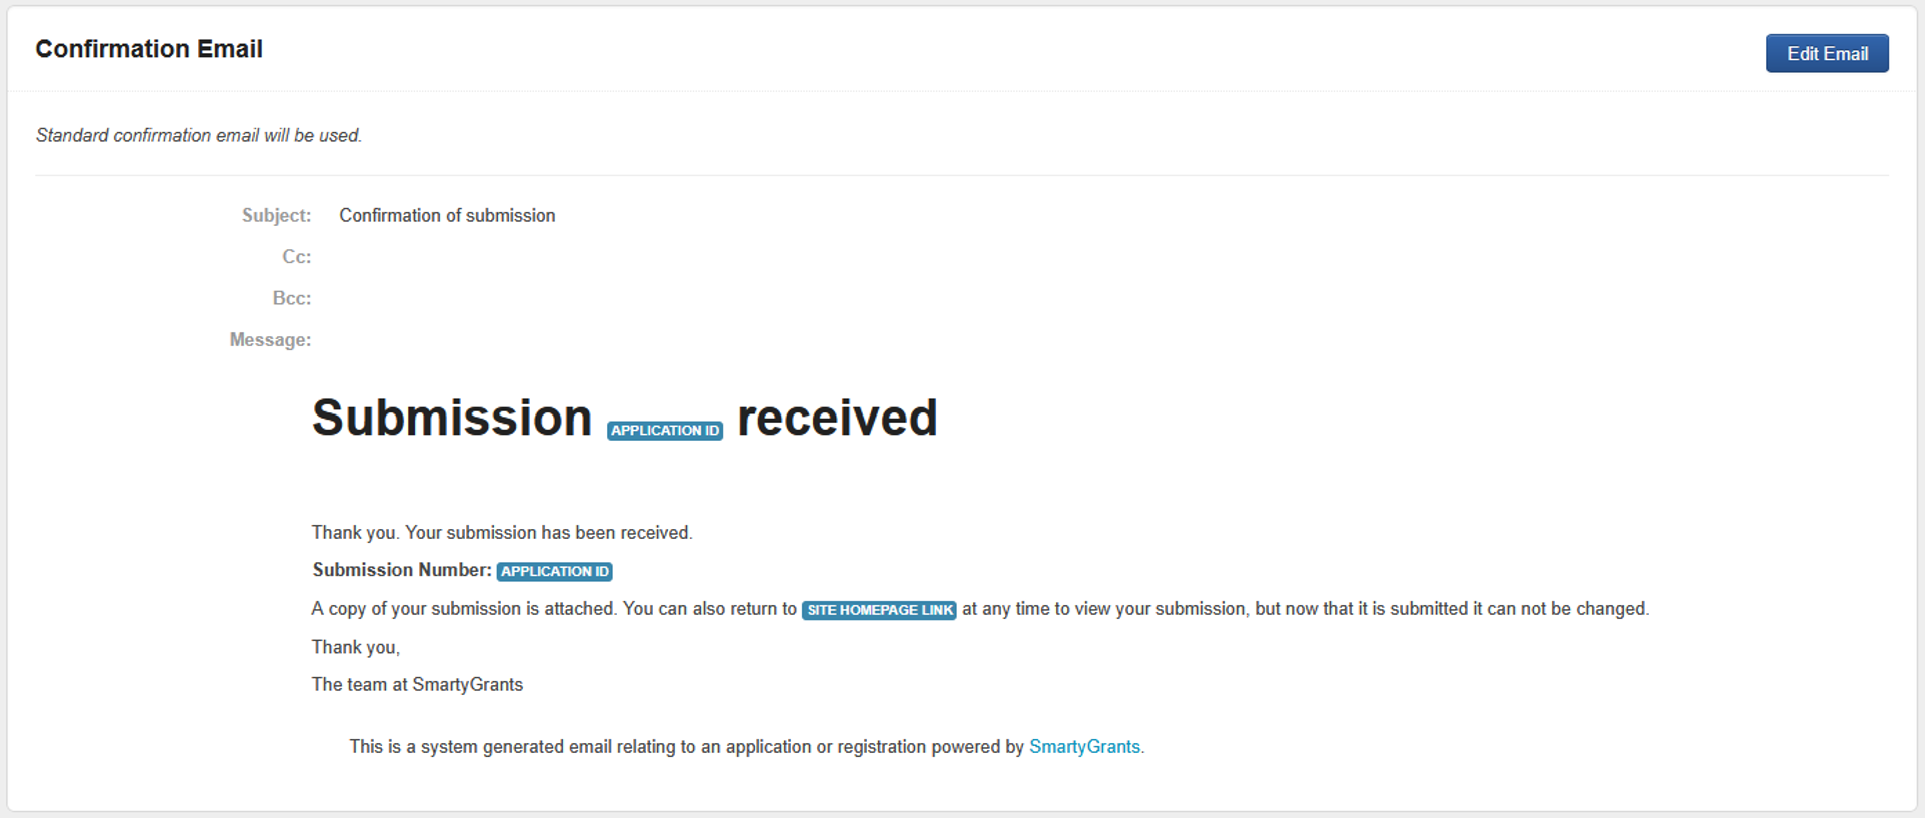
When your form is ready, you have the option to customise the notification email applicants receive when they submit the form. To edit this notification:
From the Forms tab, select Options next to your form.
Select Form Settings.
Scroll down to the Confirmation Email section, and select Edit Email.
Edit the contents of the confirmation message. You can also set CC and BCC recipients if required.
Select Save.
Create a test round
You should always test your forms before making them available to applicants. A Test Round allows you to create test applications without them populating the contact directory. Unlike live rounds, test rounds are easily deleted once you’re done with them.
Navigate to the Program you made earlier.
Select the Rounds tab.
Select the blue Create Round button.
Next to Round name, enter a name for your test round. E.g: Community Grants TEST.
Under Access, select Test Round.
Next to Application form, select the application form you created earlier from the drop-down list.
Select an opening date and time using the calendar and drop-down lists.
Enter a unique Webpage URL identifier to be used to access this round. E.g: CommunityTEST.
Select the Create Round button, which will take you to the round settings page.
So that you can test your form, select the red Publish Now button.
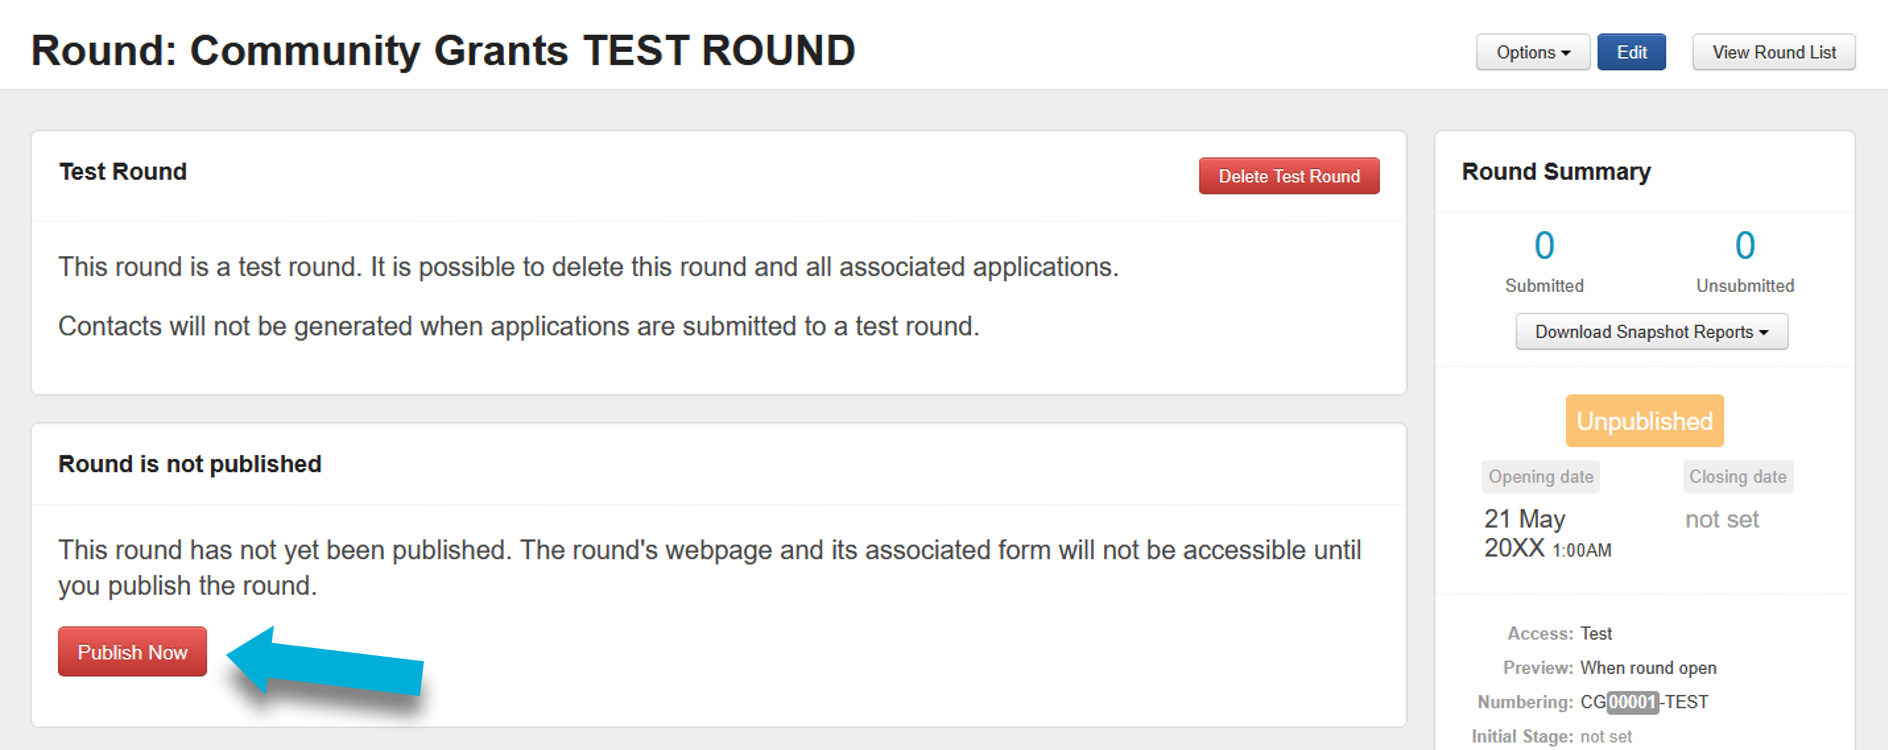
Under Round Summary, select the URL. This will open the test round URL on the applicant site.
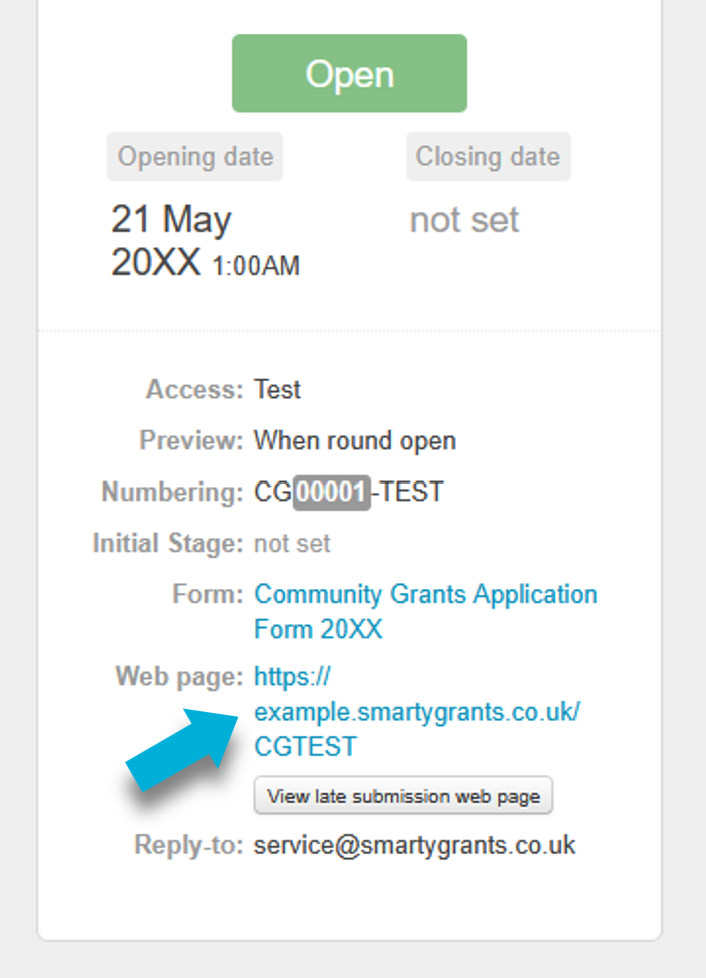
From here you can test your application form by submitting test applications via the same URL above. Any testers will need to have a registered SmartyGrants account. We recommend testing the form as many times as required to ensure all conditions in the form are working as you expect.
Info: To start a test application, your manage site log in details can be used to log in as an applicant. Alternatively, you can register a new account on the applicant site using a different email to start a test.
Once you have finished testing, you can either retain the test round for testing future forms, or you can delete it. To delete the test round:
On the Available Rounds page, select the test round you wish to delete.
Select the red Delete Test Round button.
To confirm deletion, select Yes - Delete.
The round will now be deleted.
The form that was attached to that round can now be edited without restriction. If you would like to test a round again, follow the steps above starting from Step 1.
Important: When the first application is started for a round (including test rounds), the application form will be marked as In Use. A form that is marked as In Use is restricted, and you won’t be able to delete or edit questions within the form. Once you’ve deleted the test round, the form will no longer be marked in use, letting you freely make changes again.
Publish a live round
Now that you’ve tested your forms, you can publish your round and start accepting applications!
Select the program from the Program page.
Select the blue + Create Round button.
Enter the name of the round.
Important: The Round name you choose will be visible to applicants.
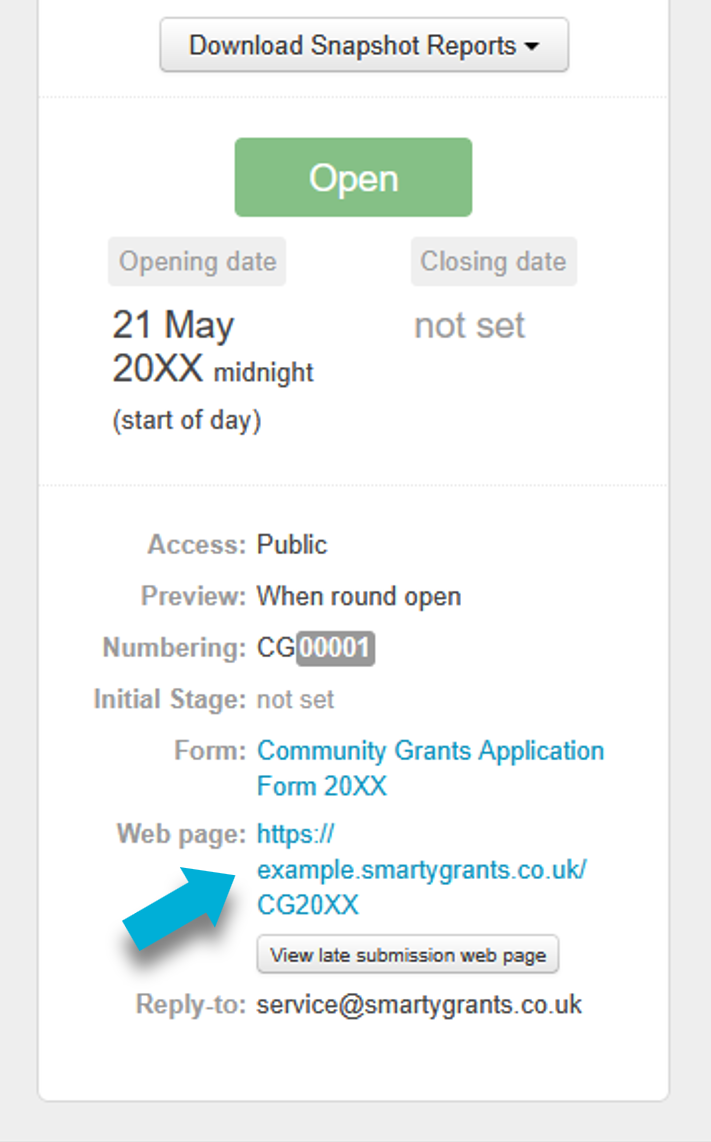
Next to Access, select Public if you would like to publish the round on your applicant site, or Private if you will instead share a private link directly to pre-selected applicants.
Select the application form that you created earlier from the drop-down list.
Select an opening date and time, and if relevant, a closing date and time.
Enter a unique identifier in the Webpage URL. This is used to create the direct link to your round on your applicant site. Note that this identifier must be unique; identifiers cannot be used more than once.
Info: A round link is comprised of two elements: Your applicant site (example.smartygrants.com.au), and the webpage URL that you set here. Combined, they form the complete link that will send applicants to that round. We recommend that the webpage URL be short and distinct. You could consider using numbers to represent a time period, and/or use a naming convention so you can easily identify the round.
E.g:
A round named Environment Grants 2025 could set EG2025 as the webpage URL. The page to this direct round would be https://example.smartygrants.com.au/eg2025
An ongoing round named Community Grants could set CommGrants as the webpage URL. The page to this direct round would be https://example.smartygrants.com.au/commgrants
A round named Alumni Scholarships Fund 2025-2027 could set AlumniS2527 as the webpage URL. The page to this direct round would be https://example.smartygrants.com.au/alumni2527
Choose when you want applicants to preview your application form.
When round open: Applicants can only preview the application form after the round is open.
When round published: Applicants can preview the application form as soon as the round is published (which could be before the round is open).
Set the Application ID numbering scheme for this round:
Use the PROGRAM WIDE ID numbering: Follow the numbering convention set at the programme level.
Define the ID numbering for this ROUND ONLY: Enter in a custom numbering convention specific to this round.
Enter the Reply-to email if different from the reply-to email set at the programme level.
Update the Webpage Message to reflect the details relevant to your round. This message will be seen by applicants when they navigate to the round URL.
Select the Create round button.
Your round will first be created in an Unpublished state, which gives you the opportunity to tweak any settings before publishing it. If you wish to make any changes to the settings, you can select the Edit button.
When you are ready to make the round webpage publicly accessible, select the red Publish this round button.
Important: Publishing a round does not automatically open your round for applications. A round will only open after the round open date and time has passed.
To share this round, copy the Web page link.
If it’s a public round, you can share this link freely. Consider sending this link to your organisation's IT department or website administrator, and ask them to place the link on your organisation's own website.
If it’s a private round, email the link directly to your selected applicants.
Warning: Do not share a private round’s web page link anywhere other than directly with selected applicants. If shared on social media, your organisation’s website, or similar, you may start receiving applications from the general public.
Further help and resources
System overview video
The video below provides an overview of the system.
Grantmaking Toolkit
The Grantmaking Toolkit is designed to walk you through the process of building, reviewing or refreshing a grants programme. The easy-to-follow stages will provide you with the necessary knowledge to administer grant programmes for maximum impact.
Help guide for applicants
The system provides an easy way for grantseekers to complete their application form online. Our Help Guide for Applicants will explain the essential steps your applicant needs to take to complete and submit a form.
Viewing applications
Once you’ve started receiving applications, you’ll want to be able to view, edit, and update them. To get ready for this, see the View and Filter applications section of the Help Hub.
For instructions on where to see applications that haven’t yet been submitted, see the View unsubmitted applications section of the Help Hub.
Training & further reading
The links below with help you with expanding your knowledge on key concepts.
Documentation | Interactive Training | |
Applications | ||
Contacts | Creating and managing contact types | |
Forms | ||
Funding & payments | ||
Mailouts | ||
Outcomes Engine | ||
Programs | ||
Reports | ||
Rounds | ||
Standard Fields | ||
Workflow |
Further help on setting up your account and configuring your account settings:

Interactive training:
Documentation:
Support
If you have any questions, please do not hesitate to contact our support team.